background image

EAGLE 3000 Moving Head User Manual

5

Please

Please

Please

Please installing

installing

installing

installing the

the

the

the lamp

lamp

lamp

lamp before

before

before

before using,

using,

using,

using, the

the

the

the lamp

lamp

lamp

lamp and

and

and

and light

light

light

light are

are

are

are packed

packed

packed

packed separately

separately

separately

separately during

during

during

during delivery.

delivery.

delivery.

delivery.

CAUTION:

CAUTION:

CAUTION:

CAUTION:

Wear cotton gloves or other covering while installing lamp. Touching lamp glass with bare

fingers will leave oil and may cause the lamp to explode or reduce lamp life. If touched, use alcohol and

cotton cloth to thoroughly clean glass portion of lamp.

INSTALLING / REPLACING THE LAMP

1.Ensure power is removed from luminaire.

2.Lock the Head before installing the lamp.

3.

At rear of luminaire head, loosen four screws and slide lamp box back and out.

4.Loosen 2 nuts at the both ends of lamp and take out the worn-out lamp.

5.Fit new lamp and fasten 2 screws at the both ends of lamp.

Note:

Note:

Note:

Note:

don’t touch the bulb of the new lamp

with bare hand so as not to influence the beam output; the PST (pumping stem tip off) on the bulb facing the

rear cover with fans perpendicularly and being not in the beam’s way is a must and aids cooling.

6.Close lamp box and re-tighten screws.

7.

Align lamp as detailed in Chapter Four.

WARNING:

WARNING:

WARNING:

WARNING: The

The

The

The HTI

HTI

HTI

HTI series

series

series

series are

are

are

are high-pressure

high-pressure

high-pressure

high-pressure lamps

lamps

lamps

lamps with

with

with

with external

external

external

external igniters

igniters

igniters

igniters ....Care

Care

Care

Care should

should

should

should always

always

always

always be

be

be

be

taken

taken

taken

taken when

when

when

when handling

handling

handling

handling these

these

these

these lamps.

lamps.

lamps.

lamps. Always

Always

Always

Always read

read

read

read the

the

the

the manufacturers

manufacturers

manufacturers

manufacturers "Instructions

"Instructions

"Instructions

"Instructions for

for

for

for use"

use"

use"

use" enclosed

enclosed

enclosed

enclosed

with

with

with

with the

the

the

the lamp.

lamp.

lamp.

lamp.

THREE:

THREE:

THREE:

THREE: POWER

POWER

POWER

POWER AND

AND

AND

AND DATA

DATA

DATA

DATA CABLING

CABLING

CABLING

CABLING REQUIREMENTS

REQUIREMENTS

REQUIREMENTS

REQUIREMENTS

POWER

POWER

POWER

POWER

The luminaire requires standard AC power distribution from, Electronic Ballast: 100-120 VAC, 200-240 VAC,

50/60 Hz; Magnetic Ballast: 200-240 VAC. Use the plug provided to connect the mains power to the luminaire

paying attention to the voltage and frequency marked on the panel of the luminaire. It is recommended that

each luminaire be supplied separately so that they may be individually switched on and off.

Depending on the application, the luminaire’s AC input cable may require a different connector. If required,

install a new connector meeting your requirements using the following wire color code:

Table

Table

Table

Table One:

One:

One:

One: Power

Power

Power

Power Connection

Connection

Connection

Connection

IMPORTANT

IMPORTANT

IMPORTANT

IMPORTANT

It

It

It

It is

is

is

is essential

essential

essential

essential that

that

that

that each

each

each

each luminaire

luminaire

luminaire

luminaire is

is

is

is correctly

correctly

correctly

correctly earthed

earthed

earthed

earthed and

and

and

and the

the

the

the electrical

electrical

electrical

electrical installation

installation

installation

installation conforms

conforms

conforms

conforms to

to

to

to all

all

all

all

relevant

relevant

relevant

relevant standards.

standards.

standards.

standards.

Wire

Connection

Green/Yellow

AC Ground

Blue

AC Neutral

Brown

AC Line

Summary of Contents for EAGLE-3000

Page 1: ...ANUAL EAGLE 3000 Gu a n g z h o u C Y Li g h t i n g E q u i p m e n t C o L t d No 17 South Longtou Road Dalongtou Village Jianggao Town Baiyun District Guangzhou China http www chuangyilight com www eagle hk com This product manual contains important information about the safe installation and use of this luminaire Please read and follow these instructions carefully and keep this manual in a saf...

Page 2: ...KEEPING THE LUMINAIRE CLEAN 18 CHAPTER 6 TECHNICAL SPECIFICATIONS 19 EAGLE 3000 SPOT LUMINAIRE 19 ELECTRICAL DIAGRAM 21 Please note that as part of our ongoing commitment to continuous product development specifications are subject to change without notice Whilst every care is taken in the preparation of this manual we reserve the right to change specifications in the course of product improvement...

Page 3: ...It complies with CE certificate and international standard DMX512 signal control This luminaire uses advanced optical system which can make it have super big zoom and linear dimmer in big scale High quality lens enable project out ultra clear high efficient imaging and reach super spot effect Especial selected Gobos and CMY linear mixing system can performance hight saturation and richness color L...

Page 4: ...e power cord come into contact with other cables Only handle the power cord by the plug Never pull out the plug by tugging the power cord Keep the lamp clean Do not touch the lamp glass with bare hand The luminaire should always be installed with a secondary safety fixing A safety cord is supplied for this it should be attached as shown in installing the luminaire section The lamp used in this lum...

Page 5: ...ss pass pass 1 1 1 1 SAFETY SAFETY SAFETY SAFETY belt belt belt belt through through through through 2 2 2 2 HOLES HOLES HOLES HOLES for for for for safety safety safety safety Always ensure that the luminaire is firmly anchored to avoid vibration and slipping whilst functioning Always ensure that the structure that you are going to mount the luminaire is secure and is strong enough to support a w...

Page 6: ...e be be taken taken taken taken when when when when handling handling handling handling these these these these lamps lamps lamps lamps Always Always Always Always read read read read the the the the manufacturers manufacturers manufacturers manufacturers Instructions Instructions Instructions Instructions for for for for use use use use enclosed enclosed enclosed enclosed with with with with the ...

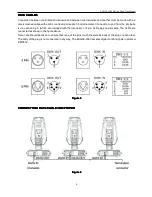
Page 7: ...ed with the luminaire or 5 pin XLR plugs and sockets The XLR s are connected as shown in the figure above Note care should be taken to ensure that none of the pins touch the metallic body of the plug or each other The body of the plug is not connected in any way The EAGLE 3000 accepts digital control signals in protocol DMX512 Figure Figure Figure Figure 3 3 3 3 CONNECTTING CONNECTTING CONNECTTING...

Page 8: ...ss AC input and data cables and secure them so that they will not interfere with luminaire head and yoke movement DMX DMX DMX DMX TERMINATOR TERMINATOR TERMINATOR TERMINATOR In the Controller mode at the last luminaire in the chain the DMX output has to be connected with a DMX terminator This prevents electrical noise from disturbing and corrupting the DMX control signals The DMX terminator is sim...

Page 9: ...ING ING ING ADDRESS ADDRESS ADDRESS ADDRESS Each EAGLE 3000 must be given a DMX start address so that the correct luminaire responds to the correct control signals This DMX start address is the channel number from which the luminaire starts to listen to the digital control information being sent out from the controller The EAGLE 3000 Strengthen has 28 DMX channels For example standard mode has 28 ...

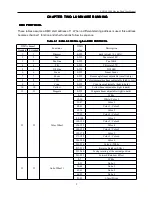
Page 10: ...n Fine 0 255 Pan 16Bit 4 4 Tilt 0 255 Tilt rotate 270 5 5 Tilt Fine 0 255 Tilt16Bit 6 6 Focus 0 255 Linear Focus 7 7 Zoom 0 255 Beam angle linear adjustable small to big 8 8 CTO 0 255 Color temperature linear adjustable high to low 9 9 Cyan 0 255 Cyan linear adjustable light to dark 10 10 Yellow 0 255 Yellow linear adjustable light to dark 11 11 Magenta 0 255 Magenta linear adjustable light to dar...
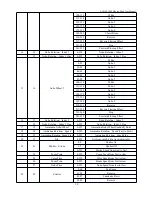
Page 11: ...241 255 Forward Flowing Effect 16 17 Gobo Rotation Index 2 0 255 Gobo Rotation Index 2 18 Gobo Rotation Index 2 Fine 0 255 Gobo Rotation Index 2 Fine 17 19 Animation Gobo Wheel 0 255 Animation Gobo Wheel Gradually Enter 18 20 Animation Rotation Speed 0 255 Animation Rotation Speed Fast to Slow 19 21 Animation Rotation Speed Fine 0 255 Animation Rotation Speed Fine 20 22 Iris 0 255 Iris from small ...

Page 12: ...ontrol Channel Channel Channel Channel Functions Functions Functions Functions To To To To use use use use control control control control channel channel channel channel functions functions functions functions Step 1 Select an action to be sent Step 2 Set control channel value for desired action for example 84 for reset Hold value for 3 seconds Step 3 Set control channel value to zero 100 104 Col...

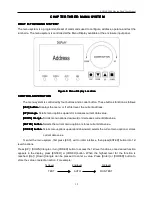
Page 13: ...evel the current address UP UP UP UP triangle triangle triangle triangle Scrolls menu options upward or increases current data value DOWN DOWN DOWN DOWN triangle triangle triangle triangle Scrolls menu options downward or decreases current data value ENTER ENTER ENTER ENTER button button button button Selects the current menu option or stores current data value CODER CODER CODER CODER button butto...

Page 14: ...ad User Manual 13 MENU MENU MENU MENU SYSTEM SYSTEM SYSTEM SYSTEM OVERVIEW OVERVIEW OVERVIEW OVERVIEW Figure Figure Figure Figure 7 7 7 7 Menu Menu Menu Menu System System System System Overview Overview Overview Overview ...

Page 15: ...stem System Function Function Function Function Chart Chart Chart Chart 1st Level 2nd Level 3rd Level Main Menu Exit DMX Address DMX value XXX Parameter Back Control Standard Extended Models EAGLE Series EAGLE 1018 EAGLE 1018C EAGLE 1028 EAGLE 1008 EAGLE 2008 EAGLE 2008C EAGLE 2028 EAGLE 2000 EAGLE 1000C EAGLE 3000 Option Back X Reverse No Yes Y Reverse No Yes XY Exchange No Yes Dimmer Reverse No ...

Page 16: ... XXX CH12 XXX CH12 Dmx value XXX CH13 XXX CH13 Dmx value XXX CH14 XXX CH14 Dmx value XXX CH15 XXX CH15 Dmx value XXX CH16 XXX CH16 Dmx value XXX CH17 XXX CH17 Dmx value XXX CH18 XXX CH18 Dmx value XXX CH19 XXX CH19 Dmx value XXX CH20 XXX CH20 Dmx value XXX CH21 XXX CH21 Dmx value XXX CH22 XXX CH22 Dmx value XXX CH23 XXX CH23 Dmx value XXX CH24 XXX CH24 Dmx value XXX CH25 XXX CH25 Dmx value XXX CH2...

Page 17: ...e where the intensity of the beam is greater at the center of the beam than at the perimeter After a new lamp is installed it will be necessary to align the lamp to optimize the beam Knobs located at the luminaire s backcap will allow adjustment PROBLEM PROBLEM PROBLEM PROBLEM ACTION ACTION ACTION ACTION The luminaire doesn t switch on 1 Check the fuse on the power socket 2 Replace the lamp The la...

Page 18: ... carrier only CAUTION CAUTION CAUTION CAUTION Do not touch gobos with bare fingers Wear cotton gloves or other covering while replacing Clean with glass cleaner and soft cloth if required 4 Remove current gobo by carefully pressing on edges of gobo carrier with fingers pressing gobo toward front end of luminaire toward lens and out of wheel 5 Install new gobo as follows A Align three tabs on gobo ...

Page 19: ...linear motion of the lens for focusing it is recommended that the bearings for the rotating gobos and the 2 shafts for the focusing lens holder be lubricated periodically preferably every two months Use only high quality high temperature resistant grease instead of any type of oil When lubricating the bearings a syringe with a fine needle is the easiest way to introduce the grease to the bearings ...

Page 20: ...le 1 color wheel 6 interchangeable colors plus white with CTO color temperature filter half color effect bi directional rainbow effect at variable speed GOBOS GOBOS GOBOS GOBOS 2 rotating gobo wheels 10 interchangeable rotating glass gobos plus white indexable bi directionally rotating at variable speed ANIMATION ANIMATION ANIMATION ANIMATION GOBO GOBO GOBO GOBO WHEEL WHEEL WHEEL WHEEL Bi directio...

Page 21: ...G SAVING SAVING DESIGN DESIGN DESIGN DESIGN Lamp power consumption reduced to half power at shutter colsing status PROTECT PROTECT PROTECT PROTECT GRADE GRADE GRADE GRADE IP20 overheating overvoltage protection NET NET NET NET WEIGHT WEIGHT WEIGHT WEIGHT Electronic Ballast 45 5Kg Magnetic Ballast 55 5Kg LUMINAIRE LUMINAIRE LUMINAIRE LUMINAIRE DIMENSION DIMENSION DIMENSION DIMENSION L594 W535 H843M...

Page 22: ...EAGLE 3000 Moving Head User Manual 21 Figure Figure Figure Figure 9 9 9 9 ELECTRICAL ELECTRICAL ELECTRICAL ELECTRICAL DIAGRAM DIAGRAM DIAGRAM DIAGRAM Figure Figure Figure Figure 10 10 10 10 ...

Reviews: