background image


User Manual 

 VisiPac & VisiTouch Series 

VisiPac & VisiTouch Series 


User Manual 

M

AR

2021 

V1.0 

33/69 

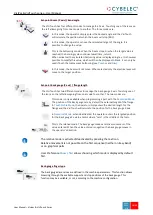
Force


The force is automatically calculated by the VisiTouch, according to 
th

Material

, the Material thickness, the Material sigma and the 

Bending length / Position offset. The value can also be manually 

modified here. 


Opening (TDC)


For parts created with a profile (see 

TouchProfile Mode

 or 

L-Alpha 

Mode

), this value is automatically calculated to allow the operator 

enough room to extract its bent part from between the tools. It is 
however possible to change it manually. 

 
For part created manually (see 

Numerical Mode

), this parameter uses the default 

minimum value defined in the machine parameters. It can however be programmed here. 

Creating a “New part” reinitializes it to its default value.


When this field is deactivated (grayed), the beam moves back all the way up to its 
maximum limit switch. 


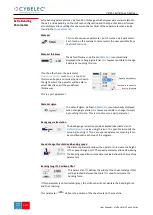
Crowning


The crowning function is activated here. It is automatically 
calculated, according to th

Material

, the Material thickness, the 

Material sigma and the Bending length / Position offset. If the 

crowning needs correction, use the Crowning (see page 39) function in the correction page. 
 
The value can be manually changed by operator. It will however be automatically 
recalculated if any of the values used for its calculation is changed. 


When the crowning function is deactivated (grey icon), the crowning system 
physically remains to its last position and does not automatically return to 0.0 mm. 
Keep that in mind when using this function 

 or not 

 between one sequence and 

the following. 


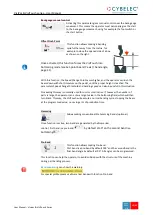
Number of parts 

The operator can enter here the total amount of parts to be 
produced. Every time all the sequences of the program are 
executed, hence a part is completed, this counter is updated of one 

unit (increased or decreased, see 

Program counter mode

). When the amount of parts is 

reached, a yellow pop-up window signals it to the operator. 


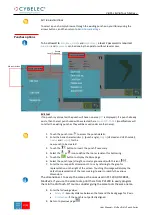
Quantity 

The quantity is used for count the number of Part, bend or Part + 
bend. If function active, is possible to see and modify the number 
of bend from the extra bending parameters page. 


Summary of Contents for VisiPac Series

Page 1: ...VisiPac VisiTouch Series User Manual MARCH 2021 V1 0 for Synchronized Press Brakes ...

Page 2: ...eries User Manual MAR 2021 V1 0 1 69 2020 CybelecS A All Rights Reserved Copying reproduction modification distribution display or transmission of anyof the contents of this manual for anypurpose without the prior consent of CybelecS A is strictlyprohibited ...

Page 3: ...avigation 11 Menu Button 11 Status Page Zone 11 Screen Cleaning 11 Status page 12 User Preferences 13 Language 13 Length Units 14 Force Units 14 Force Length Units 14 Sigma Units 14 Show axes position values 14 Show bent part 14 Materials 15 BDC Correction 16 Menu horizontal alignment 16 Menu vertical alignment 16 Clear indexation 17 USB Explorer 17 Beam trace 17 Auto open beam trace 17 Default re...

Page 4: ...d axis 23 Information Page 24 USB Transfer 25 Precautions 25 Importing parts from PC program 25 Backup and restore 26 Backup 26 Restore 26 Delete Backup 26 Basic Page Description 27 Bend Numerical Page 27 Available functions on the Bend Num page 27 Quick access tab 30 User button tab 30 Extra Bending Parameters 31 Copy to All Function 35 Tools Management 36 Punches 36 Punches options 37 Dies 39 Pu...

Page 5: ...rts 51 Numerical Mode 52 Bending and Corrections 53 Semi Automatic mode 53 Angle Correction Y axis 54 Crowning 55 Back gauge Correction 55 Managing Programs 56 Saving a Program 56 Creating a Program 56 Loading a Program 57 Deleting a Program 57 Extra Fonction 58 Group and Batch 58 Station management 60 Troubleshooting 62 Fastware Error Messages 62 Beam Error Messages 68 Resources 69 Tutorials Vide...

Page 6: ...User Manual VisiPac VisiTouch Series VisiPac VisiTouch Series User Manual MAR 2021 V1 0 5 69 ...

Page 7: ... the numerical control is installed Improper use of the numerical control can cause heavy damage on equipment and or injuries to people Modification of machine parameters can cause important material damage or lead to irregular product quality Do not expose the numerical control to excessive humidity to avoid any risk of electrocution and any deterioration of the equipment Make sure the numerical ...

Page 8: ... of operations is to be followed in order to avoid damage to the machine Symbolizes a serious personnel danger This warning sign appears in this manual whenever an important information needs to be taken into consideration Pay attention to this sign and follow the instructions given This sign appears in this manual whenever SETTING INSTRUCTIONS are given Pay attention to this sign and follow the s...

Page 9: ...ressure sensitive Do not press down hard on the screen Pressing hard on the screen will damage the display Such damage is not covered by manufacturer warranty Do not use sharp and or pointed objects sheet metal screwdriver metal pen ball etc to touch the screen only use your fingers with or without gloves on or a plastic pen Make sure that your gloves do not have metal particles encrusted in the f...

Page 10: ...User Manual MAR 2021 V1 0 9 69 SCREEN MAP Punches Punches Dies Dies Correction Page Extra Bending Parameters Bend Graphic Page Bend List Page Bend Sequencing Graphical Part Extra Simulation Criteria Main Page Bend Numerical page Menu Next Page Machine Status Page ...

Page 11: ...c VisiTouch Series VisiPac VisiTouch series User Manual MAR 2021 V1 0 10 69 SCREEN MAP CONTINUED Manual Page User preference Service Page Transfer Page Parameter Page Information Page Statistics page Backup Restore Page ...

Page 12: ... page This is really a zone that is active at any moment from any page Touching this zone for more than 2 seconds will activate the Semi Automatic mode To clean the screen while the VisiTouch is on touch the button Use only a damp and smooth cloth with soap or a neutral detergent NEVER use solvent petrol benzene alcohols etc GENERAL NAVIGATION Add step or next step Status Pages Zone Menu button St...

Page 13: ...rom anywhere by pressing the Status Pages Zone To exit the Status page press on the arrow on the left Axes have specific indicators Their colour indicates the position of the axis relative to the tolerance Possible states are Device not active and in the tolerance Device moving Device not active and outside of the tolerance STATUS PAGE A cycle message may appear indicating the cycle phase the mach...

Page 14: ...wse through the available languages simply touch Language on the screen Available languages are EN English FI Suomi RU Русский BR Brazil FR Français SL Slovensko CN 中文 IT Italiano SV Svenska CZ Český NL Nederlands TR Türkçe DE Deutsch PL Polski TW 台灣 ES Español PT Português The list of available languages is subject to change and may increase over time USER PREFERENCES Language ...

Page 15: ...ing between kg mm2 N mm2 and psi 1000 for the sigma unit to be used in the VisiTouch This function will display the axes positions on the Bend Numerical Page When set to no the position of axes Y1 X and R is displayed during the beam s movements When set to yes1 the positions of the axes Y1 Y2 X and R are displayed during their respective movements When set to yes2 the positions of the axes Y1 Y2 ...

Page 16: ...re Steel K Factor for the material by default DIN6935 Default sigma Default sigma for the material here 45 Default thickness for the material Thickness min max Determines the maximum and minimum accepted thickness for the selected material Three predefined default materials are available steel stainless steel aluminium but others can be added To add a material 1 Touch and write the name of the new...

Page 17: ...he thickness effect of the material for different angles degrees This parameter allows the operator to apply a permanent correction to the Bottom Dead Centre position Please note that this correction is always applied and is NOT shown in the correction page If you experience big differences from what you expect to get maybe check the value of this parameter This parameter allows the operator to ch...

Page 18: ...arameter is set to yes this small button is displayed on the Status page By activating deactivating it one can start and stop the recording of beam traces When activated this function will open the beam trace screen automatically at the end of the recording This parameter allows defining the default value displayed in the Extra Bending Parameters when activating the back gauge retraction function ...

Page 19: ...ntity Set to down The counter will count from top to bottom Set to up The counter will count from bottom to top Set to Autorelaod The counter will automatically restart the counter once finish Set to Reset The counter will need to be reset manually once finish This function allows choosing the data entry mode for the back gauge on the Bend Numerical Page or EasyBend Page When set to yes the length...

Page 20: ...or a modification have been made in the part it will not recalculate the axes and beam position When this parameter is set to yes the down movement of the beam is stopped and the beam is maintained in closed loop at pinch point during the retraction The beam cycle will resume as soon as the back gauge has finished its retraction This function allows choosing file destination for Parts and tools By...

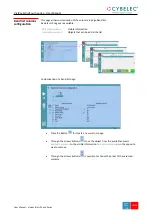
Page 21: ...rmation Available columns Objects that can be add in the list Customisation of a bend list page Press the Button for create a new custom page Through the arrows buttons move the object from the available objects Available columns to the visible information Selected columns or in the opposite way to remove Through the arrows buttons is possible to choose the order of the selected columns Bend list ...

Page 22: ...list button on the Bend numerical page to toggle between the display of the Bend numerical page and the Bend list page The Bend list page shows an overview of the bends of the current part Touch to select what data is shown in the list Up to 3 list views can be user defined in User preferences Bend list config ...

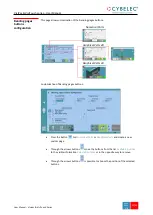
Page 23: ...Button For Numerical Parts or Graphical Parts and create a new custom page Through the arrows buttons move the buttons from the list Available buttons to the visible information Selected buttons or in the opposite way to remove Through the arrows buttons is possible to choose the position of the selected buttons Bending pages buttons configuration Graphical Parts 2D Numerical Parts Graphical Parts...

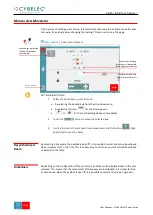
Page 24: ... Speed Down movement and this button High Speed Up to move the beam By selecting a line where the padlock is open it is possible to select and move Low Speed Down movement Y1 or Y2 only This is an easy way to return an unsynchronized beam back to parallel to the table Depending on the configuration of the machine a padlock can be displayed next to the axes selected This means that the movements of...

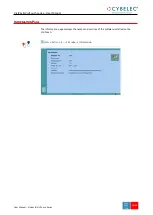
Page 25: ...c VisiTouch Series VisiPac VisiTouch series User Manual MAR 2021 V1 0 24 69 The Information page displays the names and versions of the software installed on the VisiTouch Menu Button Service Information INFORMATION PAGE ...

Page 26: ...ernal HDD are not accepted Although unlikely it is possible to find a USB key that is not compatible with the VisiTouch If so try with another one 3 rules for a fast and easy transfer Use a USB key dedicated to files transfer with the VisiTouch Less files means a faster transfer The file s path on the key is limited to 255 characters PC VisiTouch is the offline software which has the same features...

Page 27: ...ion machine We suggest to make a Backup of all parameters to avoid complete data loss 1 Press to make a backup of the system 1 Select from the Backup list files the Backup you want restore 2 Press to make a restore from a previous backup 1 Select from the Backup list files the Backup you want remove 2 Press to delete the Backup BACKUP AND RESTORE Save Backup Delete Backup Restore previous backup B...

Page 28: ...function allows jumping directly to the desired step Skip step this function will skip the current bend The Insert step and Delete step functions cannot be used on parts created with the TouchProfile Mode BASIC PAGE DESCRIPTION BEND NUMERICAL PAGE Menu Button Start Stop Index Interactive message line Bending and Corrections Tool management Repeat sequence button inactive here Current step sequence...

Page 29: ...anage the back gauge X axis Touching one of the icons on the left allows going from one mode to another The two modes are This mode is only available when programming a part with the Numerical Mode The position of the Back gauges are by default the external lenght of the flange In TouchProfile Mode the operator simply enters the desired length for the flange and the VisiTouch will calculate the po...

Page 30: ...nd calculations See Tool Management chapter From the Bend Numerical Page is possible to reverse or not the Punch or the Die by pressing in the tool for at least 2 seconds Optional axes All the various optional axes of the machine are displayed in this zone Their respective values are calculated by the VisiTouch and are displayed in gray They can however be manually modified but are then displayed ...

Page 31: ... bending parameters If the machine has multiple axes it s possible to slide on the display in order to show the other axes Contains various buttons depending on the configuration for machine functions such as tool clamping pump activation or upward command The user buttons tab will only appear if configured by the machine manufacturer Quick access tab User button tab ...

Page 32: ...parameter Material sigma The default sigma defined in Materials is automatically displayed when changing material It is however possible to change it simply by touching this icon This is also of course a part parameter Back gauge retractation The back gauge retraction can be activated deactivated at its Default retraction value using this icon It is possible to modify the value by touching it This...

Page 33: ...after the bend and is generally used when the part has a long flange and the operator tries not to let it fall down too fast The beam will return at low speed up while the operator holds the foot pedal It switches to high speed up when either the pedal is released or Pinch Point is reached whichever comes first When this field is deactivated grayed the beam moves back up directly at HSU High Speed...

Page 34: ...atically calculated according to the Material the Material thickness the Material sigma and the Bending length Position offset If the crowning needs correction use the Crowning see page 39 function in the correction page The value can be manually changed by operator It will however be automatically recalculated if any of the values used for its calculation is changed When the crowning function is ...

Page 35: ...threshold and bending speed can also be useful in this situation Proceeding this way is normally used for unit or small series If however the number of parts is large the operator can enter a target value in the bottoming field which will then turn black This way the VisiTouch will execute a normal bending cycle stopping the beam at the programmed value i e saving a lot of production time Hemming ...

Page 36: ...ds such as Bending length Position offset Force Bending and Corrections etc When pressed the filters window will appear In this window is possible to set the copy to all in function of the bend angle punch die length ecc There are parameters that are depending of the tools and angle in this case the filters will be automatically selected Other filters for the copy to all are by the user COPY TO AL...

Page 37: ... bend angle you require as well as the flange length L The VisiTouch then calculates the positions for axes X and Y for the bend Bend Numerical Page Press Punch name and Edit tool to modify specifications of the selected tool TOOLS MANAGEMENT PUNCHES Punch mounting direction Punch name Browsing through existing punches Basic punch data Bottoming Return to Bend Numerical Page Punch more specific da...

Page 38: ...houlder Radius and Ton m for the new punch to be created 3 Touch the button to invert the punch if necessary 4 Select the or icon to define the tool as resistant for bottoming 5 Touch the button to display the More page 6 Select the punch type straight normal or gooseneck with this icon 7 Enter the more specific dimensions L1 to Lx by referring to the graphic representation on the right of the scr...

Page 39: ...ities to save it under another tool name Load tool Change tool with another in your library Delete tool Delete tool from library Replace by Replace tool with another in your library for all profiles in function of the applied filter Angle Punch by default selected previous tool to be replaced Die Lenght Import DXF It allow the import DXF files of the punch in the numerical control We recommend tha...

Page 40: ...h the existing dies in your library using the arrows buttons and then return to Bend Numerical Page DIES Die mounting direction Die name Browsing through existing dies Basic die data Customizable output signal for multi die position Return to Bend Numerical Page Die more specific data Touch the die to display its default shape allowing an easier identification of the various dimensions Bottoming H...

Page 41: ...e used will be selected here Die 22 60 modifications will not alter the existing die as they will be saved under another name 1 Touch the die icon to access the die details 2 Enter the basic characteristics Ve die width α Height Radius and Max ton m for the new die to be created 3 Enter an angle in Max ton m to configure the curve of ton m in function of the angle Press in the graph enter an angle...

Page 42: ...easily program them in the VisiTouch Of course consider giving the same tools the same name 9 Enter the following values Safety XS Security distance between the tool and the back gauge for X axis Safety RS Security distance between the tool and the back gauge for R axis Retr zone Retraction zone 10 Return to previous page Save tool Once a value of the die have been modified before quit the page it...

Page 43: ...ding on your needs you may need to create more rules for punch and die naming The name of the punch should be built in the following manner first its angle followed by its type and then whether it is inverted or not PUNCH ANGLE PUNCH TYPE INVERTED OR NOT 30 60 90 _ N Normal S Straight G Gooseneck _ i If inverted Following these rules here are some examples of punch names 90_N_i 60_G 30_S and so on...

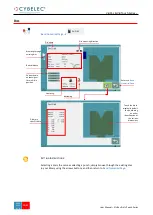
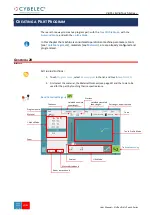
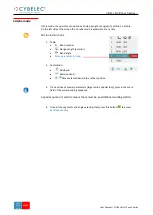
Page 44: ...gured and programmed SETTING INSTRUCTIONS 1 Touch Program name select New program in the list and touch Graphical 2D 2 First select the material the Material thickness see page 22 and the tools to be used for the part by touching their respective icons Bend Numerical Page CREATING A PART PROGRAM GRAPHICAL 2D MODE Program name To Bend Sequencing Move selected bend Material L Alpha Mode Touch Profil...

Page 45: ...ool by touching its icon and select it from the library If Real unfolded length is different from calculate is possible to choose which step need to keep calculated length The value can change in function of tooling and K factor Please see Step bending chapter in Extra Bending Parameters 4 Should it prove difficult to select a particular segment or angle it is possible to zoom on an area by touchi...

Page 46: ...INSTRUCTIONS 1 Table N Bend number Flange Length exterior Bend angle More parameter for step 2 Commands Add bend Remove bend Move selected bend into another position 3 If a bend needs special parameters large radius special tool press in the more field of the corresponding sequence A special punch or and die means there must be an additional working station 4 Once all the segments and angles are a...

Page 47: ...INSTRUCTIONS 1 Select the reference step through the Touch profile or the L Alpha The line will have a yellow ball in the middle 2 Press this button to access the U W mode The reference line will automatically be in the middle of the Touch profile screen 3 Enter the values in U and in W i e The step length will be automatically calculated i e 5 Commands Add bend Remove bend Move selected bend into...

Page 48: ...m Here below an example to create a box 200 x 100 x 50 L x W x H SETTING INSTRUCTIONS 1 Design first section Section 1 profile 2 Press and a slide menu will open Number of the section Section 1 Add section Remove section 3 Press to add new section and the slide menu change to the next section 4 Design second section Section 2 profile Multi profiles ...

Page 49: ...ressing the back button will erase the last bend in the sequence If you wish to delete all bends simply touch the button 2 Immediately after determining the last bend to be selected the Bend 2D Page here below is displayed Bend sequencing can show the warning It may be possible that the Software cannot find a solution The reasons can be Collisions the software are not able to find others solutions...

Page 50: ...the product on the side of the profile which enters in to collision The software arranges that the section error is located on the specified face Secondary The software will choose the solution which demands the least possible number of swings The software will choose the solution which demands the least possible number of returns The software will choose the solution which demands the least possi...

Page 51: ...unning 2 Press to index the machine 3 Press the button to position the machine according to the data that were just entered 4 When the machine is ready to bend a button is displayed 5 If you want to repeat the same step in order to apply all the necessary corrections to it switch to the Semi Automatic mode 6 Press the foot switch to execute the bend Browsing through the bends Bend numerical page S...

Page 52: ...eleted by selecting it and touching the button Extra numerical bends are marked with the symbol and can be moved around in the list using the up and down arrows Modify the bend data as required on the Bend numerical page for the extra bend On the Bend numerical page an extra bend can be inserted by touching the bend number and then selecting Insert step Use Delete step to remove an extra bend The ...

Page 53: ...create here 90 7 Touch the numerical value next to the segment length icon and enter the value for the first segment you wish to create here 200 00 mm 8 Add the next bend to the program by touching 9 Proceed in the same manner to create the other segments of the part 10 Touch to return to the first bend 11 Start the hydraulic pump motor by pressing this button if available It turns red when the mo...

Page 54: ... mode Corrections can be made to The angle Y1 Y2 see Angle Correction Y axis and or crowning if available see Crowning The back gauge position X and R if available see Back gauge X R axes Correction The semi automatic mode allows repeating the same sequence indefinitely It is used when the operator wants to apply corrections to his part one bend after another He can thus execute the same step unti...

Page 55: ...l reset all angle corrections 3 Depending on the position of the sheet metal in the press it may be necessary to fine tune the beam s corrections It is possible by simply touching this icons or this one and entering the desired values 4 Depending on the length part and the machine size the corrections are calculated in their respective ends of the machine Y1 and Y2 cylinders It can happen that the...

Page 56: ... next to the Pinch Point correction icon is the value calculated by the numerical control and thus the value onto which the correction will be applied 7 Touching the values next to any axes allows entering a correction The axes corrections can be positive or negative and will be added to the axes positions The back gauge positions corrections can also directly be made on the Bend Numerical Page Cr...

Page 57: ...rogram name 2 Touch Save part as to save a new part Give it a distinctive name using the alphanumerical keyboard and validate with 3 Or touch Save part to save the modifications made to an existing part 4 The program is now saved in the VisiTouch To create a new program 1 Touch the Program number e g Sample1 2 Touch New program 3 A pop up windows asks what kind of program Selecting Numerical will ...

Page 58: ...ory and is ready to be used Programs created with the TouchProfile Mode have a small miniature to help easily to identify them from those created in Numerical Mode To delete a program 1 Touch the Program name 2 Touch Delete program 3 Browse through the programs using the arrows and select the program to be deleted 4 Validate your choice by touching 5 Confirm in the pop up window LOADING A PROGRAM ...

Page 59: ...w Group 2 Add into the group all programs you need in the production series 3 Press menu and select Save group as And use keyboard to write the name of the group here Product group 4 Press once the group have been saved and you will come back to the Bend Numerical page EXTRA FONCTION GROUP AND BATCH Group Name Programs selected in the group Group commentary Add program into the group Delete progra...

Page 60: ...e the Batch have been saved and you will come back to the Bend Numerical page and start the series production 12 A yellow pop up will inform you about the part loaded and Quantity requested 13 The program name will be substituted with the Batch Name and the actual program name in production 14 For quit the Batch select program Name Here Product Batch 15 Press Batch 16 Press Review Batch 17 Press t...

Page 61: ...er of the station Punch Die Position from origin Length of the tools 3 Commands Add station Remove station Move selected station into another position Move selected station to the left or to the right from the actual position 4 Fill the table data for each station by choosing the station tools and set the position from the origin and the size of the punch and die tools STATION MANAGEMENT Move into...

Page 62: ...numerical part and station is activate it is not possible to change the tools directly from the Bend Numerical Page In this case a message will appear It will be necessary to delete all stations before be able to manage the tools Otherwise tools will keep the same configuration as in the Station management Punch Offset Punch tool origin and size Die tool origin and size Change station Back to stat...

Page 63: ...n software limit For the most part of the cases the real axis position will not go over the specified axis limits because a checking of the limits is performed during the initialization of the axis functions This error is considered as a warning This error can be generated in the following cases During the set on of the Increment axis function when the specified increment would provoke a move with...

Page 64: ...User Manual VisiPac VisiTouch Series VisiPac VisiTouch Series User Manual MAR 2021 V1 0 63 69 ...


Page 65: ...s a warning 13 Attempt to Start Stop an unknows cycle Attempt to start or stop an unknown cycle from a cycle block Start Cycle Start CycleAux or Stop CycleAux This error is considered as a warning 14 Start cycle not allowed Start of a cycle not allowed from a cycle block Start Cycle It happends when a cycle try to start a cycle located in the same area This error is considered as a warning 30 31 S...

Page 66: ...tion position is available in the interpolation buffer at the moment This error is considered as a simple error This error can be generated in the following cases The interpolation function has not been initialized by the corresponding initialization function and the interpolation buffer is consequently empty During the automatic management of the positions downloading by blocks of the interpolati...

Page 67: ...Error generated when an order is addressed to an independent axis which is currently controlled from another cycle Error generated when it is tried to make free an independent axis which is currently controlled from another cycle This error is considered as a simple error 42 Inconsistent coordinate transformation identifier Error generated during a cycle when a block managing a coordinate transfor...

Page 68: ...ycle it also halts the cycle This error is considered as a simple error 50 Servo in stop mode Error generated when the servo switched in stop mode When the servo switch in this mode it first generate itself a decelaration ramp and regulates the axis speed at 0 Then no movement can be ordered as long as it stay in this mode This error halts the current movement If on the regulator is set off When t...

Page 69: ...h limit parameters max and min of the beam Contact your dealer 28 Command refused because stop is active 37 Command refused because zero has not been found yet Beam is not indexed 40 Command refused because bend data have never been loaded 44 Command refused because beam is in emergency Only a manual down of the upper axis is allowed Only the axis with the highest position is allowed to be moved m...

Page 70: ...7 02 00 Mar 2021 V1 0 69 69 Visit our Web site https cybelec ch videos Please subscribe to our YouTube channel to have our latest videos and tutorials https www youtube com channel UCLBu RxCGGf_epuHtMwoAcQ Don t forget to click on the ring bell button to stay in touch Please let us know if you have any suggestion at support cybelec ch RESOURCES TUTORIALS VIDEOS ...

Reviews: