background image

•   For the PDU with attached input Power Cords, the socket must be installed 

near the equipment and must be easily accessible. 

•   Make sure to disconnect all power supply cords before attempting to 

service or remove this unit. 

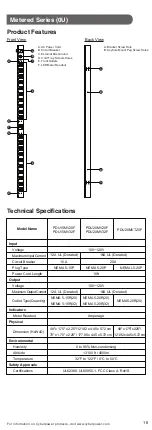
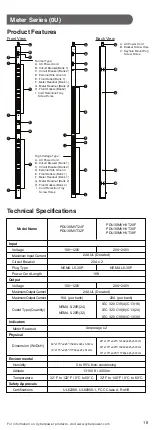
•   As for overcurrent protection, please be noted that all PDUs are equipped 

with circuit breakers according to bank numbers. 

•   Use only the supplied hardware to attach the mounting brackets 
•   The PDU must be plugged into a three-wire, grounded outlet on a circuit 

that is protected by a fuse or circuit breaker. For 15A PDU series, please 

use a 15A circuit protector. For 20A PDU series, please use a 20A circuit 

protector. For 30A PDU series, please use a 30A circuit protector. 

Connection to any other type of power outlet may result in a shock hazard.

•   Do not use extension cords or adapters with this PDU.
•   Never install a PDU or associated wiring or equipment during a lightning 

storm.

•   Ensure that the power cord, plug, and socket are in good condition.
•   Suitable for installation in Information Technology Rooms in accordance 

with Article 645 of the National Electrical Code and NFPA 75.  

Safety Precautions

Read the following before installing or operating the 
Power Distribution Unit (PDU):

•   Pour la PDU avec les cordons d'alimentation d'entrée connectés, la prise 

doit être installée à proximité de l'équipement et doit être facilement 

accessible.

•   Assurez-vous de débrancher les cordons d'alimentation et toutes les 

sources d'alimentation avant de tenter de réparer ou de retirer cette unité.

•   Pour le dispositif de protection contre les surintensités des équipements, 

veuillez noter que toutes les PDU sont équipées de disjoncteurs en 

fonction des numéros de banque. 

•   Utilisez uniquement le matériel fourni pour fixer les supports de montage.
•   La PDU doit être branchée sur une prise à trois fils mise à la terre sur un 

circuit protégé par un fusible ou un disjoncteur. Pour la série PDU 15A, 

veuillez utiliser un protecteur de circuit 15A. Pour la série PDU 20A, 

veuillez utiliser un protecteur de circuit 20A. Pour la série PDU 30A, 

veuillez utiliser un protecteur de circuit 30A. La connexion à tout autre type 

de prise de courant peut provoquer un choc électrique.

•   N'utilisez pas de rallonges ni d'adaptateurs avec cette PDU.
•   N'installez jamais une PDU ni le câblage ou l'équipement associé pendant 

un orage.

•   Assurez-vous que le cordon d'alimentation, la fiche et la prise sont en bon 

état.

•   Peut être installé dans des salles de matériel de traitement de l’information
    conformément à l’article 645 du National Electrical Code et à la NFPA 75.

Précautions de sécurité

Lisez ce qui suit avant d’installer ou d’utiliser les unités 
de distribution de l’alimentation (PDU):

To prevent the risk of fire or electrocution, this PDU should be installed in a 

temperature and humidity controlled indoor area free of conductive contaminants. 

Do not install this PDU where excessive moisture or heat is present.

For information on Cyberpower products, visit www.cyberpower.com

3

Summary of Contents for Basic Series

Page 1: ...Power Distribution Unit User s Manual ...

Page 2: ...cking Power Cord For IEC Type PDU 7 Input Power Cord 7 Output Power Cord 7 Electrical Installation 8 Basic Series 1U 9 Basic Series 0U 13 Metered Series 1U 15 Metered Series 0U 16 Model List 1 PDU Naming Convention 1 Package Contents 2 Safety Precautions 3 Précautions de sécurité 3 Installation 4 Troubleshooting 8 Product Features Technical Specification 9 Conformance Approvals 19 Customer Service...

Page 3: ...ts visit www cyberpower com 1 Basic Series 0U PDU15BV14F PDU20BVT14F PDU20BV32F PDU30BVHVT32F Basic Series 1U PDU15B8R PDU15B10R PDU15B12R PDU15B2F8R PDU15B2F10R PDU15B2F12R PDU15B4F12R PDU15B6F8R PDU15B6F12R PDU20B10R PDU20BHVT8R PDU20BHVT12R PDU20BHVIEC8R PDU20BHVIEC12R PDU20BHVCEE8R PDU20BHVCEE12R PDU30BT8F8R PDU30BT10F10R PDU30BHVT2F6R PDU30BHVT4F8R Metered Series 1U PDU15M2F8R PDU15M2F10R PDU...

Page 4: ...90 96 114 pcs varies by model for Cord Retention Tray Documentation User s Manual Pow er Dist ribu tion Unit Use r Man ual Product Registration Card Product Registration Card Check Before using please check to ensure the package contains all the items shown above If there are missing parts please contact CyberPower technical support at www cyberpower com or call 1 877 297 6937 2 Cord Retention Tra...

Page 5: ...r les cordons d alimentation et toutes les sources d alimentation avant de tenter de réparer ou de retirer cette unité Pour le dispositif de protection contre les surintensités des équipements veuillez noter que toutes les PDU sont équipées de disjoncteurs en fonction des numéros de banque Utilisez uniquement le matériel fourni pour fixer les supports de montage La PDU doit être branchée sur une p...

Page 6: ...s only Step 1 Mounting bracket installation Install the screws M4 X 6 in holes diagonal from each other Step 2 PDU Mounting Install the PDU using fasteners compatible with the rack 4 For information on Cyberpower products visit www cyberpower com ...

Page 7: ...1 Mounting bracket installation Attach the Vertical Mounting Brackets to the PDU with the 4 supplied Bracket Mounting Screws M4 X 6 Step 2 PDU Mounting Install the PDU using fasteners compatible with the rack Step 1 Mounting bracket installation Install the screws M4 X 6 in holes diagonal from each other For information on Cyberpower products visit www cyberpower com 5 ...

Page 8: ...he PDU with the 4 supplied Cord Retention Tray Mounting Screws M3 X 6 Tighten the Cord Retention Tray with the screw on it Use the Cable Ties provided to fasten each power cord to the Cord Retention Tray Meter Configuration Use a screwdriver to gently remove the LED Meter Rotate the LED Meter 90 degrees and insert back into the PDU Note Depending on installation method vertical or horizontal the L...

Page 9: ...the Fixed Stand and fasten it as shown below Output Power Cord Locking Power Cord For IEC Type PDU Input Power Cord Step 1 Align and insert the Cable Tie from the upper side of the Fixed Stand and fasten it as shown below Step 2 Align and insert the Cable Tie from the bottom side of the Fixed Stand and fasten it as shown below ...

Page 10: ...aximum current load as outlined in the Specifications section In order to determine your total load simply add up the amperage of your devices and ensure that it does not exceed the unit s capacity Troubleshooting Problem Possible Cause Solution PDU Outlets do not provide power to connected equipment 1 Open breaker 2 Loose power cord Reset Breaker check if plug is completely connected If the probl...

Page 11: ...let Type Quantity Physical Dimension HxWxD Environmental Humidity Altitude Temperature Safety Approvals Certifications 12A UL Derated 15 A NEMA 5 15P 12A UL Derated NEMA 5 15R 8 NEMA 5 15R 10 NEMA 5 15R 12 16A UL Derated 20 A NEMA 5 20P 16A UL Derated NEMA 5 20R 10 PDU15B8R PDU15B10R PDU15B12R PDU20B10R 100 120 V 100 120 V 1 75 x 17 5 x 1 5 4 45 x 44 5 x 3 81 cm 0 to 95 Non condensing 32 F to 122 ...

Page 12: ...rrent Outlet Type Quantity Physical Dimension HxWxD Environmental Humidity Altitude Temperature Safety Approvals Certifications 100 120 V 12A UL Derated 15 A NEMA 5 15P 15 ft 100 120 V 12A UL Derated 1 75 x 17 5 x 2 25 4 45 x 44 5 x 5 72 cm 0 to 95 Non condensing 13100 ft 4000m 32 F to 122 F 0 C to 50 C UL62368 UL60950 1 RoHS PDU15B2F8R PDU15B2F10R PDU15B2F12R PDU15B4F12R PDU15B6F8R PDU15B6F12R NE...

Page 13: ... x 44 5 x 3 81 cm 0 to 95 Non condensing 13100 ft 4000m 32 F to 122 F 0 C to 50 C UL62368 UL60950 1 RoHS UL62368 UL60950 1 RoHS CE CE PDU20BHVT8R PDU20BHVT12R PDU20BHVIEC8R PDU20BHVIEC12R PDU20BHVCEE8R PDU20BHVCEE12R 20 A For information on Cyberpower products visit www cyberpower com 11 A A Mounting Bracket Back View Twist Type A Mounting Bracket B Back Outlets IEC 320 C13 C Back Outlets IEC 320 ...

Page 14: ...UL Derated 20A x 2 24A UL Derated Bank1 GREEN Bank2 GREEN 1 75 x 17 5 x 2 25 4 45 x 44 5 x 5 72 cm 13100 ft 4000m 32 F to 122 F 0 C to 50 C 32 F to 140 F 0 C to 60 C UL62368 UL60950 1 RoHS Technical Specifications 0 to 95 Non condensing 12 For information on Cyberpower products visit www cyberpower com A A A A B C G B C D B C A Mounting Bracket B LED Indicators C Front Bank 1 Outlets A Mounting Br...

Page 15: ...ons Model Name PDU15BV14F PDU20BVT14F PDU20BV32F 100 120V 100 120V NEMA 5 20R 14 24 x 1 75 x 1 5 60 96 x 4 45 x 3 81 cm 70 x1 75 x1 5 177 80x4 45x3 81cm 0 to 95 Non condensing 32 F to 122 F 0 C to 50 C UL62368 UL60950 1 RoHS 13100 ft 4000m NEMA 5 20R 32 NEMA L5 20P 10ft NEMA 5 20P NEMA 5 15P NEMA 5 15R 14 12A UL Derated 15 A 16A UL Derated 20 A 12A UL Derated 16A UL Derated For information on Cybe...

Page 16: ...ated 20 A x 2 NEMA L6 30P 10 ft 200 240V 24A UL Derated 20A per bank IEC 320 C19 8 C13 24 60 x 1 75 x 2 25 152 40 x 4 45 x 5 72 cm 0 to 95 Non condensing 13100 ft 4000m 32 F to 140 F 0 C to 60 C UL62368 UL60950 1 RoHS 14 For information on Cyberpower products visit www cyberpower com A B C D E F G High Voltage Type A AC Power Cord B Circuit Breaker Bank 1 C Circuit Breaker Bank 2 D External Site G...

Page 17: ...100 120V 100 120V NEMA 5 20R 10 NEMA 5 20R 12 NEMA 5 20R 14 1 75 x 17 5 x 2 25 4 45 x 44 5 x 5 72 cm 0 to 95 Non condensing 13100 ft 4000m 32 F to 122 F 0 C to 50 C UL62368 UL60950 1 FCC Class A RoHS NEMA 5 20R 12 NEMA 5 20P 15ft NEMA L5 20P 12A UL Derated 15 A NEMA 5 15P 12A UL Derated NEMA 5 15R 10 NEMA 5 15R 12 NEMA 5 15R 14 16A UL Derated 20 A Amperage 16A UL Derated For information on Cyberpo...

Page 18: ...L Derated NEMA 5 15R 20 NEMA 5 15R 32 16A UL Derated 20 A 100 120V 100 120V 48 x 1 75 x 2 25 121 92 x 4 45 x 5 72 cm 70 x 1 75 x 2 25 177 80 x 4 45 x 5 72 cm 48 x1 75 x2 25 121 92x4 45x5 72cm 10ft NEMA 5 20P NEMA L5 20P 16A UL Derated NEMA 5 20R 20 NEMA 5 20R 32 NEMA5 20R 20 Amperage 0 to 95 Non condensing 13100 ft 4000m 32 F to 122 F 0 C to 50 C UL62368 UL60950 1 FCC Class A RoHS 16 For informati...

Page 19: ... 320 C19 8 C13 30 Amperage 48 x 1 75 x 1 5 121 92 x 4 45 x 3 81 cm 60 x 1 75 x 1 5 152 40 x 4 45 x 3 81 cm 70 x 1 75 x 1 5 177 80 x 4 45 x 3 81 cm 0 to 95 Non condensing 13100 ft 4000m 32 F to 122 F 0 C to 50 C IEC 320 C20 IEC 309 16A UL62368 UL60950 1 FCC Class A RoHS UL62368 UL60950 1 FCC Class A RoHS CE CE NEMA L6 20P For information on Cyberpower products visit www cyberpower com 17 A A A B B ...

Page 20: ... IEC 320 C19 4 C13 16 IEC 320 C19 6 C13 24 IEC 320 C19 8 C13 30 48 x1 75 x2 25 121 92x4 45x5 72cm 60 x1 75 x2 25 152 40x4 45x5 72cm 70 x1 75 x2 25 177 80x4 45x5 72cm 32 F to 122 F 0 C to 50 C 32 F to 140 F 0 C to 60 C 20A per bank 16A per bank UL62368 UL60950 1 FCC Class A RoHS 13100 ft 4000m 0 to 95 Non condensing 18 For information on Cyberpower products visit www cyberpower com Normal Type A AC...

Page 21: ...ion between the equipment and receiver Connect the equipment into an outlet on a circuit different from that to which the receiver is connected Consult the dealer or an experienced radio TV technician for help Notice 1 An unshielded type power cord is required in order to meet FCC emission limits and also to prevent interference to the nearby radio and television reception It is essential that onl...

Page 22: ...es team for more information Who Is Covered This warranty only covers the original purchaser Coverage ends if you sell or otherwise transfer the Product How Do You Get Service 1 You can use the contact information mentioned above for instructions 2 When you contact CyberPower identify the Product and the Purchase Date 3 You must provide a purchase receipt or other proof of the original purchase an...

Page 23: ...hained together in serial fashion with any extension cords another Product or device similar to the Product surge suppressor or power tap Any such installation voids the Limited Warranty 3 The Product and equipment connected to it must have been used properly in a suitable and proper environment and in conformance with any license instruction manual or warnings provided with the Product and the eq...

Page 24: ...K01 0000742 01 Cyber Power Systems Inc www cyberpower com ...

Reviews: