background image

13

USING THE UPS SYSTEM

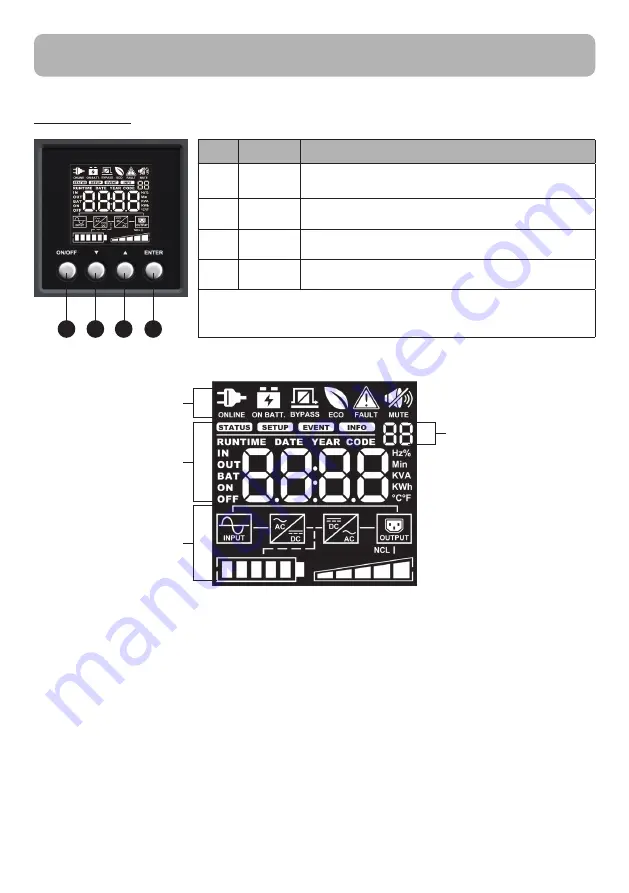
LCD PANEL

ITEM BUTTON

FUNCTION DESCRIPTION

1

ON/OFF Press this button for at least 3 seconds to turn 

on or turn off UPS.

2

DOWN Press this button to scroll down in the LCD menu.

3

UP

Press this button to scroll up in the LCD menu.

4

ENTER Press this button to select an option.

Silencing the alarm: 

Press any button to silence the alarm. If the alarm status changes, 

the alarm will override the previous alarm silencing and will beep again.

LCD Display introduction: 

There are 4 display Zones: ICON, CONTENT, EVENT CODE/INDEX and TOPOLOGY.

ICON ZONE:


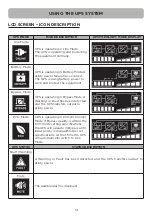
In the top area, there are 6 ICONS for displaying the UPS working status, Fault (Warning) and Mute.

CONTENT ZONE: 

The Content area is on the middle screen. 

The top of Content area is for displaying UPS Menu. 

The bottom area is the UPS status which depends on different UPS status to provide different 

information included Input / Output / Battery / Load parameters. Please find 

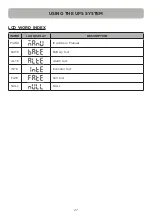
LCD WORD 

COMPARISON TABLE

 on page 34 for reference.

EVENT CODE/INDEX ZONE: 

In the upper right corner of the Content area, there are two seven-segment displays to show 

the event code when UPS fault. Besides, this area will show the index of setup, event and 

information menu.

TOPOLOGY ZONE: 

The Content area is on the bottom screen. 

In this area, there are 6 TOPOLOGYS for displaying the UPS working status. The topology will 

be lighted up when the area is working.

ICON ZONE

EVENT CODE/ 

INDEX ZONE

CONTENT ZONE

TOPOLOGY ZONE

4

2

1

3

Summary of Contents for OLS1000ERT2Ua

Page 1: ...User s Manual OLS1000ERT2UA OLS1500ERT2UA OLS2000ERT2UA OLS3000ERT2UA Cyber Power Systems Inc www cyberpower com K01 C000603 02 ...

Page 2: ......

Page 3: ...AGRAM 7 HARDWARE INSTALLATION GUIDE 7 OVERVIEW 9 POWER MODULE FRONT REAR PANEL DESCRIPTION 9 BATTERY MODULE FRONT REAR PANEL DESCRIPTION 1 1 UPS SYSTEM STARTUP 1 2 USING THE UPS SYSTEM 1 3 LCD PANEL 1 3 ICON DESCRIPTION 1 4 FUNCTION TREE 1 5 MAIN MENU FUNCTION SELECT 1 6 EVENT CODE LIST 24 LCD WORD INDEX 26 TROUBLESHOOTING 28 MAINTENANCE 30 TECHNICAL SPECIFICATIONS 32 APPENDIX LCD WORD COMPARISON ...

Page 4: ... from AC power source hazardous voltage may exist between battery terminals and ground Test before touching CAUTION To reduce the risk of fire connect the UPS to a branch circuit with 10 amperes 1000 1500 2000 16 amperes 3000 maximum over current protection in accordance to CE requirement CAUTION The AC outlet where the UPS is connected should be close to the unit and easily accessible CAUTION Ple...

Page 5: ...metal objects Use tools with insulated handles CAUTION The unit has a dangerous amount of voltage When the UPS indicators is on the units may continue to supply power thus the unit s outlets may have a dangerous amount of voltage even when it s not plugged in to the wall outlet CAUTION Make sure everything is turned off and disconnected completely before conducting any maintenance repairs or shipm...

Page 6: ...er com and go to the Software Section for free download Input power cord Output power cord s USB communication cable Rackmount rails 2 Flat head screws M4X8L 8 Pan head screws M5X12L 12 Plastic washers 12 Rackmount ears Stands 2 Screw hole dust covers 8 M5 nut 8 Machine screw with round washer M4X8L 6 Phone cable ...

Page 7: ...mount in 48 cm 19 inch panel racks from 46 4 to 73 8cm 18 3 to 29 inches deep Select the proper holes in the rack for positioning the UPS in the rack The rails take up position 1 through position 3 2 Attach the rackmount rail to your rack with two M5X12L screws two plastic washers and two M5 nuts at the front of the rack Located in position 1 position 3 It can also be located in position 1 positio...

Page 8: ... of the UPS Separate the right panel from the UPS 2 Unscrew the LCD plate gently lift the LCD module out Rotate it to the tower orientation Reinstall it for a tower configuration Attach the LCD plate and LCD module to the right panel using the provided screws Step 2 Attach the base stands Tighten the screws M5X12 4pcs of the base stands rackmount ears onto the bottom of the UPS Step 3 Attach dust ...

Page 9: ...sture or heat is present Please see specifications for acceptable temperature and humidity range CAUTION Never install a UPS or associated wiring or equipment during a lightning storm CAUTION Do not work alone under hazardous conditions CAUTION In case of the risk of electric shock do not remove the top cover CAUTION The battery can energize hazardous live parts inside even when the AC input power...

Page 10: ...oad and possibly damage the unit 4 To protect a fax machine telephone modem line or network cable connect the telephone or network cable from the wall jack outlet to the jack marked IN on the UPS and connect a telephone cable or network cable from the jack marked OUT on the UPS to the modem computer telephone fax machine or network device 5 Press the ON OFF switch to turn the UPS on If an overload...

Page 11: ...hutdown during a power outage through the connection while the computer can monitor the UPS and alter various programmable parameters Note Only one communication port can be used at a time The port not in use will automatically become disabled or the serial port will be disabled if both ports are attached 10 EPO Emergency Power Off ROO Remote on off Port EPO ROO ports allow administrators the capa...

Page 12: ...nd fault protection 7 Serial Port Serial port provides RS 232 communication between the UPS and the computer The UPS can control the computer s shutdown during a power outage through the connection while the computer can monitor the UPS and change its various programmable settings 8 USB Port This is a connectivity port which allows communication and control between the UPS and the connected comput...

Page 13: ...one Modem Lines and cabling systems from surges 11 EBM Detection Connector Provide External Battery Module detection function 12 Relay Output Connector Convert UPS signals into real potential free Dry Contacts for industrial control 13 SNMP HTTP Network Slot Slot to install the optional SNMP card for remote network control and monitoring 14 Extended Runtime Battery Module Connector Connection for ...

Page 14: ... Automatic Detection of Extended Battery Module Connector Connect to UPS for automatic detection of battery modules CONNECTION 1 POWER MODULE WITH ONE BATTERY MODULE Use the battery cable of the Battery module to connect the Battery module to the Power module CONNECTION 2 POWER MODULE WITH MULTIPLE BATTERY MODULES Step 1 Connect the first Battery module to the Power module via battery cable Step 2...

Page 15: ...s are connected to AC source 2 The UPS LCD shows Standby Mode and fans turn on 3 Press the ON OFF button on the UPS front panel for at least 3 seconds to turn on the UPS 4 UPS will perform a brief self test lasting about 15 seconds The LCD will be lighted up during this time 5 The UPS is operating in Battery Mode first then transfer to Line Mode if Input power is qualification and powering the out...

Page 16: ...king status Fault Warning and Mute CONTENT ZONE The Content area is on the middle screen The top of Content area is for displaying UPS Menu The bottom area is the UPS status which depends on different UPS status to provide different information included Input Output Battery Load parameters Please find LCD WORD COMPARISON TABLE on page 34 for reference EVENT CODE INDEX ZONE In the upper right corne...

Page 17: ...nt Bypass Mode UPS is operating in Bypass Mode A Warning or Fault has been detected and the UPS transfers output to utility power ECO Mode UPS is operating in ECO Economy Mode If Bypass quality is within the ECO mode setting specifications the UPS will operate in Bypass until input power is disqualified per set specifications At that time the UPS will automatically switch to Line Mode UPS STATUS S...

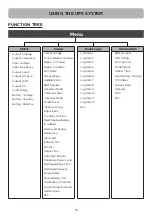
Page 18: ...vent Log Signal Input Dry Relay Function Reset Replace Battery IP Address Reset Load Energy Battery Test Alarm Test Indicator Test Fan Test Date Time Automatic Restore Mandatory Power Cycle Recharged Delay Time Recharged Capacity Startup Delay Period Battery Test Low Battery Threshold Low Runtime Threshold Outlet Group ESC Event Logs Log Item 1 Log Item 2 Log Item 3 Log Item 4 Log Item 5 Log Item ...

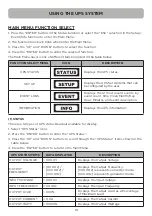
Page 19: ...ENTER button to return to the Main Menu USING THE UPS SYSTEM FUNCTION SELECT MENU ICON DESCRIPTION UPS STATUS Displays the UPS status SET UP Displays the UPS Set Up items that can be configured by the user EVENT LOGS Displays the 12 most recent events by event count time Year Month Day Hour Minute and event description INFORMATION Displays the UPS information UPS STATUS ITEMS DATA DISPLAYED DESCRI...

Page 20: ...GY XXXWh XXXXKWh XXXXKKWh Display UPS Load Energy Consumption XXXWh represents the load energy 1kWh XXXXKWh represents the load energy 999Wh and 1kKWh BATTERY VOLTAGE XXX XV Displays the Battery Voltage BATTERY CAPACITY XXX Displays the Estimated Percentage of Battery Capacity BATTERY RUNTIME XXXM Displays the Estimated Battery Runtime in Minutes ...

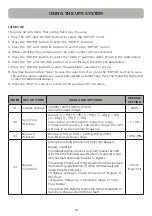
Page 21: ...ange of Bypass V Window 2 Bypass frequency is inside the range of Sync Freq Range The setting No Bypass means the UPS is forbidden to transfer to Bypass when UPS has fault Check Freq Volt 2 SET UP There are 32 UPS items that can be Set Up by the user 1 Press the UP and DOWN buttons to select the SETUP ICON 2 Press the ENTER button to enter the SETUP function 3 Press the UP and DOWN buttons to scro...

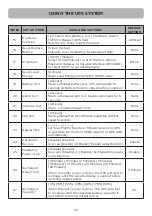
Page 22: ...en the UPS input power source is a generator set the UPS will operate normally without transferring to Battery Mode when this is Enable Disable 10 Communication Disable Enable All communication ports on the UPS are Disable or Enable Enable 11 Converter Mode Disable Output Freq 50Hz Output Freq 60Hz Sets Output Freq 50Hz Output Freq 60Hz to convert the input frequency to required output frequency D...

Page 23: ...conds None 21 Indicator Test Activate Starts a manual Indicator test None 22 Fan Test Activate Starts a manual Fan test UPS will operate fan with full speed 5 seconds None 23 Date Time set Year Month Day Hour Minute Second to UPS or get Date Time from PPBE Agent or RMCARD automatically None 24 Automatic Restore Disable Enable User can Disable or Enable the auto restart function Enable 25 Mandatory...

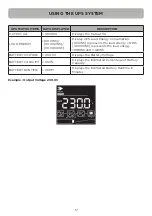
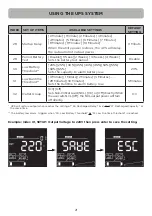
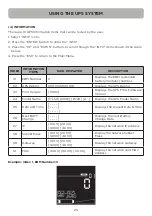
Page 24: ... 45 50 55 60 65 Sets the capacity to alarm battery low 20 31 Low Runtime Threshold 0 Minute 1 Minute 2 Minutes 3 Minutes 29 Minutes 30 Minutes Sets the Runtime to alarm battery low 5 Minutes 32 Outlet Group On Off Sets Non Critical Load NCL On or Off directly When the user sets NCL Off the NCL output power will turn off directly On Example Index 01 SETUP Output Voltage to 220V then press enter to ...

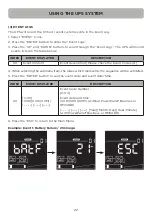
Page 25: ...represents the sequence will be exhibited 5 Press the ENTER button to see the event code and event date time 6 Press the ESC to return to the Main Menu USING THE UPS SYSTEM INDEX EVENT DISPLAYED DESCRIPTION XX Event Content Event description Please check the Event Code List INDEX EVENT DISPLAYED DESCRIPTION XX C XX XXD XXH XXM Event Code Number C XX Event date and time XXD XXH XXM without PowerPan...

Page 26: ...ended battery modules number 02 UPS Rating XXXXVA XXXXW Displays the UPS Rating 03 MCU Version XXXX Displays the UPS MCU Firmware Version 04 Model Name OLSX 000E RT2U A Displays the UPS Model Name 05 Date and Time Displays the present Date Time 06 Next BATT Change Displays the next Battery Change Date 07 IP 1 XXX 2 XXX 3 XXX 4 XXX Display the network IP address 08 Subnet Mask 1 XXX 2 XXX 3 XXX 4 X...

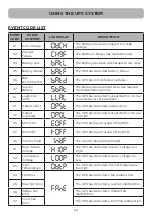
Page 27: ...r 21 Output short The UPS has detected output short 22 Output Overload The UPS has detected Output Watt or VA are too High 25 EPO OFF The UPS has been turned off by EPO 27 ROO OFF The UPS has been turned off by ROO 30 Inverter Fault The inverter has malfunctioned 31 High Output Voltage The UPS has detected Inverter voltage too High 32 Low Output Voltage The UPS has detected Inverter voltage too Lo...

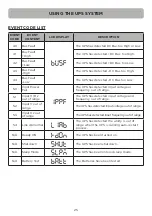
Page 28: ...ted input voltage or frequency out of range 51 Input V Hz out of range The UPS has detected input voltage and frequency out of range 52 Input V out of range The UPS has detected input voltage out of range 53 Input Hz out of range The UPS has detected input frequency out of range 54 Line Abnormal The UPS has detected the utility is out of range when the UPS is running auto restart process N A Ready...

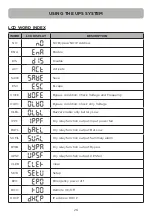
Page 29: ... OLVO Bypass condition Check only Voltage OLBL Buzzer enable only battery Low IPPF Dry relay function output Input power fail BATL Dry relay function output Bat Low SUML Dry relay function output Summary alarm BYPA Dry relay function output Bypass UPSF Dry relay function output UPS fail CLER Clear SETU Setup EPO Emergency power off ROO Remote On Off DHCP IP address DHCP LCD WORD INDEX ...

Page 30: ...27 USING THE UPS SYSTEM WORD LCD DISPLAY DESCRIPTION MANU IP address Manual BATE Battery test ALTE Alarm test INTE Indicator test FATE Fan test NULL NULL LCD WORD INDEX ...

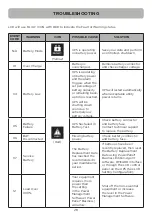
Page 31: ...y Test Check battery connector and battery fuse Contact technical support to replace the battery 06 BAT Disconnected Missing battery power Check battery connector and battery fuse 07 Service Battery The Battery Replacement Date has reached the recommended 3 year maintenance period If batteries have been recently replaced then reset the Battery Replacement Date using PowerPanel Business Edition Age...

Page 32: ...nection 33 Over Temperature High temperature sensor activates protection Check the fan for operation and if the ventilation hole has been covered 54 Line Abnormal Utility power is out of range for the UPS to auto restart Check whether voltage or frequency of utility power is out of range EVENT CODE FAULT ICON POSSIBLE CAUSE SOLUTION 02 Charger Failure Red Charger has failed Contact CyberPower for ...

Page 33: ...he wall receptacle before servicing the battery CAUTION Only use tools with insulated handles Do not lay tools or metal parts on top of the UPS or battery terminals Replacement Batteries Please refer to the front side of the UPS for the model number of the correct replacement batteries For battery procurement log onto www cyberpower com or contact your local dealer When the Replace Battery the LCD...

Page 34: ...e battery compartment cover Step 2 Pull the battery trays out slowly and then put the new battery trays into the compartment Step 3 Re install the battery compartment cover and the plastic sheet by tightening the screws Connect the battery connector and secure onto the battery compartment cover Please make sure the connection is properly seated Step 4 Re install the right front panel and tighten w...

Page 35: ... 0 5Hz Transfer Time Typically 0ms Rated Power Factor 0 9 Harmonic Distortion THD 3 at Linear Load 5 at Non linear Load Crest Factor 3 1 ECO Mode Voltage Regulation 10 15 Configurable UPS Outlets 4 4 IEC C13 4 4 IEC C13 4 4 IEC C13 4 4 IEC C13 1 IEC C19 Protection Surge Protection Surge Suppression 350 Joules Phone Network Protection RJ11 RJ45 One In One Out Overload Protection Line Mode 105 110 O...

Page 36: ...Management Communications On Device Features Self Test Auto Charge Auto Restart Auto Overload Recovery Connectivity Ports 1 Serial Port RS232 1 USB Port SNMP HTTP Capable 1 Expansion Port With optional RMCARD 205 Software Power Management Software PowerPanel Business Physical Dimension WxHxD mm 438 x 88 x 430 438 x 88 x 430 438 x 88 x 430 438 x 88 x 610 Net Weight kg 10 4 13 8 17 2 27 6 Within 50 ...

Page 37: ...34 APPENDIX LCD WORD COMPARISON TABLE WORD LCD DISPLAY WORD LCD DISPLAY WORD LCD DISPLAY WORD LCD DISPLAY 0 A L V 1 B M W 2 C N X 3 D O Y 4 E P 5 F Q 6 G R 7 H S 8 I T 9 J U ...

Page 38: ......

Page 39: ......

Page 40: ... Rd Neihu Dist Taipei City 114 Taiwan Entire contents copyright 2020 Cyber Power Systems Inc All rights reserved Reproduction in whole or in part without permission is prohibited PowerPanel Business and PowerPanel Personal are trademarks of Cyber Power Systems Inc ...

Reviews: