background image

 VoIP Intercom


Operations Guide

Part #

010935F

Document Part #

930242M

for Firmware Version 

6.0.1

CyberData Corporation

2555 Garden Road

Monterey, CA 93940

(831) 373-2601

Summary of Contents for VoIP Intercom 010935F

Page 1: ...VoIP Intercom Operations Guide Part 010935F Document Part 930242M for Firmware Version 6 0 1 CyberData Corporation 2555 Garden Road Monterey CA 93940 831 373 2601...

Page 2: ...r such products software firmware and or hardware CyberData Corporation reserves the right to make changes without notice to this manual and to any such product software firmware and or hardware OPEN...

Page 3: ...RTFM Switch Adds Section 4 1 7 2 Intercom with a Jumper and No RTFM Switch Updates Section 4 1 8 Restore the Factory Default Settings Adds Section 4 1 8 1 Intercom with an RTFM Switch Adds Section 4...

Page 4: ...e obsolete outlet 10 Protect the power cord from being walked on or pinched particularly at plugs convenience receptacles and the point where they exit from the apparatus 11 Only use attachments acces...

Page 5: ...hat is a safety policy or protection of property The safety guidelines for the equipment in this manual do not purport to address all the safety issues of the equipment It is the responsibility of the...

Page 6: ...gure the Device 28 4 2 4 Configure the Network Parameters 31 4 2 5 Configure the SIP Parameters 33 4 2 6 Configure the Nightringer Parameters 38 4 2 7 Configure the Sensor Configuration Parameters 40...

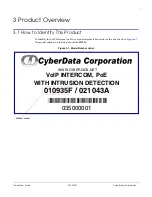
Page 7: ...This Product To identify the VoIP Intercom look for a model number label similar to the one shown in Figure 3 1 The model number on the label should be 010935 Figure 3 1 Model Number Label VoIP INTERC...

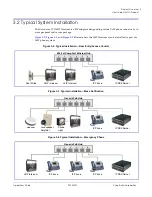
Page 8: ...w the VoIP Intercoms can be installed as part of a VoIP phone system Figure 3 2 Typical Installation Door Entry Access Control Figure 3 3 Typical Installation Mass Notification Figure 3 4 Typical Inst...

Page 9: ...ated for any AC voltages Warning Electrical Hazard This product should be installed by a licensed electrician according to all local electrical and building codes Warning Electrical Hazard To prevent...

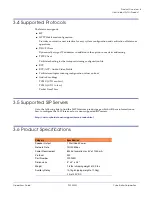
Page 10: ...s Network configurable relay activation settings Dial Out Extension supports the addition of comma delimited pauses before sending additional DTMF tones Network configurable microphone input sensitivi...

Page 11: ...acilitates autoprovisioning configuration values on boot Audio Encodings PCMU G 711 mu law PCMA G 711 A law Packet Time 20 ms 3 5 Supported SIP Servers Go to the following link to find the VoIP Interc...

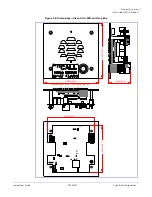
Page 12: ...tify This Product Operations Guide 930242M CyberData Corporation 6 3 7 Dimensions Figure 3 5 Dimensions Size of Unit With Case DIMENSIONS ARE IN INCHES MILLIMETER 5 00 127 0 2 36 60 0 4 64 117 8 4 70...

Page 13: ...to Identify This Product Operations Guide 930242M CyberData Corporation 7 Figure 3 6 Dimensions Size of Unit Without Gang Box 5 000 127 0 5 000 127 0 1 985 50 4 4 200 106 7 4 200 106 7 DIMENSIONS ARE...

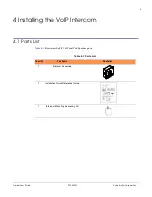
Page 14: ...4 Installing the VoIP Intercom 4 1 Parts List Table 4 1 illustrates the SiP VoIP and PoE Speaker parts Table 4 1 Parts List Quantity Part Name Illustration 1 Intercom Assembly 1 Installation Quick Re...

Page 15: ...er you can supply 5 VDC at 1000 mA into the terminal block Figure 4 1 VoIP Intercom Connections 6 5 4 3 2 1 Alternate Power Input 1 5Vat 1000 mA 2 Power Ground Relay Contact 2A at 30 VDCor 0 4A at 125...

Page 16: ...with RFC2833 DTMF generation Figure 4 2 Auxiliary Relay Wiring Diagram Warning Electrical Hazard The VoIP Intercom enclosure is not rated for any AC voltages Warning Electrical Hazard This product sho...

Page 17: ...4 1 3 Identifying the VoIP Intercom Connectors See the following Figures and Tables to identify the connectors and functions Figure 4 3 J2 J5 and J6 Connector Locations Table 4 2 Connector Functions...

Page 18: ...tion J1 PoE Network Connection RJ 45 ethernet J3 Terminal Block see Figure 4 1 J4 Factory Only J8 Factory Only JP0 Factory Only JP1 Factory Only JP2 Factory Only JP3 Factory Only JP4 Factory Only JP5...

Page 19: ...ncoming call or a call that was initiated by you 4 1 4 2 Call Button LED Function Upon initial power or reset the Call Button LED will illuminate When the software has finished initialization the Call...

Page 20: ...cable or power supply The square green Link light above the Ethernet port indicates that the network connection has been established see Figure 4 6 and Figure 4 7 The Link light changes color to conf...

Page 21: ...e VoIP Intercom Intercom Setup Operations Guide 930242M CyberData Corporation 15 4 1 5 1 Verify Network Activity The square yellow Activity light blinks when there is network activity Figure 4 7 Netwo...

Page 22: ...n the Intercom is operational and linked to the network use the Reset Test Function Management RTFM switch see SW1 in Figure 4 8 on the Intercom board to announce and confirm the Intercom s IP Address...

Page 23: ...Intercom that has an RTFM switch then see Section 4 1 7 1 Intercom with an RTFM Switch If you have an Intercom that has a jumper and does not have an RTFM switch then see Section 4 1 7 2 Intercom wit...

Page 24: ...oration 18 4 1 7 2 Intercom with a Jumper and No RTFM Switch 1 If you have an Intercom with a jumper and no RTFM switch then install a jumper on JP11 See JP11 in Figure 4 10 2 Wait until the IP addres...

Page 25: ...om with an RTFM Switch If you have an Intercom that has a jumper and does not have an RTFM switch then see Section 4 1 8 2 Intercom with a Jumper Note Each Intercom is delivered with factory set defau...

Page 26: ...tion 20 2 The Call Button LED see Figure 4 12 on the front will blink quickly 3 Press and hold the Call Button until restoring defaults is announced Figure 4 12 Call Button and Call Button LED 4 Relea...

Page 27: ...m that has a jumper and no RTFM switch 1 Put a jumper on JP11 See Figure 4 13 Figure 4 13 Jumper on JP11 2 Wait for the Intercom to announce the IP address 3 Press and hold the Call Button see Figure...

Page 28: ...Operations Guide 930242M CyberData Corporation 22 Figure 4 14 Call Button and Call Button LED 4 1 9 Adjust the Volume You can adjust the volume through the Speaker Volume setting on the Device Configu...

Page 29: ...ix 5 Mounting the Intercom for instructions All Intercoms are initially configured with the following default IP settings When configuring more than one Intercom attach the Intercoms to the network an...

Page 30: ...avigation Web Page Item Description Link to the Home page Link to the Device Configuration page Link to the Networking page Link to go to the SIP Configuration page Link to go to the Nightringer page...

Page 31: ...PC is on the same IP network as the Intercom Note You may also download CyberData s VoIP Discovery Utility program which allows you to easily find and configure the default web address of the CyberDa...

Page 32: ...perations Guide 930242M CyberData Corporation 26 2 When prompted use the following default Web Access Username and Web Access Password to access the Home Page Figure 4 15 Web Access Username admin Web...

Page 33: ...IP Addressing Shows the current IP addressing setting DHCP or static IP Address Shows the current IP address Subnet Mask Shows the current subnet mask address Default Gateway Shows the current defaul...

Page 34: ...om Intercom Setup Operations Guide 930242M CyberData Corporation 28 4 2 3 Configure the Device 1 Click the Device Configuration button to open the Device Configuration page See Figure 4 16 Figure 4 16...

Page 35: ...g When selected the relay will be activated for as long as the call is active NOTE When the phone is set to Auto Answer it will not ring and this option does nothing Activate Relay During Night Ring C...

Page 36: ...older hardware Click the Save button to save your configuration settings Note You need to reboot for changes to take effect Click on the Test Audio button to do an audio test When the Test Audio butt...

Page 37: ...ter values for the parameters indicated in Table 4 8 Table 4 8 Network Configuration Parameters Web Page Item Description IP Addressing Select either DHCP IP Addressing or Static IP Addressing by mark...

Page 38: ...1 address DNS Server 2 Enter the DNS Server 2 address Current Network Settings Shows the current network settings IP Address Shows the current Static IP address Subnet Mask Shows the current Subnet Ma...

Page 39: ...a Corporation 33 4 2 5 Configure the SIP Parameters 1 Click SIP Config to open the SIP Configuration page Figure 4 18 Note For specific server configurations go to the following website address http w...

Page 40: ...s Authenticate Password Type the Authenticate Password up to 64 alphanumeric characters Register with a SIP Server Check this box to enable SIP Registration For information about Point to Point Config...

Page 41: ...for 2 seconds A pause of one second will be sent after each numerical digit Note The maximum number of total characters in the dial out field is 64 Click on the Reboot button to reboot the system Tabl...

Page 42: ...intercom to dial out to a single endpoint In this case the dial out extension should be the IP address of the remote device The Intercom can also receive Point to Point calls The delayed DTMF functio...

Page 43: ...mas will pause for 2 seconds A pause of one second will be sent after each numerical digit Note The maximum number of total characters in the dial out field is 25 Table 4 11 Examples of Dial Out Exten...

Page 44: ...s not have to be to the same server as the primary SIP registration Any calls made to the Nightringer extension will cause the Intercom to play a ring tone There is no way to answer this call The Nigh...

Page 45: ...d decimal notation Remote SIP Port Type the Remote SIP Port number default 5060 8 character limit Local SIP Port Type the Local SIP Port number default 5060 8 character limit Note This value cannot be...

Page 46: ...imeout parameter has been met The intrusion sensor is an optical sensor installed on the Intercom board and will be activated when the Intercom is removed from the case For each sensor there are four...

Page 47: ...stalling the VoIP Intercom Intercom Setup Operations Guide 930242M CyberData Corporation 41 1 Click Sensor Config to open the Sensor Configuration page Figure 4 21 Figure 4 21 Sensor Configuration Pag...

Page 48: ...orded audio file once Dial Out Extension Enter the desired dial out extension number For information about dial out extension strings and DTMF tones see Section 4 2 5 1 Dial Out Extension Strings and...

Page 49: ...ers allowing the group traffic traversal from the source The Multicast Configuration page allows the Intercom to join up to 10 paging zones for receiving ulaw alaw encoded RTP audio streams A paging z...

Page 50: ...Intercom Intercom Setup Operations Guide 930242M CyberData Corporation 44 1 Click on the Multicast Configuration button to open the Multicast Configuration page See Figure 4 22 Figure 4 22 Multicast...

Page 51: ...ightring tones are all prioritized Ringtones and Nightringtones Ringtones all play at the same priority level This means that it is possible to have a nightring tone and a normal ringtone playing at t...

Page 52: ...gure the Audio Configuration Parameters The Audio Configuration page is used to add custom audio to the board User uploaded audio will take precedence over the audio files shipped with the Intercom 1...

Page 53: ...Installing the VoIP Intercom Intercom Setup Operations Guide 930242M CyberData Corporation 47 Figure 4 24 Audio Configuration Page continued...

Page 54: ...Installing the VoIP Intercom Intercom Setup Operations Guide 930242M CyberData Corporation 48 Figure 4 25 Audio Configuration Page continued...

Page 55: ...used by default 24 character limit Your IP Address is Corresponds to the message Your IP address is 24 character limit Rebooting Corresponds to the spoken word Rebooting 24 character limit Restoring d...

Page 56: ...ated Audio Files User created audio files should be saved in the following format RIFF little endian data WAVE audio Microsoft PCM 16 bit mono 8000 Hz You can use the free utility Audacity to convert...

Page 57: ...ercom Setup Operations Guide 930242M CyberData Corporation 51 When you export an audio file with Audacity save the output as WAV Microsoft signed 16 bit PCM Figure 4 28 WAV Microsoft signed 16 bit PCM...

Page 58: ...2 4 2 10 Configure the Event Parameters Click the Event Config button to open the Event Configuration page Figure 4 29 The Event Configuration page specifies a remote server that can be used to receiv...

Page 59: ...Terminated Events When selected Call Terminated Events are enabled Enable Relay Activated Events When selected Relay Activated Events are enabled Enable Relay Deactivated Events When selected Relay D...

Page 60: ...ta VoIP Device MAC 0020f70015b6 event POWERON event cyberdata POST xmlparse_engine HTTP 1 1 Host 10 0 3 79 User Agent CyberData 1 0 0 Content Length 199 Content Type application x www form urlencoded...

Page 61: ...r Agent CyberData 1 0 0 Content Length 234 Content Type application x www form urlencoded xml version 1 0 encoding ISO 8859 1 cyberdata NAME CyberData VoIP Device MAC 0020f70015b6 event MULTICAST_STAR...

Page 62: ...version 1 0 encoding ISO 8859 1 cyberdata NAME CyberData VoIP Device MAC 0020f70015b6 event RELAY_DEACTIVATED event cyberdata POST xmlparse_engine HTTP 1 1 Host 10 0 3 79 User Agent CyberData 1 0 0 C...

Page 63: ...perations Guide 930242M CyberData Corporation 57 4 2 11 Configure the Autoprovisioning Parameters 1 Click the Autoprovisioning button to open the Autoprovisioning Configuration page See Figure 4 30 Fi...

Page 64: ...toprovisioning Enable Autoprovisioning See Section 4 2 11 1 Autoprovisioning Get Autoprovisioning from DHCP See Section 4 2 11 1 Autoprovisioning Autoprovisioning Server IP Address See Section 4 2 11...

Page 65: ...is file into your TFTP server directory and manually set the TFTP server address on the board It is not necessary to set every option found in the autoprovisioning template As long as the XML is valid...

Page 66: ...a service is started on startup that will wait the configured number of minutes and then try to re download its autoprovisioning file It will compare its previously autoprovisioned file with this new...

Page 67: ...e uses the file name to determine when to download a new audio file This means that if you used autoprovisioning to upload a file and then changed the contents of this file at the TFTP server the devi...

Page 68: ...rmware version 6 0 0 or later will not be able to run firmware that is version 5 1 2 or earlier To upload the firmware from your computer 1 Retrieve the latest Intercom firmware file from the VoIP Int...

Page 69: ...ete When the countdown finishes the Upgrade Firmware page will refresh The uploaded firmware filename should be displayed in the system configuration indicating successful upload and reboot Table 4 18...

Page 70: ...4 3 1 Reboot the Intercom To reboot a Intercom log in to the web page as instructed in Section 4 2 2 Log in to the Configuration Home Page 1 Click Update Firmware to open the Upgrade Firmware page Fi...

Page 71: ...he parts for each Intercom Refer to Table 5 1 Table 5 1 Mounting Components Part of the Accessory Kit Quantity Part Name Illustration 2 Outlet Box Plugs 2 Flush Mounting Plate 2 8 32 x 1 4 Flat Head P...

Page 72: ...ion 66 To mount the Intercom 1 Plug the Ethernet cable into the Intercom Assembly see Figure 5 1 Section 4 1 5 Network Connectivity and Data Rate explains how the Link and Status LEDs work Figure 5 1...

Page 73: ...ng use the two 8 32 X 1 4 FLAT HEAD PHILLIPS MACHINE SCREW and the one 10 24 X 5 16 PAN HEAD PHILLIPS MACHINE SCREW to secure the Intercom Figure 5 2 VoIP Intercom Assembly Security Torx Screw 4x Face...

Page 74: ...therwise use the outlet box plug to plug the exit hole Note Apply good quality waterproof sealant to all threads Figure 5 3 Mounting the VoIP Intercom Assembly Figure 5 4 shows the restrictions of the...

Page 75: ...m Operations Guide 930242M CyberData Corporation 69 Figure 5 5 shows how to properly mount the VoIP Intercom Figure 5 5 Mounting Not Provided Mounting Screw Flat Head Phillips Machine Screw 2x Plate 2...

Page 76: ...ed in Step 1 the directory that contains the files to be uploaded For example in tftpd l s tftpboot your_directory_name 6 1 2 In a Windows Environment You can find several options online for setting u...

Page 77: ...data net products voip digitalanalog intercom docs html 7 3 Contact Information Contact CyberData Corporation 2555 Garden Road Monterey CA 93940 USA www CyberData net Phone 800 CYBERDATA 800 292 3732...

Page 78: ...a will be paid by CyberData CyberData shall not under any circumstances be liable to any person for any special incidental indirect or consequential damages including without limitation damages result...

Page 79: ...y spareintheair html 7 4 4 Return and Restocking Policy For our authorized distributors and resellers please refer to your CyberData Service Agreement for information on our return guidelines and proc...

Page 80: ...twork 31 SIP 33 using Web interface 23 configuration home page 26 configuration page configurable parameters 27 29 31 contact information 71 contact information for CyberData 71 Current Network Settin...

Page 81: ...34 63 intrusion sensor 40 42 activate relay 42 dial out extension 42 flash button LED 42 play audio locally 42 play audio remotely 42 IP address 23 31 32 IP addressing 31 default IP addressing settin...

Page 82: ...tch 16 RTP AVP 5 S sales 71 sensor setup page 41 sensor setup parameters 40 sensors 42 server address SIP 34 service 71 setting up an intercom 9 settings default 19 SIP enable SIP operation 34 local S...

Page 83: ...nited States 72 warranty and RMA returns page 73 warranty policy at CyberData 72 web access password 23 web access username 23 web configuration log in address 25 web page navigation 24 web page navig...

Reviews: