User's Guide
the CYBERSTORM MKIII/PPC will be even and smoothly connected. If the expansion
slot has never been used before you may need to use more effort, but please do not use
excessive force.
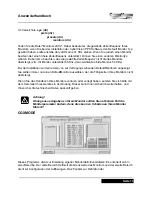
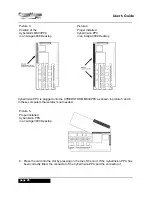
Picture 6.
Proper installed
CyberVision PPC
in an Amiga 4000 Tower
9.
Remove the cover plate of a chosen slot, where you would like to insert the connector
module. The cover plate is held on by one screw. To make later operations easier,
remove the screw completely, even if you can remove the cover plate it only partly
unscrewed. Attach the connector module cover plate with the screw that you removed
from the empty slot.
10. Close up the Amiga casing.
CONNECTING THE MONITOR
Connect the monitor cable to the VGA port on the CyberVision PPC connector module. (Refer
to Picture "Connectors of the Connector module" for that purpose) This connector outputs
always the CyberVision PPC video signal. You can use a 15kHz monitor in parallel on the
standard Amiga RGB port for a two monitor system.
The 3pole Mini-DIN connector above the the VGA connector is for the use of an optional LCD-
3D-Shutterglasses system (VESA standard).
page 27

