5-2
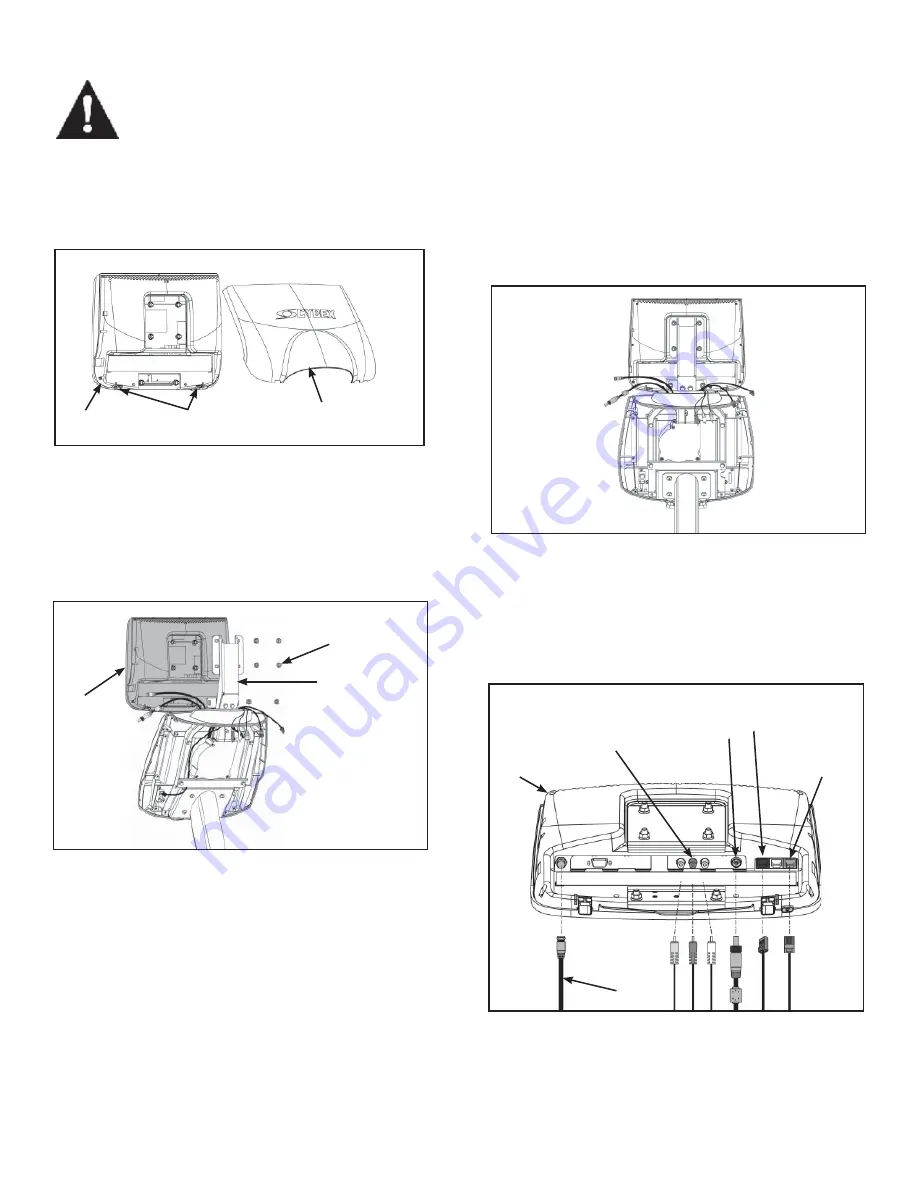
Locate monitor (A). See Figure 2.
A.
Remove the back cover by pressing in the two tabs
B.
at the base of the monitor (A) and rotating the back
cover up and off of the monitor (A). See Figure 2.
Using an 11mm socket wrench, remove the six nuts
C.
mounted to the monitor (A). See Figure 3.
Using an 11mm socket wrench, secure the monitor
D.
(A) to the monitor bracket using the six nuts
removed in step 3C. See Figure 3.
Locate the power cable, composite video cables,
E.
coax cable, blue RJ-45 cable and green RJ-45
cable exiting the back of the console. See Figure 4.
Insert the power cable, composite video cables,
F.
coax cable, blue RJ-45 cable and green RJ-45
cable into the monitor (A) as shown in Figure
5.
NOTE:
Composite video cable inlets vary by
monitor. Ensure cable color matches inlet color.
3. Install Monitor
WARNING: To prevent injury, this apparatus must be securely attached to the mounting bracket in
accordance with these installation instructions.
NOTE: Refer to the appropriate Cybex A/V installation instructions before performing the steps listed below.
Figure 2
Figure 3
Figure 4
Figure 5
A
Composite
Video
Cables
Coax Cable
Blue
RJ-45
Green
RJ-45
Power
Cable
Nuts (6)
Monitor
Bracket
A
A
Tabs (2)
Back
Cover
Summary of Contents for CP-21072
Page 2: ......
Page 4: ......
Page 6: ...This page intentionally left blank ii ...
Page 10: ...2 2 This page intentionally left blank ...
Page 16: ...3 6 This page intentionally left blank ...
Page 18: ...4 2 This page intentionally left blank ...
Page 30: ...5 12 This page intentionally left blank ...
Page 34: ......
Page 36: ......
Page 38: ...Cette page est intentionnellement laissée vierge ii ...
Page 42: ...2 2 Cette page est intentionnellement laissée vierge ...
Page 48: ...3 6 Cette page est intentionnellement laissée vierge ...
Page 50: ...4 2 Cette page est intentionnellement laissée vierge ...
Page 62: ...5 12 Cette page est intentionnellement laissée vierge ...
Page 66: ......
Page 68: ......
Page 70: ...Esta página se ha dejado en blanco de manera intencionada ii ...
Page 74: ...2 2 Esta página se ha dejado en blanco de manera intencionada ...
Page 80: ...3 6 Esta página se ha dejado en blanco de manera intencionada ...
Page 82: ...4 2 Esta página se ha dejado en blanco de manera intencionada ...
Page 94: ...5 12 Esta página se ha dejado en blanco de manera intencionada ...


