AlterPath KVM QuickStart Guide
Page 3
5. Connect AlterPath PMs to the
KVM [Optional]
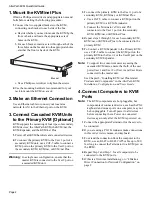
By daisy-chaining any combination of PM models to
the AUX port on the KVM, you can control up to 128
outlets from one KVM.
1.
Use a CAT-5 cable to connect the AUX port on the
KVM to the IN port of your AlterPath PM.
2.
Configure the AUX port for power management.
3.
To connect multiple PMs to the KVM:
a. Use a CAT-5 cable to connect the OUT port of a
PM that is already connected to the AUX port of a
KVM to the IN port of the next AlterPath PM.
b. Repeat Step a. until you have connected the desired
number of PMs.
You can control up to 128 power outlets in any
combination of PM models.
6. Plug Servers to be Managed
by the KVM Into an AlterPath
PM [Optional]
In order to manage power of servers while connected to
them through KVM ports, the server must be powered
by an AlterPath PM that is connected to the KVM. You
can manage power of up to two outlets while connected
to the server through a KVM port. See the Power
Management sections in the A
lterPath KVM
Installation, Configuration, and Users Guide
for
detailed instructions.
7. Access the KVM to Perform
Basic Network Configuration
To perform necessary basic network configuration,
make a direct connection to the KVM by doing one of
the following: connect a terminal or computer to the
console port; connect a keyboard, monitor, and mouse
to the keyboard, monitor, and mouse connectors on the
KVM; or connect the AlterPath KVM RP to the KVM’s
User 2 port.
Optionally, you can access the KVM without making a
direct connection. See “Access the KVM without
Making a Direct Connection” on page 6 for
instructions.
!
To Connect to the Console Port
Perform the following steps to connect a computer to
the console port of the KVM. An RJ-45 to DB-9
crossover adapter is included.
1.
Connect an RJ-45 CAT-5 cable to the console port on
the KVM.
2.
Connect the other end of the RJ-45 CAT-5 cable to
the DB-9 crossover console adapter that ships with
the KVM.
3.
If your work station has a DB-9 connection, plug the
DB-9 console adapter into the DB-9 connection.
4.
If your work station has a USB connection, you may
need to acquire a DB-9 to USB adapter and plug the
USB adapter into a USB port on the computer.
5.
Using a terminal emulation program installed on a
computer, start a session with the following console
port settings:
6.
Go to “Power On the KVM and Connected Devices”
on page 4.
!
To Connect to the User 1 Manage-
ment Port
Connect a keyboard, monitor, and mouse to the User 1
port on the right back of the KVM.
1.
Plug the station's monitor, keyboard, and mouse
cables to the Keyboard, Video, and Mouse
connectors, labelled User 1, on the KVM.
2.
Go to “Power On the KVM and Connected Devices”
on page 4.
!
To Connect the KVM RP to the
KVM
1.
Place the KVM R
P
on a desk or table up to 500 feet
away from the KVM.
2.
Use a CAT-5 cable to connect the Remote User port
on the KVM RP to the User 2 port on the KVM.
3.
Connect your monitor, keyboard, and mouse cables to
the User port on the KVM RP.
Serial Speed:
9600
bps
Stop Bits:
1
Data Length:
8
bits
Flow Control:
None
Parity:
None
ANSI emulation


