background image

3.


Remove the outside lower front screen from the unit by removing the four Phillips 
head screws.  Next remove the inside lower front screen.  Use a flat blade 
screwdriver and apply pressure against the fasteners, pushing from the inside. 


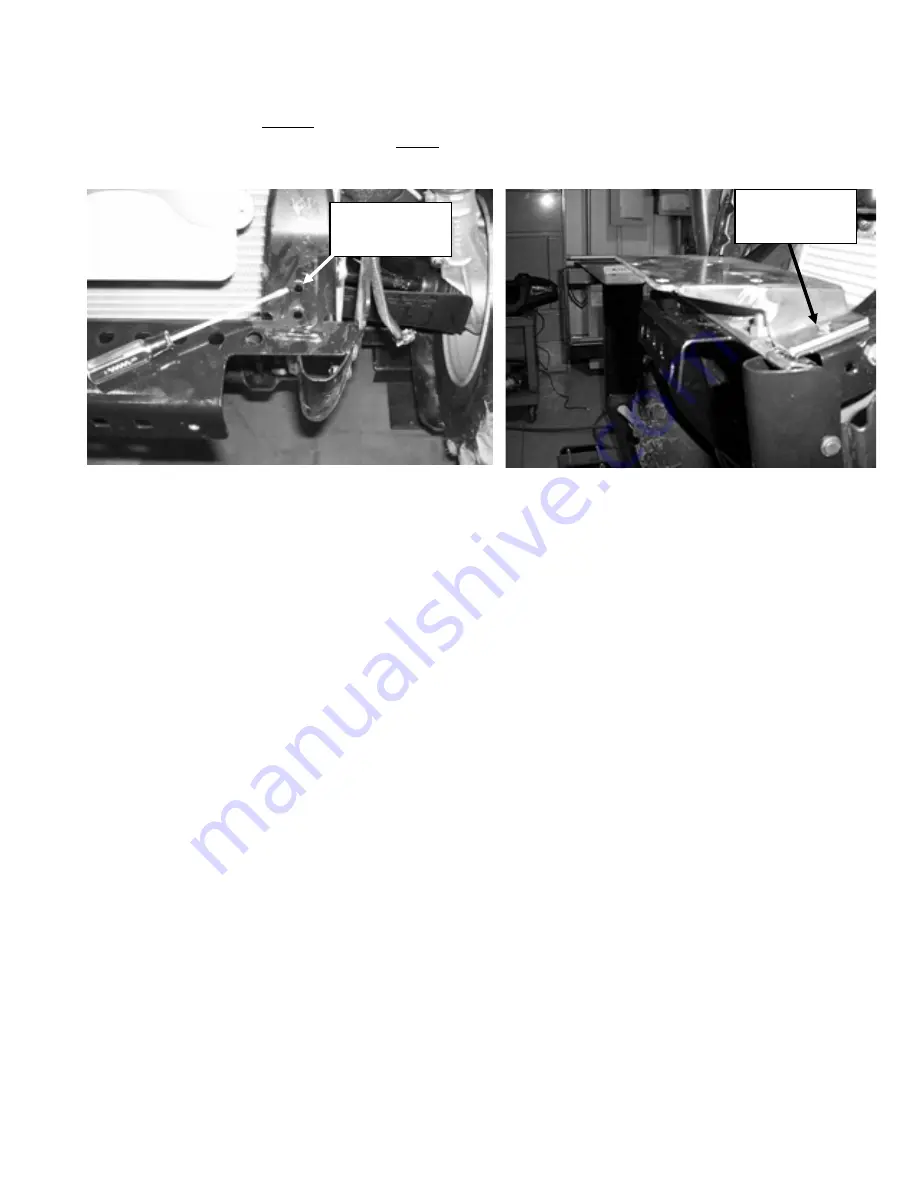
Use rear holes 
for 1/4” Bolts 

Use rear holes 
for 1/4” Bolts 


4.


Mount the mounting bracket weldment as shown above. (Be sure to use the 1/4” flat 
washers on the slotted holes).  Use one 3/8” flatwasher on the bolt head and one 
between the mounting bracket weldment and the ATV frame. (Two 3/8” bolts and 
four flatwashers in this step). 

 
5.


Go to instructions for your winch. 


CYCLE COUNTRY 1500 WINCH  

MOUNTING INSTRUCTIONS 


Using the two 5/16” x 1” bolts supplied with kit, mount the winch and roller hawse mount 
plate to the mounting bracket weldment using the holes farthest to the right.  Be sure that 
when the winch is mounted to the ATV the winch motor is on the 

LEFT

 side of the 

machine.  GO TO ROLLER HAWSE INSTRUCTIONS. 


CYCLE COUNTRY 2500 WINCH  

MOUNTING INSTRUCTIONS 


Install the roller hawse mount plate included with the winch to the mounting bracket 
weldment using the four bolts PROVIDED WITH THE CYCLE COUNTRY WINCH.  
The roller hawse mount plate supplied with the winch kit will not be used.  The roller 
hawse mount plate will need to be mounted on the bottom side of the mounting bracket 
weldment (to allow for clearance of the winch) and the winch will be mounted on the top 
side of the mounting bracket weldment.  Be sure that when the winch is mounted to the 
ATV the winch motor is on the 

RIGHT

 side of the machine.  GO TO ROLLER HAWSE 

INSTRUCTIONS. 


Summary of Contents for 25-3200

Page 1: ...62 0248 SERVICE 800 841 2222 E MAIL ccac cyclecountry com www cyclecountry com WINCH MOUNT KIT For POLARIS ATVs OWNER S MANUAL MODEL NUMBER 25 3200 CUSTOMER MUST RECEIVE A COPY OF THIS OWNER S MANUAL AT TIME OF SALE 2005 Cycle Country Accessories Corp Rev 2 7 12 06 MAN0321 ...

Page 2: ...clamp and 2 ITEM NO QTY PART NO DESCRIPTION 1 1 CYC5062 Winch Mount Plate 2 1 CYC5318 Roller Hawse Mount Plate 3 2 PUR1118 1 4 x 1 Bolt 4 2 PUR1237 1 4 Flatwasher 5 2 PUR1265 Nut 1 4 Nylock 6 2 PUR1155 5 16 x 1 Bolt Gr 5 7 2 PUR1275 Nut 5 16 Nylock 8 2 PUR1140 3 8 x 1 Bolt 9 4 PUR0250 3 8 Flatwasher 10 2 PUR1272 Nut 3 8 Nylock ...

Page 3: ...lease Note The cable clamp roller hawse and cable stop are included with the winch MODEL NUMBER 25 3200 WINCH MOUNT INSTALLATION INSTRUCTIONS 1 Remove the front storage compartment from the unit 2 Disconnect the headlights and remove the headlight grill assembly You will need to remove the insert that is attached to the headlight grill assembly Main Front Grill Assembly Remove insert from Main Gri...

Page 4: ...it mount the winch and roller hawse mount plate to the mounting bracket weldment using the holes farthest to the right Be sure that when the winch is mounted to the ATV the winch motor is on the LEFT side of the machine GO TO ROLLER HAWSE INSTRUCTIONS CYCLE COUNTRY 2500 WINCH MOUNTING INSTRUCTIONS Install the roller hawse mount plate included with the winch to the mounting bracket weldment using t...

Page 5: ...nting bracket weldment Be sure that when the winch is mounted to the ATV the winch motor is on the RIGHT side of the machine GO TO ROLLER HAWSE INSTRUCTIONS ROLLER HAWSE MOUNTING INSTRUCTIONS Remove one of the long rollers and the two side rollers and feed the winch cable through the roller hawse Reinstall the rollers and be sure rollers move freely Attach the roller hawse to the roller hawse moun...

Page 6: ...ountry Plow a Cable Stop must be installed Hook the Winch Cable to the CYC0345 U608 item 4 on your 15 0001 push tube kit through the slotted hole Carefully raise the blade until the top of the push tube are no closer than 1 anywhere on the ATV Place the Cable Stop onto the Winch Cable up against the Winch Hawse Secure the Cable Stop to the Winch Cable using the Cable Clamp Assembly as shown in the...

Page 7: ... Cycle Country Accessories Corporation determines that the product must be returned to the factory for credit please call 1 800 841 2222 for an RMA number and shipping instructions The warranty does not apply to parts that have been damaged by accident alteration abuse improper lubrication normal wear or other causes beyond Cycle Country Accessories Corporation s control Products such as engines e...

Page 8: ...ear Drop Basket All Purpose Basket New Poly Rear Drop Basket If you need to mow the trail before you go riding one of these will help Our 54 finish cut Quick Silver 54 can be mounted in front or towed behind your ATV The 48 Rough Cut will handle your toughest mowing jobs The Rough Cut 44 provides an economical way to handle all your mowing needs If you are into deer hunting and want to make a food...

Reviews: