background image

10

DV160 Installation - English

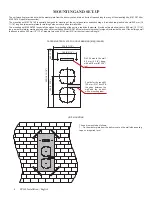
MOUNTING WITH THE MK1 DV160 MOUNTING SET

Wall 

Outer ventilation hood 

Round air duct 

sloped down by 2-3°

Fasteners 

DV160 unit 

Round air duct sloped 

down by 2-3°

The MK1 DV160 mounting set is designed to prepare a mounting 

site for installation of the DV160 unit at general construction 

stage. The set is not included into the delivery and is available 

on separate order. The MK1 DV160 mounting set includes: 

• 

Plastic air duct Ø 125 mm (Ø 5’’), 500 mm (19 11/16’’) long 

- 2 items; 

• 

Paper master plate - 2 items. Mounting sequence of the 

MK1 DV160

Mounting sequence of the MK1 DV160 set:

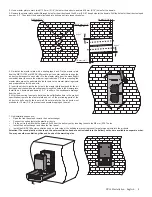
1. Fix the first master plate on the inner wall side with a sealing 

tape at a required height. 

2. Use the master plate to mark two Ø 130 (5 1/8”) mm holes for 

the air ducts and two Ø 8 mm (5/16”) holes for the fixing dowels 

of the unit. 

3. Remove the master plate and drill through holes for the air 

ducts and the holes, 60 mm (2 3/8”) deep for the dowels. 

4. Re-install the first master plate with a sealing tape back. Fix 

the second master plate on the outer wall side to align the air 

ducts with respect to each other. Fix the second master plate 

somewhat lower to ensure the minimum slope 3° for the air 

ducts. Before installation of the master plate press the marked 

perforated opening on the master plate and remove the master plate cut-outs. 

5. Install the air ducts into the master plate holes and seal those with a mounting foam through the openings in the master plate. Install the air ducts sloped 

down by 2-3° to enable the condensate drainage. 

6. After the mounting foam gets hard (see the solidification time in the product specification) remove the master plate and cut the protruding parts of the 

air ducts to be flush with the inner wall. On the outer wall side, the air ducts must protrude by 10 mm (3/8’’) to prevent condensate dropping on the wall.

MOUNTING WITH THE MK2 DV160 MOUNTING SET

The MK2 DV160 mounting set is designed for the DV160 unit mounting and is available upon separate order. The MK2 DV160 mounting set includes: 

• 

Plastic air duct Ø 125 mm (Ø 5’’), 500 mm (19 11/16’’) long - 2 items; 

• 

Paper master plate - 1 item; 

• 

NB DV160 outer ventilation hood - 1 item; 

• 

8x40 screw and dowel - 4 items.

Mounting sequence of the MK2 DV160 set: 

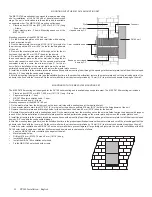
1. Fix the master plate from the delivery set on the inner wall side with a sealing tape at the required height. 

2. Use a master plate to mark two Ø 130 (5 1/8”) mm holes for the air ducts and two Ø 8 mm (5/16”) holes for the fixing dowels of the unit. 

3. Remove the master plate and drill through holes for the air ducts and the holes, 60 mm (2 3/8”) deep for the dowels. 

4. Re-install the master plate with a sealing tape back. Fix the master plate from the mounting set on the outer wall side to align the air ducts with respect 

to each other. Before installation of the master plate press the marked perforated opening on the master plate and remove the master plate cut-out. 

5. Install the air ducts into the master plate holes and seal those with a mounting foam through the openings in the master plate. Install the air ducts sloped 

down by 2-3° to enable the condensate drainage. 

6. After the mounting foam gets hard (see the solidification time in the product specification) remove the master plate and cut off the protruding parts of the 

air ducts to be flush with the inner wall. On the outer wall side, the air ducts must protrude by 10 mm (3/8’’) to prevent condensate dropping on the wall. 

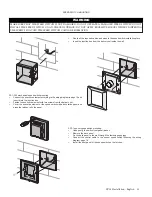
7. Install the outer ventilation hood NB DV160 on the outer wall side to prevent ingress of large foreign objects into the air ducts. Installation of the NB 

DV160 outer hood is carried out with four 8x40 screws and dowels and is carries out as follows:

• 

Lean the NB DV160 outer ventilation hood against the wall; 

• 

Mark fastening holes; 

• 

Drill four Ø 8 mm (Ø 5/16”) holes, 40 mm (1 9/16’’) deep; 

• 

Install 8x40 dowels; 

• 

Install the NB DV160 ventilation outer hood; 

• 

Fix the NB DV160 outer hood with screws.

Summary of Contents for DV160

Page 1: ...RECOVERY Installation and Operation Instructions Please read all instructions before installing and operating All wiring and installation must be in accordance with CEC NEC and local electrical codes...

Page 2: ...2 DV160 Installation English...

Page 3: ...power cable while operating the unit Do not put any objects on the power cable Do not open the operating unit In case of unusual sounds smoke disconnect the unit from power supply and contact the serv...

Page 4: ...Instructions 3 About the product 5 Introduction 5 Use 5 Delivery set 5 Main technical parameters 5 Design and operating logic 7 Mounting and set up 8 Connection to power mains 12 Unit control 13 Maint...

Page 5: ...ECHNICAL PARAMETERS The unit is designed for indoor application with the ambient temperature ranging from 1 C 34 F up to 40 C 104 F and relative humidity up to 80 The transported air temperature must...

Page 6: ...35 3 RPM min 1 1165 1720 2685 Noise level dB A Sones 22 0 38 25 0 42 29 1 0 Max transported air temperature C F From 20 4 up to 50 122 Ingress Protection IP22 Casing material Painted steel Insulation...

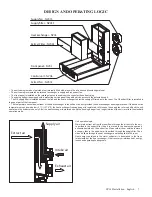
Page 7: ...er in the exhaust air duct provides the heat exchanger freezing protection If the exhaust air temperature drops down below 3 C 37 4 F the heat exchanger freezing danger is registered In this case the...

Page 8: ...ter plate for marking holes and an outer ventilation hood NB DV160 that prevents ingress of foreign objects inside the unit If the building s wall thickness is above 500 mm 19 11 16 prepare two extra...

Page 9: ...signed for the air ducts and seal those with a mounting foam through the holes in the master plate Install the air ducts sloped down by 2 3 to ensure the condensate drainage from the unit 6 After the...

Page 10: ...l MOUNTING WITH THE MK2 DV160 MOUNTING SET The MK2 DV160 mounting set is designed for the DV160 unit mounting and is available upon separate order The MK2 DV160 mounting set includes Plastic air duct...

Page 11: ...P3 1 300 mechanical speed switch mounting Connect the executive element according to the wiring diagram in page 12 and insert it into the junction box Fasten the executive element with two screws fro...

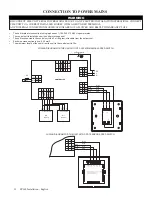
Page 12: ...FOR THE UNIT WITH SP3 1 SENSOR SPEED SWITCH 5 4 3 2 1 NN LL L3 L2 L1 speed 3 speed 2 speed 1 brown yellow green white OUT OUT OUT OUTI N L L1 L2 L3 L4 High Middle Low DISCONNECT THE UNIT FROM POWER MA...

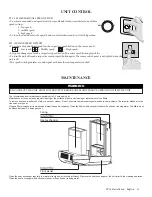
Page 13: ...IT CONTROL 3 O 1 2 3 OFF MAINTENANCE DISCONNECT THE UNIT FROM POWER SUPPLY BEFORE ANY MAINTENANCE OPERATION WITH THE UNIT WARNING The recommended unit maintenance periodicity is 3 4 times per year Mai...

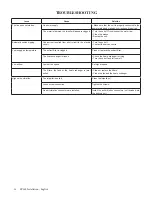
Page 14: ...Turn the unit off Contact the service centre Low supply air temperature The extract filter is clogged Clean or replace the extract filter The heat exchanger is frozen Check the heat exchanger for ici...

Page 15: ...improper maintenance use of corrosive and abrasive cleaning products d products or parts which have been subject to freight damage misuse negligence accident or any other circumstances beyond the cont...

Page 16: ...uillez lire toutes les instructions avant d installer et d utiliser la hotte Les travaux d installation et les branchements lectriques doivent satisfaire aux exigences du Code canadien de l lectricit...

Page 17: ...2 Installation d une DV160 Fran ais...

Page 18: ...mentation N ouvrez pas l unit op rationnelle Si vous entendez un bruit inhabituel ou si vous d tectez de la fum e d branchez l unit de la source d alimentation et communiquez avec le centre de service...

Page 19: ...3 propos du produit 5 Introduction 5 Utilisation 5 Ensemble la livraison 5 Param tres techniques principaux 5 Conception et logique de fonctionnement 7 Montage et mise en place 8 Connexion au r seau...

Page 20: ...un article PARAM TRES TECHNIQUES PRINCIPAUX L unit est con ue pour une utilisation int rieure dans un endroit au sein duquel la temp rature ambiante se situe entre 1 C 34 F et 40 C 104 F et o le taux...

Page 21: ...e dB A sones 22 0 38 25 0 42 29 1 0 Temp rature maximale de l air en circulation C F de 4 F 20 C 122 F 50 C Indice de protection contre l infiltration IP22 Mat riau du bo tier Acier peint Isolation Mo...

Page 22: ...situ dans la conduite d extraction d air permet une protection contre le gel Si la temp rature de l air extrait descend sous 3 C 37 4 F le danger de gel pour l changeur d air est enregistr Dans ce ca...

Page 23: ...patron pour le marquage de trous et une hotte de ventilation NB DV160 pour pr venir l infiltration d objets trangers dans l unit Si l paisseur du mur va au del de 500 mm 19 11 16 po pr voyez utiliser...

Page 24: ...l aide de mousse de montage Installez les conduites d air de fa on ce qu elles soient inclin es de 2 3 vers le bas afin de permettre l vacuation du condensat de l unit 6 Une fois que la mousse de mont...

Page 25: ...2 L ensemble de montage MK2 DV160 est con u pour le montage de l unit DV160 Il peut tre command s par ment L ensemble de montage MK2 DV160 comprend Conduites d air de plastique de 125 mm 5 po 500 mm 1...

Page 26: ...ommutateur de vitesse m canique P3 1 300 Connectez les l ments ex cutifs conform ment au diagramme de c blage la page 12 et ins rez les dans la bo te de jonctions Fixez les l ments ex cutifs avec deux...

Page 27: ...4 Marron N N L L Haute Moyenne Faible Jaune Vert Blanc Marron Haute Moyenne Faible Jaune Vert Blanc Tension d alimentation 110 240 V Courant de sortie 1A N N L L D BRANCHEZ L UNIT DU R SEAU LECTRIQUE...

Page 28: ...NTRETIEN DISCONNECT THE UNIT FROM POWER SUPPLY BEFORE ANY MAINTENANCE OPERATION WITH THE UNIT AVERTISSEMENT On recommande d effectuer la maintenance de l unit de trois quatre fois par an L entretien d...

Page 29: ...rature de l air ext rieur basse Le filtre d extraction est bouch Nettoyez ou remplacez le filtre d extraction L changeur de chaleur est gel V rifiez l changeur de chaleur pour d tecter la pr sence de...

Page 30: ...x articles suivants Dommage ou perte caus par une calamit naturelle telle qu une incendie un tremblement de terre une inondation la foudre un orage lectrique etc Dommage ou perte r sultant d une utili...

Reviews: