background image

10

V1.0

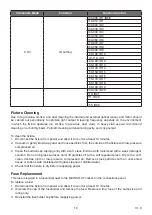
4 Channels Mode

Function

Function Control

CH4

ID setting

000-009: ID1-ID66

010-019: ID1

020-029: ID2

030-039: ID3

040-049: ID4

050-059: ID5

060-069: ID6

070-079: ID7

080-089: ID8

090-099: ID9

100-109: ID10

110-119: ID11

120-129: ID12

130-139: ID13

140-149: ID14

150-159: ID15

160-169: ID16

170-179: ID17

180-189: ID18

190-199: ID19

200-209: ID20

210: ID21

211: ID22

...

255: ID66

Fixture Cleaning

Due to fog residue, smoke, and dust cleaning the internal and external optical lenses and mirror should 

be carried out periodically to optimize light output. Cleaning frequency depends on the environment 

in which the fixture operates (I.e. smoke, fog residue, dust, dew). In heavy club use we recommend 

cleaning on a monthly basis. Periodic cleaning will ensure longevity, and crisp output.

To clean the fixture:

1. 

Disconnect the fixture from power and allow it to cool for at least 10 minutes.

2. 

Vacuum or gently blow away dust and loose particles from the outside of the fixture with low-pressure 

compressed air.

3.  Clean the surfaces by wiping gently with a soft, clean lint-free cloth moistened with a weak detergent 

solution. Do not rub glass surfaces hard: lift particles off with a soft repeated press. Dry with a soft, 

clean, lint-free cloth or low-pressure compressed air. Remove stuck particles with an unscented 

tissue or cotton swab moistened with glass cleaner or distilled water.

4. 

Check that the fixture is dry before reapplying power.

Fuse Replacement

This fuse is located in a fuseholder next to the MAINS OUT socket on the connections panel.

To replace a fuse:

1. 

Disconnect the fixture from power and allow it to cool for at least 10 minutes.

2. 

Unscrew the cap of the fuseholder and remove the fuse. Replace with a fuse of the same size and 

rating only.

3.  Reinstall the fuseholder cap before reapplying power.

Summary of Contents for FR-40W

Page 1: ...USER MANUAL FR 40W Warm White Super Compact LED Fresnel...

Page 2: ...ng the fixture on a truss 5 Securing with a safety cable 5 DMX 512 connection connection between fixtures 5 Power connection 6 Operation 6 Addressing 7 Universal DMX Control 7 Rotary control 7 Zoom 8...

Page 3: ...f the housing can become hot during operation After use wait for a cool down period of at least 10 minutes before handling or transporting the device Every person involved with the installation operat...

Page 4: ...esigned for indoor use only and must be used in a dry location with adequate ventilation Ensure that none of the fixture s ventilation slots are blocked Fasten the fixture to a secure structure or sur...

Page 5: ...ord To clamp the fixture to a truss 1 Check that the rigging structure can support at least 10 times the weight of all fixtures and equipment to be installed on it 2 Block access under the work area 3...

Page 6: ...n of the digital control signal by electrical noise The DMX terminator is simply an XLR plug with a 120 resistor connected between pins 2 and 3 which is then plugged into the output XLR socket of the...

Page 7: ...unit will start to listen to the channel number you have set based on the quantity of control channels of the unit That means changing the settings of one channel will affect only the selected fixtur...

Page 8: ...MENU OPERATION Addr d001 d512 RDM DMX address CHnL 1CH Channel mode 2CH 3CH 4CH Strb S 01 s 20 Strobe with spead increasing uL u 000 u 255 Key control of dimmer UOL 000 255 Rotary control of dimmer n...

Page 9: ...dimmer CH2 Strobe 000 255 strobe with speed increasing CH3 Dimmer mode 000 255 Dimmer speed 0 no delay 000 255 Dimmer speed 1 000 255 Dimmer speed 2 000 255 Dimmer speed 3 000 255 Dimmer speed 4 slow...

Page 10: ...ct the fixture from power and allow it to cool for at least 10 minutes 2 Vacuum or gently blow away dust and loose particles from the outside of the fixture with low pressure compressed air 3 Clean th...

Page 11: ...LED Color temperature 3200 K LED life expectancy 50 000 Hrs CRI 97 R9 90 TLCI 98 Manual zoom Zoom range 25 to 90 manual Light output 14 000 Lux 1m 25 5 Dimmer curves Strobe Video flicker free PMMA po...

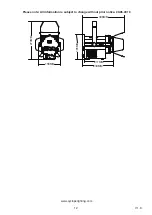
Page 12: ...12 V1 0 Please note All information is subject to change without prior notice 20 06 2018 156MM 211MM 306MM 230MM 279MM 185MM www cyclopslighting com...

Reviews: