background image

Cygnus UW-TSR Operation Manual 

M4-CYG1UW-TSR-M-ENG_Iss11.docx 


76 

17.


Topside Repeater Electrical Connections 

Cygnus UNDERWATER Gauge to Topside Repeater Display 
Unit 

Impulse Connector 

IE-LPMIL-4-MP 

(Gauge End) 

Topside Repeater 

Lemo 1 

(Topside) 

Signal 

Pin 1 (black) 

No Connection 

Pin 2 (white) 

Pin 3 (yellow) 

RS-422 : TX-  

Pin 3 (red) 

Pin 1 (grey) 

GND 

Pin 4 (green) 

Pin 2 (green) 

RS-422 : TX+ 

Cygnus UNDERWATER Gauge to USB-485 to Computer 
(CygLink) 

RS-422 input signal connections to the USB-485 converter are 
made using a 9 way D-sub plug, shown below: 


RS-422 Connections to Converter 


Impulse Connector 

IE-LPMIL-4-MP 

(Gauge End) 

RS-422 Converter 

9 way D-sub Plug 

(Topside) 

Signal 

Pin 1 (black) 

No Connection 

Pin 2 (white) 

Pin 2 (yellow) 

RS-422 : A (TX-) 

Pin 3 (red) 

Pin 4 

Shield (GND) 

Pin 4 (green) 

Pin 7 (green) 

RS-422 : B (TX+) 

TXB 
TXA 

120 Ω


Termination 

Resistor 

Summary of Contents for UW-TSR

Page 1: ...Cygnus UNDERWATER and Topside Repeater Systems Operation Manual and Accessories List Doc No M4 CYG1UW TSR M ENG_Iss11 docx August 2019 Mk4 Cygnus UW Gauges ...

Page 2: ...he Probe and Nosecone 16 Removing the Nosecone 16 Replacing the O Ring Seals 17 Checking the O rings 19 Lanyard 20 4 Gauge Operation 21 Gauge Controls 21 Turning the Gauge On 22 Turning the Gauge Off 22 Automatic Power Off 22 Taking a Thickness Measurement 23 Echo Strength Indicators 23 Battery Life 25 Low Battery Warning 25 Charging the Batteries 26 5 Topside Repeater Facility 28 6 Using the Tops...

Page 3: ...ings 37 Status Bar 37 Surveys 38 Creating a new Survey 38 Opening an Existing Survey 39 Editing the Survey Info 39 Managing the Survey 40 Sorting Survey Records 40 Viewing Record Information 40 Ref and Min Thickness 41 Protection State 42 Measurement Summary Stats 42 Logging Measurements in CygLink 43 Logging Measurements 43 Grouping Measurements in Survey Records 43 Viewing Thickness Measurements...

Page 4: ...ating to a known thickness Single Point 63 Setting the Velocity of Sound 64 Measurement Units 65 Resolution Setting 66 Automatic Probe Frequency Setting 67 12 General Points on Thickness Gauging 68 13 Troubleshooting 69 The Gauge will not Switch On 69 Difficulty obtaining a Reading 69 If Readings are Erratic or Unstable 69 14 The 4 Point Check 71 15 Care and Servicing 72 Cleaning the Gauge 72 O Ri...

Page 5: ...WATER Probes with 1 metre Lead 82 Probe Spares and Membranes 82 Cables and Leads 83 Electronic Bodies Only 83 Batteries and Chargers 84 Miscellaneous Spares 84 Carry Case 84 21 Topside Repeater Upgrade Options 85 Add Option A or B to a Cygnus UNDERWATER Gauge with Impulse Socket 85 22 Recycling and Disposal EC Countries 87 23 Warranty Information 88 24 Pressure Test Statement 89 25 Index 90 ...

Page 6: ...eading of this manual proper transducer selection correct zeroing of the transducer correct sound velocity correct use of the appropriate test blocks proper cable length and proper couplant selection all play a factor in successful ultrasonic thickness gauging Of critical importance is the process of complete and accurate calibration of the instrument This manual will provide instructions in the s...

Page 7: ...as a side mounted red LED display which can easily be read in low light situations Crystal controlled Calibration provides stability and accuracy The gauge can easily be calibrated to a known thickness or to a known Velocity of Sound Velocity of Sound is displayed in either m s or in μs depending on the current selection for Measurement Units The Top Side Repeater TSR facility allows the thickness...

Page 8: ...s UW TSR Operation Manual M4 CYG1UW TSR M ENG_Iss11 docx 8 Although designed for ease of operation first time users should carefully read this manual to familiarise themselves with the features of the Gauge ...

Page 9: ...urface as the ultrasonic energy reverberates up and down within the metal shown on the left Each time an echo is reflected back down a small portion of the energy comes up through the coatings e1 e2 and e3 and is detected by the Probe which acts as a receiver The delay between echoes at the Probe face t2 and t3 is exactly equal to the time taken to pass through the metal twice therefore coatings s...

Page 10: ...Cygnus UW TSR Operation Manual M4 CYG1UW TSR M ENG_Iss11 docx 10 echoes provide a reliable method of signal verification This process is referred to as Triple Echo Verification ...

Page 11: ...ince been the standard required to ensure that accurate measurements are taken without the need to zero the Gauge or remove any coatings first Our philosophy is to work closely our customers to provide high quality products engineered to serve heavy industry harsh environments Cygnus Ultrasonic thickness gauges are designed to be reliable and simple to use We have an unrivalled reputation in over ...

Page 12: ...nyard Molykote Tommy Bar 3 Two Rechargeable NiMH Battery Packs 4 Battery Charger and Leads 5 Probe for Cygnus UNDERWATER supplied as nosecone assembly with 1 m cable 6 Membrane Couplant 7 Accessories Spare O Rings Spare Membranes Membrane Locking Ring Key 15 mm Test block Torque Tommy bar Calibration Jumper Lead The Operating Manual and Documentation is attached in the lid of the case ...

Page 13: ...pgrade Kit A Cygnus Topside Repeater TSR Display In addition to the main kit the following items are included 1 Cygnus Topside Repeater Display unit 2 Umbilical cable a Impulse connector for Gauge connection b Lemo connection for Topside Repeater Display unit 1 a b 2 ...

Page 14: ... M4 CYG1UW TSR M ENG_Iss11 docx 14 Upgrade Kit B CygLink Software In addition to the main kit the following items are included 1 CygLink Software Driver Installation CD or USB flash drive 2 Umbilical cable 3 USB 485 Converter 2 1 3 ...

Page 15: ...nd you are ready to take thickness measurements Fitting the Battery Pack The Gauge is supplied with two rechargeable NiMH battery packs which are screwed onto the gauge body by hand Do not over tighten the battery packs hand tight is sufficient When the battery pack is correctly fitted there should be no gap between the battery pack and gauge body Correctly Fitted Incorrectly Fitted When changing ...

Page 16: ...Gauge body tighten only by hand ensuring there is no gap between the nosecone and Gauge DO NOT use the Tommy Bar to tighten the nosecone Correctly Fitted Incorrectly Fitted Removing the Nosecone The nosecone can be difficult to remove when the O rings have been compressed so a Tommy Bar is supplied with the kit to allow extra leverage to be applied to break the seal Fit the Tommy Bar into the hole...

Page 17: ...t the different O rings are marked A B C D B and D are the same A O rings 1 pack of 10 B D O rings 2 packs of 10 C O rings 1 pack of 10 1 Remove the old O rings and destroy them Do not use a sharp instrument to remove the O rings as damage to the sealing area may occur 2 Clean the O ring locations removing all grease and dirt 3 Pre lubricate the new O rings with Molykote grease 4 Gently fit the ne...

Page 18: ... Battery End O ring Location Molykote Grease Nosecone O ring Location Gauge Nosecone End O ring Location Correct Location of O rings Be careful not to fit the A O ring in the wrong position this is a common mistake that will cause incorrect gauge operation B A Wrong ...

Page 19: ...t of a new job Replace the O rings after every 2 3 dives Check the O rings whenever you remove the battery Check the O rings whenever you remove the nosecone Always lubricate the O rings with Molykote Do not use old or damaged O rings Never use the Gauge without any O rings fitted Spare O rings are included in the Kit and can be ordered from Cygnus Instruments see page 11 for contact details Thing...

Page 20: ...a diver s belt The small screw locking gate should be attached to the battery pack D ring the other two larger carabiners can then be attached to a belt One has a screw gate for secure attachment to a belt the other a snap gate for quick repositioning of the gauge during use Lanyard Attachments Secure attachment to belt On off attachment to belt ...

Page 21: ...ing Manual 21 4 Gauge Operation Gauge Controls Power On Off Switch LED Display Nosecone Attachment SET CAL CAL Buttons view from below battery removed Battery Connection Impulse connector for connection to an umbilical cable for Topside Repeater display ...

Page 22: ...e hardware version is displayed 5 The probe frequency is displayed 6 The velocity of sound is displayed 7 The Gauge type is displayed 8 The Gauge is ready to use Turning the Gauge Off 1 Press the Power button forward briefly 2 The display scrolls shutoff and the Gauge turns off Automatic Power Off The Gauge will turn off automatically 5 minutes after the last thickness measurement was taken ...

Page 23: ...n the prepared test surface and make firm contact applying gentle pressure 4 The Gauge will display a thickness measurement or an indication of Echo Strength if no valid measurement has been found Echo Strength Indicators Should the Gauge be unable to detect a stable multiple echo signal it displays an Echo Strength indication to help the operator locate a suitable position 1 1 Bar Flashing No ech...

Page 24: ...operator should continue to move the probe around to locate a suitable reflector using a slight rocking motion Note When using the gauge underwater the ultrasound will travel through the water and can get reflected back to the gauge by nearby surfaces causing the echo strength bars to increase this is normal ...

Page 25: ...ed that you always fit a recharged battery pack at the start of each dive session Low Battery Warning The Gauge will periodically flash a Low Battery warning message when the batteries are getting low You may still be able to continue taking measurements for about hour When the batteries are discharged the Gauge will flash the low battery warning for 5 seconds then turn of automatically E F E F 20...

Page 26: ... the cells before charging the batteries can be topped up after use To charge the batteries simply connect the battery to the charger then plug in and turn on the power The charger requires an AC power source of 100 to 240 V AC 50 to 60 Hz 0 35 A There is a charge indicator lamp on the top of the charger to show the state of the charge cycle Charge Indicator Meaning Yellow Battery Pre charge Analy...

Page 27: ...M4 CYG1UW TSR M ENG_Iss11 docx Cygnus UW TSR Operating Manual 27 The charger is designed for indoor use only and should not be exposed to water or dust ...

Page 28: ...Topside Repeater Display Option A 2 Using a computer with CygLink software Option B 3 Using both of the above Option C Option C uses a special Y splitter cable To get the thickness measurements topside the gauge sends packets of serial data using an RS 422 interface The RS 422 is a simplex differential signal transmitted along a single twisted pair The maximum cable length is 1 200 metres 4 000 ft...

Page 29: ...play that mimics the display of the Cygnus UNDERWATER gauge It connects directly to the Cygnus UNDERWATER gauge via a single pair umbilical cable Mk4 Cygnus Topside Repeater Turning the Unit On 1 Press the red ON button 2 The Cygnus Logo screen appears 3 If not connected to a CygnusUNDERWATER Gauge the display shows NO CONNECTION This is normal it just means no data has being received yet ...

Page 30: ...oes not change the units shown on the thickness gauge itself Display Hold Function The middle key HOLD can be used to freeze the display and thus hold the current thickness measurement Press the middle key again to release the HOLD function Automatic Display Backlight The display backlight automatically turns off in bright light conditions it will automatically turn on when the ambient light level...

Page 31: ...The Impulse plug on the umbilical plugs into the Impulse socket on the UNDERWATER gauge Secure the plug with the rubber strap Testing the Link Before use on a dive it is recommended to test the link between the Cygnus UNDERWATER Gauge and the Topside Repeater Display unit To do this simply power on both the display and the gauge then measure the test block the Topside Repeater Display should displ...

Page 32: ...shooting Error Messages 1 NO CONNECTION The Topside Repeater Display has not received any valid data since power up Check that the Cygnus UNDERWATER Gauge is turned on and displaying either a measurement or the echo strength bar chart Check all cable connections are secure ...

Page 33: ...ging of thickness measurements into a Survey report 3 Create a PDF report of a survey 4 Export data from the survey to a CSV file Kit Contents The CygLink kit comprises of the following items 1 USB RS485 Converter Cable 2 CygLink Software Installer on USB Flash Drive You will also need an Umbilical cable and connectors to connect the Cygnus UNDERWATER gauge to the top side Cygnus can supply the co...

Page 34: ...u want to make sure you are installing the latest version then downloading from the website is the best route Requirements To install and run CygLink the computer must 1 Be running Windows 7 or a newer version 2 Have sufficient resources for Microsoft NET Framework installation 3 We recommend a screen resolution of 1280 x 720 or greater 4 We recommend at least 1GB of memory UW Gauge Umbilical Cabl...

Page 35: ... You will need to agree to the license terms and conditions There are no options to select so installation is straight forward Running CygLink Application Once installed CygLink will place shortcuts in the start menu and on the desktop Click either shortcut to start CygLink Connecting to the Gauge First time USB Connection When you first connect the gauge to the computers USB port Windows will sea...

Page 36: ...r new Gauge and Connect 4 CygLink will search all the available Com ports listening for a Cygnus gauge If a gauge is detected then it will connect and save these settings for next time 5 When connected you should see details of the gauge in the status bar at the bottom and Connected 6 If the connection is ever lost the status bar will show Lost Connection Connecting to the Gauge Afterwards ...

Page 37: ...he menu Connect Disconnect from Gauge Manual Connection Settings If you need to manually set the connection settings then select the Connection Settings option from the Connect menu here you can specify the COM Port number gauge type and baud rate Status Bar At the bottom of the CygLink screen is the Status Bar it shows information about the gauge and the connection Status Bar From left to right 1...

Page 38: ...ents A Survey can be saved to a single file which can be copied or send electronically to another CygLink user The Survey file is binary and cannot be tampered with Creating a new Survey You don t have to create a Survey but it does create the container for any measurements that you log from the gauge If you intend to save the records logged then you will need to create a survey file anyway ...

Page 39: ...tion This information will appear on the PDF report and the export to CSV file output 3 You can save your new Survey to a file from the Menu click File Save Survey Entering your filename and location Opening an Existing Survey 1 From the Menu click File Open Survey 2 You may be prompted to save any unsaved data first Editing the Survey Info 1 From the Menu click File Edit Survey Info ...

Page 40: ... Clicking the column header a second time will toggle between an ascending or descending sort Survey Records List Survey list columns that can be sorted Name ascending or descending Points ascending or descending Type Date ascending or descending Viewing Record Information You can view the details of a record by right clicking on the record in the list which will display a context menu select the ...

Page 41: ... in this screen the Details table is read only and contains details about the record and summary information about its measurements Ref and Min Thickness You can set and apply a Reference and Minimum thickness value for the record click the Apply button to apply this values to the measurement points in the record ...

Page 42: ...ected it will prevent users from editing the measurement points or deleting them Measurement Summary Stats If you scroll down the Details table you will see summary information about the measurements contained in the records Record Properties Screen Stats 2 This information will appear on the PDF report and the export to CSV file output ...

Page 43: ...ere is no limit to the amount of measurements that can be added to each Group Topside Thickness Measurement and Log Button Grouping Measurements in Survey Records If you need to organise your measurements into separate groups then you can create separate Survey Records for each group of measurements From the menu click File New Survey Record you can then select this new Record and begin logging in...

Page 44: ...s UW TSR Operation Manual M4 CYG1UW TSR M ENG_Iss11 docx 44 Record and Measurements Tab Managing Measurements You can right click a selected measurement to display the context menu Measurements Context Menu ...

Page 45: ...formation about the measurement or display it s A Scan graph if it has one Note there is no undo function once deleted the measurement point is lost unless you have saved a copy of the survey or the record is still saved on the gauge Viewing Measurement Information Clicking Properties from the context menu will display the measurement properties screen ...

Page 46: ...omments to Measurements You can add comments to a measurement point using the measurement properties screen The Notes field can be directly typed into or you can click the Add From Comments button to select a comment from the pre defined list Comments will appear next to the measurement in the PDF report ...

Page 47: ...ust select the required comments in the list and click Ok Measurement Comment List The Measurement Comment List is a list of 8 pre set text comments that can be added to data logged measurement points 1 From the Menu click File Measurement Comments 2 You can then Add Edit or Remove the entries in the comment list ...

Page 48: ...urvey Records and thickness measurements in the Survey grouped by each Survey Records Once the export process is complete your report will automatically be displayed in your installed PDF viewer The export may take a few seconds depending on the number of measurements contained in the survey 1 From the Menu click File Create Survey Report PDF ...

Page 49: ...e may be suggested you can continue with the filename or type your own as required 4 The report is then created and will open in your PDF viewer 5 The PDF report is arranged into the following sections Title Page Survey Details Page Survey Record details and measurements for each survey Appendix of all the A Scan Graphs Appendix of all the B Scan Graphs ...

Page 50: ... data from the whole survey to a CSV3 file that can be opened with a spreadsheet such as Microsoft Excel An example of a CSV export opened in Excel is shown below 1 From the Menu click File Export Survey to CSV File 2 A filename may be suggested you can continue with the filename or type your own as required 3 CSV Comma Spaced Variable ...

Page 51: ...ber you can set in manually from the File Communications Options menu item Just tick the Manual Setup box and select the correct COM port number Finding your COM Port Number With the USB RS485 Converter plugged into your computer open Windows Device Manager to do this press the Windows key and the R key together then type devmgmt msc into the prompt followed by enter key In the Ports section look ...

Page 52: ...n a variety of factors Windows may sometimes assign a COM Port number that is too high or unusual to be easily remembered You may change the number assigned to the port by following these steps Opening Device Manager Each version of Windows has a slightly different procedure for opening Device Manager The most direct route is to press R type devmgmt msc and press Enter 1 Select the USB Serial Port...

Page 53: ...1 docx Cygnus UW TSR Operating Manual 53 2 On the Properties form select the Port Settings tab then click the Advanced button 3 On the Advanced Settings form you can change the COM Port number Finish by clicking the OK button ...

Page 54: ...Cygnus UW TSR Operation Manual M4 CYG1UW TSR M ENG_Iss11 docx 54 ...

Page 55: ... this into Google search KK SYSTEMS USB232 Or follow this link directly to the KK Systems website http www kksystems com english html_files software htm Follow the instructions for USB232 Windows Drivers Wiring Problems Sometimes the cable between the Cygnus UNDERWATER gauge and the USB converter is damaged or has been repaired incorrectly Although there are only 2 data wires they must be connecte...

Page 56: ...the Cygnus UNDERWATER gauge to the USB 485 converter module 2 Remove the Impulse blanking plug from the Cygnus UNDERWATER gauge 3 The Impulse plug on the umbilical plugs into the Impulse socket on the Cygnus UNDERWATER gauge Secure the plug with the rubber strap For details of the Electrical Connections see page 76 Topside Repeater Electrical Connections ...

Page 57: ... membrane regularly as it is important the membrane is changed as soon as it shows any signs of wear Probe Selection Apart from the physical limitation of the probe size the diameter of the probe face crystal and the frequency affects the probe performance generally Large diameter probes produce more energy which gives better performance on heavily corroded or coated materials Higher Frequency pro...

Page 58: ...membrane into the end of the Knurled Ring ensuring it locates in the groove 4 Screw the Locking Ring back inside the Knurled Ring and tighten with the Locking Ring Key 5 Place a few drops of Membrane Couplant on to the probe face 6 Screw the Knurled Ring back onto the probe Use your thumb to squeeze the couplant from under the membrane as you tighten the Knurled Ring down 7 You should see the memb...

Page 59: ...es this Probe ideal for measuring small bore tubing thin section plate and other areas where access is limited 13 mm inch 5 MHz 1 0 50 mm 0 04 2 inch Ideal for thin sections without heavy corrosion Lower frequency probes offer better penetration on heavy corrosion coatings Probe Frequency Identification The frequency of Cygnus probes is indicated by colour Old Style Probes Inox Remote Probes Colou...

Page 60: ...Cygnus UW TSR Operation Manual M4 CYG1UW TSR M ENG_Iss11 docx 60 10 Gauge Setup Gauge Menu Diagram SET CAL CAL CAL CAL CAL CAL CAL CAL SET SET SET SET SET SET SET ...

Page 61: ...Battery during Setup To provide access to the setup buttons connect the battery pack to the gauge body using the calibration jumper lead supplied with the kit Connect this lead from the battery to the connection at the battery end of the gauge as shown below Calibration Jumper Lead ...

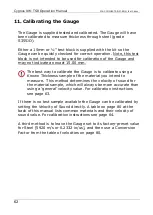
Page 62: ... calibrate using a Known Thickness sample of the material you intend to measure This method determines the velocity of sound for the material sample which will always be more accurate than using a general velocity value For calibration instructions see page 63 If there is no test sample available the Gauge can be calibrated by setting the Velocity of Sound directly A table on page 80 at the back o...

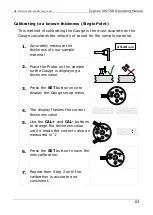
Page 63: ...curately measure the thickness of your sample material 2 Place the Probe on the sample so the Gauge is displaying a thickness value 3 Press the SET button once to display the Gauge setup menu 4 The display flashes the current thickness value 5 Use the CAL and CAL buttons to change the thickness value until it reads the correct value as measured in 1 6 Press the SET button to save the new calibrati...

Page 64: ... triple echo time A table at the back of this manual lists velocity of sound values on page 80 for common materials 1 Ensure the probe is not touching anything so the Gauge is not displaying a thickness value 2 Press the SET button once to display the Gauge setup menu 3 The display flashes the current Velocity of Sound value 4 Use the CAL and CAL buttons to change the value 5 Press the SET button ...

Page 65: ...c mm or Imperial inch Changing the measurement units will not affect the calibration 1 Press the SET button 2 times to enter the Gauge setup menu and display the Measurement Units 2 The display flashes the current Measurement Unit value 3 Use the CAL and CAL buttons to change between the two unit settings Note Euro mm 4 Press the SET button to save the new Measurement Units x 2 ...

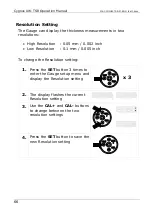
Page 66: ... High Resolution 0 05 mm 0 002 inch Low Resolution 0 1 mm 0 005 inch To change the Resolution setting 1 Press the SET button 3 times to enter the Gauge setup menu and display the Resolution setting 2 The display flashes the current Resolution setting 3 Use the CAL and CAL buttons to change between the two resolution settings 4 Press the SET button to save the new Resolution setting x 3 ...

Page 67: ... Setting The Gauge will automatically detect the frequency of the probe connected and set the Gauge accordingly When a probe of a different frequency is connected the display will briefly show the new probe frequency detected Probe Connected Display 2 25 MHz Probe 3 5 MHz Probe 5 0 MHz Probe ...

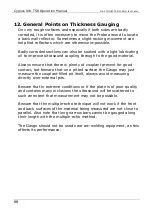
Page 68: ...is plenty of couplant present for good contact but beware that on a pitted surface the Gauge may just measure the couplant filled pit itself always avoid measuring directly over external pits Beware that in extreme conditions or if the plate is of poor quality and contains many inclusions the ultrasound will be scattered to such an extent that measurement may not be possible Beware that the multip...

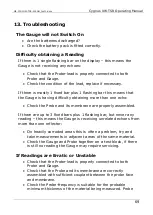
Page 69: ... the Probe and its membrane are properly assembled If there are up to 3 fixed bars plus 1 flashing bar but never any reading this means the Gauge is receiving unrelated echoes from more than one reflector On heavily corroded areas this is often a problem try and take measurements in adjacent areas of the same material Check the Gauge and Probe together on a test block if there is still no reading ...

Page 70: ...Cygnus UW TSR Operation Manual M4 CYG1UW TSR M ENG_Iss11 docx 70 frequencies which are too low cause doubling and tripling of the actual thickness ...

Page 71: ...the Probe on Page 16 3 Is there adequate couplant applied to the material being measured and is the surface properly prepared Check there is plenty of couplant gel applied and there are no air gaps between the Probe and the material when measuring in air See Taking a Thickness Measurement on Page 23 4 Is the material measurable at all Are the front and back faces of the material parallel Is the ma...

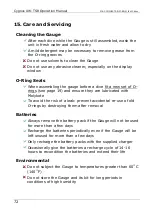
Page 72: ...nd ensure they are lubricated with Molykote To avoid the risk of a leak prevent accidental re use of old O rings by destroying them after removal Batteries Always remove the battery pack if the Gauge will not be used for more than a few days Recharge the batteries periodically even if the Gauge will be left unused for more than a few days Only recharge the battery packs with the supplied charger O...

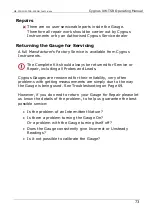
Page 73: ...ce or Repair including all Probes and Leads Cygnus Gauges are renowned for their reliability very often problems with getting measurements are simply due to the way the Gauge is being used See Troubleshooting on Page 69 However if you do need to return your Gauge for Repair please let us know the details of the problem to help us guarantee the best possible service Is the problem of an Intermitten...

Page 74: ...cation Batt flashed on Display PRF 602 Hz Monitor Outputs N A Through Coating Measurements Coatings up to 6 mm thick as standard Coatings up to 20 mm thick in Deep Coat5 mode Materials Sound Velocity from 2000 m s to 7000 m s 0 0800 in uS to 0 2780 in uS Measurement Range Measurement Ranges in Steel 2 MHz probe 3 mm to 250 mm 0 120 in to 10 00 in 3 MHz probe 2 mm to 150 mm 0 080 in to 6 000 in 5 M...

Page 75: ...utput and Storage Optional RS422 serial data output to top side repeater unit or computer can only be factory fitted from new Calibration setting storage Calibration data stored in non volatile Eeprom memory Calibration Mechanisms N A Multiple Echo Gauge Display Recall Facilities N A Display Response Time 500 ms Printer Output N A Environmental Rating IP68 Rated to 300m 984 ft continuous immersion...

Page 76: ...Pin 3 red Pin 1 grey GND Pin 4 green Pin 2 green RS 422 TX Cygnus UNDERWATER Gauge to USB 485 to Computer CygLink RS 422 input signal connections to the USB 485 converter are made using a 9 way D sub plug shown below RS 422 Connections to Converter Impulse Connector IE LPMIL 4 MP Gauge End RS 422 Converter 9 way D sub Plug Topside Signal Pin 1 black No Connection Pin 2 white Pin 2 yellow RS 422 A ...

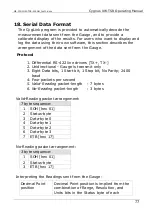
Page 77: ... TX TX 2 Unidirectional Gauge is transmit only 3 Eight Data bits 1 Start bit 1 Stop bit No Parity 2400 baud 4 Four packets per second 5 Valid Reading packet length 7 bytes 6 No Reading packet length 3 bytes Valid Reading packet arrangement 7 byte sequence 1 SOH hex 01 2 Status byte 3 Data byte 0 4 Data byte 1 5 Data byte 2 6 Data byte 3 7 ETB hex 17 No Reading packet arrangement 3 byte sequence 1 ...

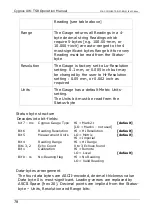
Page 78: ...as a default Metric Units setting The Units bit must be read from the Status byte Status byte structure Decodes into bit fields bit 7 ms Cygnus Gauge Type HI Mark2 default LO Mark1 not used Bit 6 Reading Resolution HI Hi Resolution default Bit 5 Measurement Units LO Metric default HI Imperial Bit 4 Reading Range HI Hi Range Bits 3 2 Echo Count 0 to 3 Echoes found Bit 1 Calibration HI Remote LO Loc...

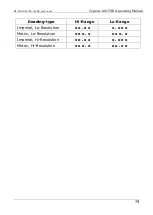
Page 79: ...11 docx Cygnus UW TSR Operating Manual 79 Reading type Hi Range Lo Range Imperial Lo Resolution x x x x x x x x Metric Lo Resolution x x x x x x x x Imperial Hi Resolution x x x x x x x x Metric Hi Resolution x x x x x x x x ...

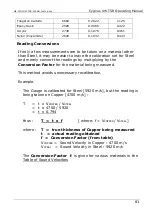
Page 80: ... velocity cl Material Velocity of Sound V Conversion Factor f m s in us Aluminium alloyed 6380 0 2512 1 078 Aluminium 2014 6320 0 2488 1 068 Aluminium 2024 T4 6370 0 2508 1 076 Aluminium 2117 T4 6500 0 2559 1 098 Brass CuZn40 4400 0 1732 0 743 Brass Naval 4330 0 1705 0 731 Brass CuZn30 4700 0 1850 0 794 Copper 4700 5000 0 1850 0 1969 0 794 0 845 Grey Cast Iron 4600 0 1811 0 777 Inconel 5700 0 2244...

Page 81: ...by multiplying by the Conversion Factor for the material being measured This method avoids unnecessary recalibration Example The Gauge is calibrated for Steel 5920 m s but the reading is being taken on Copper 4700 m s T t x VCOPPER VSTEEL t x 4700 5920 t x 0 794 thus T t x f where f VCOPPER VSTEEL where T true thickness of Copper being measured t actual reading obtained f Conversion Factor from ta...

Page 82: ...1 9343 Probe S5A 5 0MHz 6mm 1 4 for Cygnus Underwater 001 9342 Probe S5C 5 0MHz 13mm 1 2 for Cygnus Underwater 001 9320 Fixed Head Probe 2 25MHz 13mm 1 2 for Cygnus Underwater Lower frequency probes offer better penetration on heavy corrosion coatings Please refer to page 59for correct probe selection Probe Spares and Membranes Polyurethane Membranes are for normal use on surface temperatures up t...

Page 83: ... 2 Ultrasonic Couplant Gel 100 ml Cables and Leads Part No Description 001 0410 Calibration Jumper Lead for Cygnus 1 IS UW HD Gauges 001 0413 Cygnus UW Impulse to Topside PC 9D Umbilical cable 001 0414 Cygnus UW Impulse to Topside Repeater Lemo Umbilical 001 0415 Umbilical cable for DIVE UW ROV to Topside per metre 001 0416 Topside Interface Cable A Lemo socket to B 9 way D plug 001 0417 Topside I...

Page 84: ... 4 EU Mains Plug Miscellaneous Spares Part No Description 001 2620 Nose Cone Torque Bar 001 4822 Lanyard for Cygnus UNDERWATER 001 4850 Steel Test Block 15 mm 001 4851 Steel Test Block 1 2 001 4852 Coated Test Block 001 4856 Carbon Steel Step Block 5 25 mm in 5 mm steps set in perspex 001 8308 Isolated Data Converter RS422 to RS232 Model K3 003 0422 RS232 to USB Serial interface cable 001 0419 Imp...

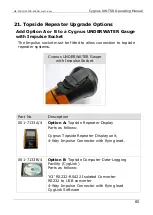
Page 85: ...opside repeater systems Cygnus UNDERWATER Gauge with Impulse Socket Part No Description 001 7133A 4 Option A Topside Repeater Display Parts as follows Cygnus Topside Repeater Display unit 4 Way Impulse Connector with flying lead 001 7133B 4 Option B Topside Computer Data Logging Facility CygLink Parts as follows K3 RS232 RS422 Isolated Converter RS232 to USB converter 4 Way Impulse Connector with ...

Page 86: ...Cygnus UW TSR Operation Manual M4 CYG1UW TSR M ENG_Iss11 docx 86 Please refer to page 28 for information on options A B and C ...

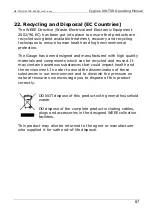
Page 87: ...h quality materials and components which can be recycled and reused It may contain hazardous substances that could impact health and the environment In order to avoid the dissemination of those substances in our environment and to diminish the pressure on natural resources we encourage you to dispose of this product correctly DO NOT dispose of this product with general household waste DO dispose o...

Page 88: ... to be performed or making any other claim under this warranty CYGNUS will not be liable under this warranty unless the total price for the Product was paid by the due date for payment 4 This warranty does not extend to any products which have been damaged as a result of accident misuse or abuse natural or personal disaster service modification or repair by anyone other than CYGNUS or an Authorise...

Page 89: ...docx Cygnus UW TSR Operating Manual 89 24 Pressure Test Statement All Cygnus UNDERWATER gauges are pressure tested in water as part of our test procedures Please refer to the environmental rating section for further information ...

Page 90: ...5 51 Drivers 35 Logging 43 Requirements 34 Deep Coating 74 Disposal 87 Echo Strength 23 Gauge Controls 21 Gauge Menu 60 Imperial 65 Impulse Connector 21 Lanyard 20 Metric 65 Nosecone Fitting 16 Removing 16 O Rings Checking 19 Molykote 18 Replacing 17 Pitted surface 68 Power button 22 Probes Frequency 67 Knurled Ring 58 Locking Ring Key 58 Membrane Couplant 58 Polyurethane Membrane Membrane 57 Sele...

Page 91: ...nus UW TSR Operating Manual 91 maximum cable length 28 Topside Repeater Upgrade Options 85 Triple Echo Verification 9 Troubleshooting 69 Umbilical Cable maximum cable length 28 Units 65 Unrelated echoes 69 Warranty 88 WEEE Directive 87 ...

Reviews: