
Rev.2 12-01-09
PAGE 1 / 6
L-1898
Thank you for purchasing this quality product. Be sure to check
all packing material carefully for small parts which may have come loose
in the carton during shipment. Separate, identify, and count all parts and
metal hardware. Compare with parts list to be sure all parts are present. If
any part (s) are missing or damaged, phone, fax, or mail to our Customer
Service Department. For efficient and speedy service, please indicate the
model number and code letter of part(s) needed.
IMPORTANT NOTES
-
THIS BUNK BED REQUIRES TWO PEOPLE TO ASSEMBLE.
-
READ CAREFULLY BEFORE ASSEMBLY TO PREVENT
DAMAGE TO PARTS.
-
TO PREVENT DAMAGE IN SHIPMENT, TOP AND BOTTOM
PANELS ARE PACKED ASSEMBLED. DISASSEMBLE AND
FOLLOW INSTRUCTIONS BELOW.
-
TO ASSEMBLE AS BUNK FOLLOW STEPS 1-7.
-
TO ASSEMBLE AS TWIN FOLLOW STEPS 8-9.
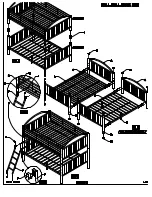
•BUNK BED ASSEMBLY•
Step 1-
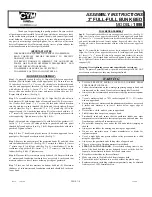
To assemble top bed (See Fig. 4). Align the (2) holes on upper deck
brackets (D) with bottom holes of end upper panel (A). Be sure to use the
19 tubes deck. Insert ¼” x 1” screws (K) thru holes in deck brackets and
into the end upper panel threaded (A) holes and loosely tighten. Repeat
with all sides. (See Fig. 1). Insert ¼” x 1 ½” screw (J) thru hole on safety
device, slide one washer (N) in screw and secure with one hex nut (O).
Repeat with all corners. (See Fig. 2).
Step 2-
To assemble lower bed (See Fig. 5). Align the (2) holes on lower
deck brackets (E) with bottom holes of lower end panel (B). Be sure to use
the 13 tubes deck. Insert ¼” x 1” screws (K) thru holes in deck brackets
into the end lower panel threaded (B) holes and loosely tighten. Repeat
with all sides.(See Fig. 1. Insert the ¾” x 1 ¾” plastic cap (M) in the
support leg end (G). Attach the support leg (G) to lower deck with two ¼”
x 1” screws (K) and secure with one hex nut (O) Repeat instructions with
other support leg. Tighten securely.(See Fig. 5 & 6).
Step 3-
Align top holes of upper panels (A) with holes of the guardrail (C).
Insert ¼” x 1” screws (K) through holes in guardrail and into panel
threaded holes and tighten. (See Fig. 3 & 4). Repeat instructions with other
guardrail. Tighten securely.
Step 4-
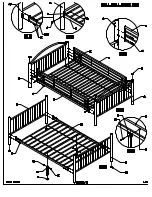
Place 3” double end plastic inserts (I) between upper and lower
panel posts. Put top bed over bottom bed. (See Fig. 7).
Step 5-
Remove the paper strips of the protection bands (P) and stick them
into the ladder brackets (F). (See Fig. 10). To attach the ladder (F), insert
1” plastic caps (L) in all four ends (See Fig. 8). Attach ladder (F) on the
crossbeam of upper deck (D). Insert ¼” x 1 ½” screws (J) thru holes in
ladder (See Fig. 8 &11). Tighten screws.
Step 6-
Place one full size mattress on top bed deck (D). Ensures thickness
of mattress and foundation combined does not exceed 8 inches and that
mattress surface is a least 5 inches below upper edge of guardrails.
Step 7-
Place one full size mattress on bottom bed deck (E). Maximum
thickness of twin mattress and foundation combined should be 8 inches on
lower bunk.
FULL BEDS ASSEMBLY
Step 8 -
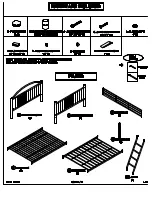
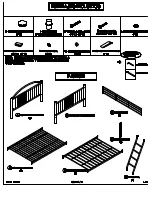
To assemble the headboard, use one upper end panel (A). (See Fig. 9).
Align the (2) holes of one upper deck brackets (E) with upper end panel holes
(A). Insert ¼” x 1” screws (K) thru holes in deck brackets (E) and into the upper
end panel threaded holes and loosely tighten. Repeat all sides. (See Fig.1).
Tighten all screws. Repeat instructions with the other bed (use one upper end
panel (D).
Step 9 –
To assemble the footboard, use one lower end panel (B). (See Fig. 9).
Align the (2) holes of one upper deck brackets (E) with upper end panel holes
(A). Insert ¼” x 1” screws (K) thru holes in upper deck brackets (E) into the
lower end panel (B) threaded holes and loosely tighten. Repeat all sides. (See
Fig.1). Tighten all screws. Repeat instructions with the other bed (use one upper
end panel (D).
Warning: Over tightening screws may cause threads to strip out.
NOTE: To preserve painted finish, wipe with a soft damp cloth. DO NOT
use cleaners or abrasives as they may damage the finish.
WARNING
•
TO HELP PREVENT SERIOUS OR FATAL INJURIES FROM
ENTRAPMENT OR FALLS:
•
Follow the information on the warnings appearing on upper bunk end
structure and on the carton. Do not remove warning label from bed.
•
Always use the recommended size mattress to help prevent entrapment
or falls.
•
Use only mattress which is: 74-75 inches long and 52 ½ – 53 ½ inches
wide on upper bunk.
•
Ensure thickness of mattress and foundation combined does not exceed
8 inches and mattress is at least 5 inches below upper edge of
guardrails.
•
Never allow a child under 6 years at upper bunk.
•
Prohibit more than one person on upper bunk.
•
Periodically check and ensure that the guardrails, ladder, and other
components are maintained in their proper position and condition, free
from damage, and that all connectors are tight.
•
Do not allow horseplay on or under the bed and prohibit jumping on
the bed.
•
Always use the ladder for entering and leaving the upper bunk.
•
Do not use substitute parts. Contact manufacturer or dealer for
replacement parts.
•
Use of a night light may provide added safety precaution for a child
using the upper bunk.
•
Always use the guardrails on both long sides of upper bunk.
•
The use of water sleep flotation mattress is prohibited.
•
STRANGULATION HAZARD
– Never attach or hang items to any
part of the bunk bed that are not designed for use with the bed; for
example, but not limited to, hooks, belts, and jump ropes.
•
Keep these instructions for future reference.
•
Make sure you use 19 spindles bed frame in upper deck.
•
To avoid the risk of injuries never use bed without top plastic caps.
•
Replacement parts, including replacement guardrails, may be obtained
from
any of our CYM Furniture dealers.
ASSEMBLY INSTRUCTIONS
3” FULL-FULL BUNK BED
MODEL
: 1898


