background image

56

2. EDID

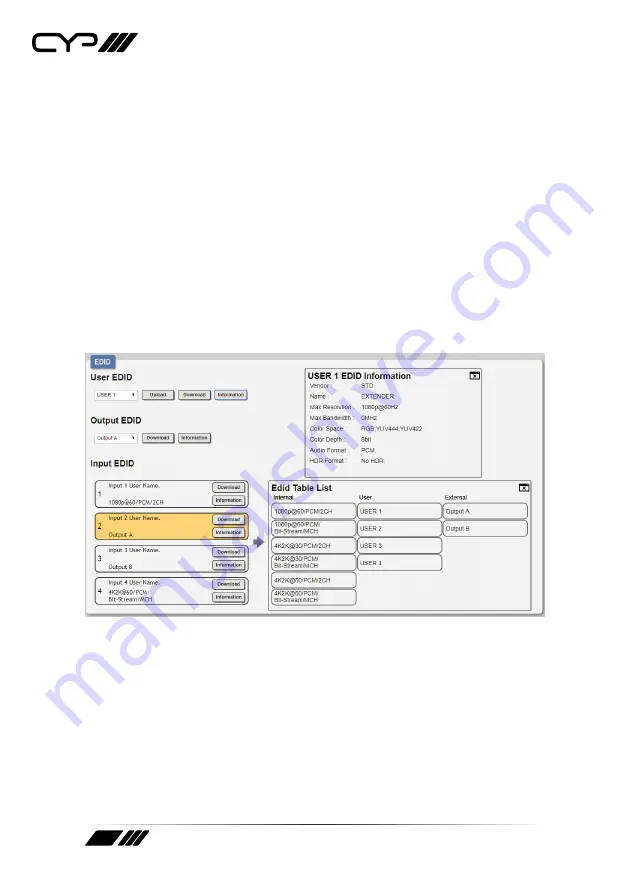
This collaboration Transmitter provides the option of six internal EDIDs, 

four customer uploaded EDIDs, and two sink sourced EDIDs that can 

be assigned to each input port individually. All EDIDs are available for 

download and saving to a PC. Important details from each EDID may also 

be displayed.
This tab allows for the assignment of an EDID to each individual input 

port, or to all inputs at once. Click as many of the Input EDID buttons on 

the left as desired and then select the preferred EDID from the buttons 

displayed on the right. The new EDID will become active immediately.

Note: In some rare cases it is possible for user or external EDIDs to cause 

compatibility issues with certain sources. If this happens, it is recommended 

to switch to one of the 6 internal EDIDs for maximum compatibility.

Summary of Contents for 5Play PUV-1650RX

Page 1: ...PUV 1650TX RX 5Play HDBaseT Transmitter Receiver with Scaling Control and Audio De embedding OPERATION MANUAL ...

Page 2: ......

Page 3: ...rves the right to make improvements to this document and or product at any time and without notice COPYRIGHT NOTICE No part of this document may be reproduced transmitted transcribed stored in a retrieval system or any of its part translated into any language or computer file in any form or by any means electronic mechanical magnetic optical chemical manual or otherwise without express written per...

Page 4: ...to this product Never push an object of any kind into this product through any openings or empty slots in the unit as you may damage parts inside the unit Do not attach the power supply cabling to building surfaces Use only the supplied power supply unit PSU Do not use the PSU if it is damaged Do not allow anything to rest on the power cabling or allow any weight to be placed upon it or any person...

Page 5: ...9 6 2 Transmitter s Front and Rear Panels 10 6 3 Receiver s Top Panel 11 6 4 Receiver s Front and Rear Panels 12 6 5 OSD Menu 14 6 6 IR Cable Pin Assignments 22 6 7 RS 232 Protocol 22 6 8 Telnet Control 23 6 9 WebGUI Control 52 7 Connection Diagram 74 8 Specifications 75 8 1 Technical Specifications 75 8 2 Video Specifications 78 8 3 Application Notes 87 9 Acronyms 88 ...

Page 6: ...Receiver can scale the HDBaseT video source or local HDMI input to match the connected display s resolution requirements The Transmitter also provides an interface for a remote control keypad or trigger interface which can be easily installed within a podium or within a table in a conference room or classroom This interface can allow the user to control a wide range of devices by activating single...

Page 7: ...Adaptor 1 Power Cord 1 Operation Manual 4 SYSTEM REQUIREMENTS HDMI and DisplayPort source equipment such as media players video game consoles or set top boxes VGA source equipment such as PCs laptops or set top boxes HDMI receiving equipment such as HDTVs monitors or audio amplifiers Analog audio receiving equipment such as headphones audio amplifiers or powered speakers The use of Premium High Sp...

Page 8: ...dependent Support for IR code learning as well as IR broadcasting Supports Telnet for both client and server functionality Control system supports defining up to 16 devices to simplify control and management of controlled devices within the system Integrated macro command lists support activating multiple events from a single button press up to 16 actions per macro Battery backed up RTC Real Time ...

Page 9: ...ntially switch through the available inputs The LED will illuminate GREEN to indicate which source is currently selected Live but unselected sources will be lit RED This unit supports a total of 4 sources 3 on the Tx 1 on the Rx The selection sequence is Tx VGA Tx HDMI Tx DP Rx HDMI Tx VGA Etc When the Rx s HDMI input is selected the Tx s local mirrored HDMI output will continue to display the las...

Page 10: ...nnect to the provided IR Extender to extend the IR control range of remotely located devices Ensure that the remote being used is within direct line of sight of the IR Extender 6 IR OUT Connect to the provided IR Blaster to transmit IR signals to devices within direct line of sight of the IR Blaster Note The IR In Out ports are multi function and may be reconfigured as IR Control IR Emitter and IR...

Page 11: ...s Press this button to sequentially switch through the available inputs The LED will illuminate GREEN to indicate the selected source is currently live When the selected source has no signal it will be lit RED When connected to the compatible switching HDBaseT Tx this unit supports a total of 4 sources 3 on the Tx 1 on the Rx The selection sequence is Tx VGA Tx HDMI Tx DP Rx HDMI Tx VGA Etc When t...

Page 12: ...vices that support relay triggered power activation such as projector screens or blinds to control them via macro commands Note The voltage amp limit for these relay connections is 0 30VDC 10A or 0 250VAC 10A 2 SERVICE This slot is reserved for firmware update use only 3 RS 232 Connect to a Projector Media Player or other serial controllable device to directly control RS 232 devices using the unit...

Page 13: ...n addition to the basic IR Bypass functionality DC 24V CAT 5e 6 7 IN HDMI IN AUDIO OUT HDMI OUT 4 5 3 2 1 1 AUDIO OUT Connect to powered speakers or an amplifier for stereo analog audio output balanced or unbalanced 2 HDMI OUT Connect to HDMI TVs monitors or amplifiers for digital video and audio output 3 HDMI IN Connect to HDMI source equipment such as a media player game console or set top box 4...

Page 14: ...0 800 60 1440 900 60 1280 1024 60 1400 1050 60 1680 1050 60 1600 1200 60 1920 1200 60 RB 720 480p 60 720 576p 50 1280 720p 50 1280 720p 60 1920 1080i 50 1920 1080p 50 1920 1080i 60 1920 1080p 60 3840 2160p 24 3840 2160p 25 3840 2160p 30 3840 2160p 50 Y420 3840 2160p 60 Y420 3840 2160p 50 3840 2160p 60 Bypass ...

Page 15: ...ur Space Auto YUV422 YUV444 RGB Bypass Colour Depth Auto 16bit 12bit 10bit 8bit Bypass Output Image Adjust Brightness 0 100 27 Contrast 0 100 66 Saturation 0 100 70 Hue 0 100 50 Sharpness 0 100 60 Aspect Ratio Full Auto 4 3 16 10 16 9 Under Scan No 95 90 85 80 Default Yes No ...

Page 16: ...t Informational Display L R Clock Channel Num HDMI Information Notify 5Sec Off 10Sec Off 15Sec Off 30Sec Off Always Never Input Informational Display Reso Colour Output Informational Display Reso Colour EDID Control HDBT In Int FHD 2CH Int FHD MCH Int UHD 2CH Int UHD MCH Int UHD 2CH Int UHD MCH External1 2 User1 2 3 4 ...

Page 17: ... External 1 2 User1 2 3 4 Vendor Informational Display Name MaxReso MaxBaWth MaxDepth HDR Fmt YCbCr HDCP Control HDBT In Apple Mode Refer Source Refer Display HDMI In Apple Mode Refer Source Refer Display In Capable Informational Display Out Capable In Active Out Active Relay Control Relay Out1 On Off Relay Out2 On Off ...

Page 18: ...le On Off Baud Rate 2400 4800 7200 9600 14400 19200 38400 57600 115200 Data Length 5bit 6bit 7bit 8bit Parity None Odd Even Stop Bit 1bit 2bit OSD Setting Auto Off 5Sec 10Sec 15Sec 30Sec 60Sec Never Horizontal 0 100 2 Vertical 0 100 3 Transparency 0 7 3 ...

Page 19: ... Gray Red Green Blue Font Colour Blue Black White Yellow Cyan Magenta FreeRun Colour Black Red Green Blue Default Yes No System Setting VID Informational Display PID SN FW Version FW Update Yes No Factory Reset Yes No Ethernet Information Mac Informational Display Mode IP Mask GWay ...

Page 20: ...e Output Image Adjust menu will be disabled and greyed out However the Output Colour Format menu s options can still be adjusted Output Colour Format Format If Auto is selected and the sink s EDID does not correspond to the CEA 861 specifications this will be set to HDMI Colour Space The YUV 4 2 0 colour space can only be selected when the output resolution is 4K 50Hz or 4K 60Hz When the Format is...

Page 21: ...DBaseT Tx Due to the limited OSD display space the following have been abbreviated Y44 YUV 4 4 4 Y42 YUV 4 2 2 Y40 YUV 4 2 0 HDCP Control When connected to a collaboration Transmitter the HDBT Input HDCP section will be grayed out because it is not needed Due to the limited OSD display space the following have been abbreviated H1 4 HDCP 1 4 H2 2 HDCP 2 2 Ethernet Information Only available when co...

Page 22: ...2 1 IR Blaster Power IR Signal NC 6 7 RS 232 Protocol UNIT REMOTE SYSTEM Pin Definition Pin Definition 1 NC 1 NC 2 TxD 2 RxD 3 RxD 3 TxD 4 NC 4 NC 5 GND 5 GND 6 NC 6 NC 7 NC 7 NC 8 NC 8 NC 9 NC 9 NC Baud Rate 115200bps Data Bits 8 Parity Bits None Stop Bit 1 Flow Control None ...

Page 23: ...the search field and press Enter In Windows XP Click Start Run type cmd and press Enter In Mac OS X Click Go Applications Utilities Terminal Once in the CLI Command Line Interface type telnet followed by the IP address of the unit and 23 then hit Enter This will connect us to the unit we wish to control Type help to list the available commands Note The IP address of the unit can be found in the OS...

Page 24: ...n marked with Certain parameter values of normal commands marked with a require the connection of a collaboration Receiver to be valid For example Input 4 is only available as valid option when a collaboration Receiver is connected but Inputs 1 3 are always available Commands will not be executed unless followed by a carriage return marked with a in the command list Commands are not case sensitive...

Page 25: ...the system s description text N1 Description string GET DESCRIPTION Display the system description SET KEYLOCK N1 Set the front panel lock state for the unit Available values for N1 OFF Unlock Keypad ON Lock Keypad GET KEYLOCK Show the current front panel lock state SET SYSTEM REBOOT Force the system to reboot SET FACTORY DEFAULT Reset all settings to the factory default SET BANNER DEFAULT Reset t...

Page 26: ...rnal UHD 2CH 4 Internal UHD MCH 5 Internal UHD 2CH 6 Internal UHD MCH 7 User 1 8 User 2 9 User 3 10 User 4 11 HDMI Output 12 HDBaseT Output GET IN N1 EDID Display input N1 s EDID source N1 1 4 Input number SET IN N1 HDCP MODE N2 Set input N1 s HDCP mode N1 1 4 Input number Available values for N2 0 HDCP Off 1 Refer to Source 2 Refer to Display GET IN N1 HDCP MODE Show input N1 s HDCP mode N1 1 4 I...

Page 27: ...d GET IN N1 TIMING Show input N1 s current resolution timing N1 1 4 Input number Note Only the currently active input can be read Input 4 s state is not available GET IN N1 AUDIO Show input N1 s current audio state N1 1 3 Input number Note Only the currently active input can be read Input 4 s state is not available SET IN N1 NAME N2 Set the name of input N1 N1 1 4 Input number N2 Name Input name G...

Page 28: ...ource to the next sequential input Note Both outputs will display the same source except when Input 4 is selected Input 4 can only display on Output B on the collaboration Rx GET OUT ROUTE Show the output s current routing source SET OUT N1 AUDIO SOURCE N2 Set the output audio source N1 A B Output letter Available values for N2 1 Follow Video 2 Use L R Input GET OUT N1 AUDIO SOURCE Display the out...

Page 29: ...us N1 A B Output letter SET OUT AUTO SWITCH N1 Enable or disable automatic source switching Available values for N1 OFF Auto switch disabled ON Auto switch enabled Note Both outputs will display the same source except when Input 4 is selected Input 4 can only display on Output B on the collaboration Rx GET OUT AUTO SWITCH Show the current auto switch mode state SET OUT N1 MASK B Enable or disable ...

Page 30: ...r output N1 N1 A B Output letter N2 Name Input name GET OUT N1 NAME Show output N1 s name N1 A B Output letter GET OUT N1 EDID DATA List output N1 s current EDID data in ASCII HEX N1 A B Output letter GET OUT N1 EDID INFORMATION Show output N1 s current EDID information N1 A B Output letter ...

Page 31: ...e values for N2 OFF Event disabled ON Event enabled GET EVENT N1 Show the enabled state for Event N1 N1 1 64 Event number SET EVENT N1 TYPE N2 Set Event N1 to event type N2 N1 1 64 Event number Available values for N2 1 Input 2 Output 3 System Command 4 COM Port 5 Telnet 6 IR 7 Ext Trigger 8 RTC Clock GET EVENT N1 TYPE Show the event type of Event N1 N1 1 64 Event number GET EVENT N1 PARAMETER Sho...

Page 32: ... 3 Repeat Mode 4 Toggle Mode GET EVENT N1 MODE Show Event N1 s activation mode N1 1 64 Event number SET EVENT N1 MACRO N2 Assign macro N2 to Event N1 N1 1 64 Event number N2 1 64 Macro number GET EVENT N1 MACRO Show the macro currently assigned to Event N1 N1 1 64 Event number SET EVENT N1 TOGGLE MACRO N2 Assign the secondary macro to use when Event N1 is set to toggle mode N1 1 64 Event number N2...

Page 33: ...Event N1 s delay value to N2 seconds N1 1 64 Event number N2 0 65535 Seconds GET EVENT N1 DELAY Show Event N1 s delay N1 1 64 Event number SET EVENT N1 REPEAT N2 Set the number of repetitions to use when Event N1 is in repeat mode N1 1 64 Event number N2 0 255 Repeat count GET EVENT N1 REPEAT Show Event N1 s repeat count when in repeat mode N1 1 64 Event number GET EVENT N1 BOOK Show the detailed ...

Page 34: ...acro N1 N1 1 64 Macro number N2 1 16 Action number N3 1 128 Command number GET MACRO N1 ACTION N2 CMDPOOL Show the command pool index number of the command assigned to action N2 of macro N1 N1 1 64 Macro number N2 1 16 Action number SET MACRO N1 ACTION N2 DELAY N3 Set a delay of N3 to action N2 of macro N1 N1 1 64 Macro number N2 1 16 Action number N3 1 65535 Milliseconds GET MACRO N1 ACTION N2 DE...

Page 35: ...rface for action N2 of macro N1 N1 1 64 Macro number N2 1 16 Action number GET MACRO N1 ACTION N2 PARAMETER Show the interface parameters of action N2 in macro N1 N1 1 64 Macro number N2 1 16 Action number SET MACRO N1 ACTION N2 DEVICE N3 Set the device to use for action N2 of macro N1 when the interface type is set to Device N1 1 64 Macro number N2 1 16 Action number N3 1 16 Device number GET MAC...

Page 36: ... Macro number SET MACRO N1 PAUSE Pause macro N1 s execution N1 1 64 Macro number SET MACRO N1 RESUME Resume the execution of paused macro N1 N1 1 64 Macro number Command Pool SET CMDPOOL N1 NAME N2 Set the name for command N1 in the command pool N1 1 128 Command number N2 Name Command name GET CMDPOOL N1 NAME Show the name of command N1 in the command pool N1 1 128 Command number SET CMDPOOL N1 DA...

Page 37: ...8 Command number Available values for N2 0 Null 1 CR 2 LF 3 CR LF 4 SP 5 STX 6 ETX GET CMDPOOL N1 ENDCHAR Show the termination character selected for command N1 N1 1 128 Command number SET CMDPOOL N1 DELETE Delete command N1 from the command pool N1 1 128 Command number Device SET CTLDEVICE N1 NAME N2 Set the name for device N1 N1 1 16 Device number N2 Name Device name GET CTLDEVICE N1 NAME Show t...

Page 38: ...for N2 1 COM Port On Tx 2 Telnet On Tx 3 IR On Tx 129 COM Port On Rx 130 Telnet On Rx 131 IR On Rx 132 Relay On Rx GET CTLDEVICE N1 INTERFACE Show the interface used by device N1 N1 1 16 Device number GET CTLDEVICE N1 PARAMETER Show the parameters of the interface used by device N1 N1 1 16 Device number SET CTLDEVICE N1 DELETE Delete device N1 N1 1 16 Device number ...

Page 39: ...l time clock day SET WEEK N1 Set the real time clock day of the week to N1 Available values for N1 1 Sunday 2 Monday 3 Tuesday 4 Wednesday 5 Thursday 6 Friday 7 Saturday GET WEEK Show the real time clock day of the week SET HOUR N1 Set the real time clock hour to N1 N1 0 23 Hour 24 hour format GET HOUR Show the real time clock hour SET MINUTE N1 Set the real time clock minute to N1 N1 0 59 Minute ...

Page 40: ... MM DD format SET TIME HH MM SS Set the real time clock s hour minute and second with a single command HH 0 23 Hour 24 hour format MM 0 59 Minute SS 0 59 Second GET TIME Show the real time clock s time in HH MM SS format SET MERIDIEM N1 Set the real time clock to display in the banner using the 12 hour clock or 24 hour clock format Available values for N1 OFF 24 hour clock ON 12 hour clock GET MER...

Page 41: ...ble values for N1 1 yyyy mm dd hh mm 2 mm dd yyyy hh mm 3 dd mm yyyy hh mm 4 M dd W hh mm 5 dd M W hh mm GET CALENDAR FORMAT Show the real time clock banner display format SET TIMESYNC N1 Set the method of setting the unit s time Available values for N1 OFF Manual set ON Web browser time sync GET TIMESYNC Show the current time sync setting ...

Page 42: ...te N1 A B Output letter SET OUT N1 BANNER MODE N2 Set the banner text display mode N1 A B Output letter Available values for N2 1 Show Input timing time 2 Show user text GET OUT N1 BANNER MODE Show the banner text display mode N1 A B Output letter SET OUT N1 BANNER TEXT N2 Set the user banner text string N1 A B Output letter N2 Text Banner text 64 char max GET OUT N1 BANNER TEXT Show the current u...

Page 43: ...ed 4 Green 5 Blue 6 Yellow 7 Cyan 8 Magenta 9 Gray GET OUT N1 BANNER FONT COLOUR Show Output N1 s banner text colour N1 A B Output letter SET OUT N1 BANNER BACKGROUND Colour N2 Set Output N1 s banner background colour N1 A B Output letter Available values for N2 1 Red 2 Green 3 Blue 4 Gray GET OUT N1 BANNER BACKGROUND COLOUR Show Output N1 s banner background colour N1 A B Output letter ...

Page 44: ...evel 3 4 Level 4 5 Level 5 6 Level 6 7 Level 7 8 Level 8 transparent GET OUT N1 BANNER TRANSPARENCY Show Output N1 s banner transparency level N1 A B Output letter SET OUT N1 BANNER TIMEOUT N2 Set Output N1 s banner timeout in seconds N1 A B Output letter Available values for N2 0 No timeout 1 1000 Timeout in seconds GET OUT N1 BANNER TIMEOUT Show Output N1 s banner timeout in seconds N1 A B Outpu...

Page 45: ...r N1 1 IR input on Tx 2 IR input on Rx N2 1 128 Command number Notes The capture function will timeout automatically after 15 seconds if no signal is received The command index must already have a valid name assigned to it to store IR data SET IR N1 EMIT N2 Emit the IR code stored in command N2 over IR Output N1 Available values for N1 A IR output on Tx B IR output on Rx N2 1 128 Command number ...

Page 46: ...24 768 60 3 1280 768 60 4 1360 768 60 5 1280 800 60 6 1440 900 60 7 1280 1024 60 8 1400 1050 60 9 1680 1050 60 10 1600 1200 60 11 1920 1200 60 RB 12 720 480p 60 13 720 576p 60 14 1280 720p 50 15 1280 720p 60 16 1920 1080i 50 17 1920 1080p 50 18 1920 1080i 60 19 1920 1080p 60 20 3840 2160p 24 21 3840 2160p 25 22 3840 2160p 30 23 3840 2160p 50 YUV 4 2 0 24 3840 2160p 60 YUV 4 2 0 25 3840 2160p 50 26...

Page 47: ... 4 2 0 colour space might result in incorrect colours if the connected display does not support the combination of colour space and output timing GET OUT N1 COLOUR SPACE Show Rx Output N1 s colour space N1 B HDMI Out on the Rx SET OUT N1 COLOUR DEPTH N2 Set Rx Output N1 s colour bit depth N1 B HDMI Out on the Rx Available values for N2 0 Bypass 1 8bit 2 10bit 3 12bit 4 16 bit 5 Auto Detect Note Ou...

Page 48: ...x N2 0 100 Brightness level Note Only active when the output timing is not set to Bypass GET OUT N1 BRIGHTNESS Show Rx Output N1 s brightness N1 B HDMI Out on the Rx SET OUT N1 CONTRAST N2 Set Rx Output N1 s contrast N1 B HDMI Out on the Rx N2 0 100 Contrast level Note Only active when the output timing is not set to Bypass GET OUT N1 CONTRAST Show Rx Output N1 s contrast N1 B HDMI Out on the Rx S...

Page 49: ...he Rx SET OUT N1 SHARPNESS N2 Set Rx Output N1 s sharpness N1 B HDMI Out on the Rx N2 0 100 Sharpness level Note Only active when the output timing is not set to Bypass GET OUT N1 SHARPNESS Show Rx Output N1 s sharpness N1 B HDMI Out on the Rx SET OUT N1 ASPECT RATIO N2 Set Rx Output N1 s aspect ratio N1 B HDMI Out on the Rx Available values for N2 1 Full Screen 2 16 9 3 16 10 4 4 3 5 Maintain sou...

Page 50: ... N1 Set the volume level of the Rx s external stereo analog audio output N1 0 100 Volume level SET AUDIO OUT VOLUME UP Increase the volume level of the Rx s external stereo analog audio output by 1 SET AUDIO OUT VOLUME DOWN Decrease the volume level of the Rx s external stereo analog audio output by 1 GET AUDIO OUT VOLUME Show the volume level of the Rx s external stereo analog audio output Relay ...

Page 51: ... X X 0 255 GET IP ADDR Show the current IP address SET NETMASK N1 Set the netmask address N1 X X X X X 0 255 GET NETMASK Show the current netmask SET GATEWAY N1 Set the gateway address N1 X X X X X 0 255 GET GATEWAY Show the current gateway SET IP MODE N1 Set the IP address assignment mode Available values for N1 1 Static IP mode 2 DHCP mode GET IP MODE Show the current IP mode SET HTTP PORT N1 Se...

Page 52: ...s you will be presented with the network details of that particular device IP Mode If you choose you can alter the static IP network settings for the device or switch the unit into DHCP mode to automatically obtain proper network settings from a local DHCP server To switch to DHCP mode please select DHCP from the IP mode drop down then click Save WebGUI Once you are satisfied with the network sett...

Page 53: ...e The default user name and password is admin On the left side of the browser you will see the following menu tabs where all primary functions of the paired collaboration Transmitter and Receiver are controllable via the built in WebGUI A V Switch EDID Banner Collaboration Event Book Event Macro Command Device Network and System The individual functions will be introduced in the following sections...

Page 54: ... on the button of the preferred Input port video or audio on the right As you select each button they will change their colour to orange The new route will become active immediately and the routing information displayed on the buttons will change accordingly Note Normally both outputs will be mirrored however if Output B s source is switched to HDMI 2 then Output A will not switch and will continu...

Page 55: ...ith sync Mute Click the switch to enable disable the Output s audio mute function Input Video Group VGA HDMI DP HDMI2 Buttons for selecting the video Input to route to the selected Output Name Displays the name for the Input Click the icon to edit the Input s name Link Displays the Input s source signal detection state Auto Click the switch to enable disable auto source switching functionality Inp...

Page 56: ...d This tab allows for the assignment of an EDID to each individual input port or to all inputs at once Click as many of the Input EDID buttons on the left as desired and then select the preferred EDID from the buttons displayed on the right The new EDID will become active immediately Note In some rare cases it is possible for user or external EDIDs to cause compatibility issues with certain source...

Page 57: ...ion details Download Click to download the selected EDID file bin to thePC Information Click to show additional information about the selected EDID Input EDID Input EDID 1 4 Click to select one or more Inputs to open the EDID Table List for assigning an EDID Download Click to download the current Input s EDID file bin to the PC Information Click to show additional information about the Input s cur...

Page 58: ...control over the content format and activation of the OSD banner information displayed on both outputs Click the Enable switch to enable disable the corresponding OSD banner Click the icon to open the corresponding Banner Edit page ...

Page 59: ...round Colour Select the OSD banner background colour Background Transparency Select the OSD banner background transparency level The range is from 1 opaque to 8 transparent User Text Enter customised banner text only available when User Text mode is selected Timeout Set the OSD banner timeout in seconds ...

Page 60: ... non collaboration Receiver is connected functions on this tab will be disabled Information Displays the HDBaseT link state operational mode Receiver firmware version and serial number Relay Click to open OFF or close ON the relays located on the Receiver Resolution Dropdown menus allowing for the selection of the output resolution and aspect ratio behavior of the Receiver s HDMI output Selections...

Page 61: ...des a way to update the Receiver s firmware Click Choose File to select the firmware update file from the local PC bin format After selecting an appropriate file click the Upgrade button to begin the update process Scaler This section provides slider controls for brightness contrast saturation hue and sharpness allowing adjustment to the HDMI output on the Receiver Clicking the Scaler Reset button...

Page 62: ...vent tab allows the creation editing and deletion of Events An Event is the core process of the entire control system and determines when and how macros are activated Each Event can be individually named up to 32 characters and contains an Event Type Event Condition Event Mode and the Macro s to be run This unit supports 8 different Event sources To create a new Event click the New button on a bla...

Page 63: ...Displays the condition if applicable for the selected Event Type required to trigger the Event Examples of conditions are Low High Falling Raising Both Edge or a Command Event Mode Displays the currently selected behavior for the Event Events can have one of the following mode types Once The Event s macro is run one time when triggered and then will not be activated again If the unit is rebooted a...

Page 64: ...d Edit New Click the Edit or New button to open the Event Edit window and edit an existing Event or create a new one When creating a new Event as each field is completed additional fields will appear as parameters are filled in as appropriate to the Event type and selections made Once the Event is completely defined click Save to store the Event Delete Click to delete an Event ...

Page 65: ...WebGUI or Telnet Click on the Edit or New button to open the macro editing window At the top of the macro edit window is a text field where you can set the name of the macro Type your new macro name into the box and then click the icon to save it Note The Macro tab is not available when the user is logged in using an Operator level account Macro Name Displays each macro s name Run Click the Run bu...

Page 66: ...s to pause before executing the next action line in the macro Click the icon to only save the macro s name Click the icon to open the Edit Command Interface window for the specified macro action The setting fields displayed will be appropriate for the interface selected Click the icon to delete the specified macro action Click the Up Arrow to move the command up one position in the execution seque...

Page 67: ...st in this manual for a list of valid commands Serial Port Sends the command via one of the serial ports Remote or Local at the defined baud rate TCP IP Sends the command to the specified IP address using the specified port IR Emitter Sends the command via the specified IR emitter port Remote or Local Relay Controls the specified relay port The only valid command strings for this interface type ar...

Page 68: ...lays the command s name Command Data Displays the command s data End Char Displays the termination character s sent after the command Edit New Click the Edit or New button to open the Command Edit window where the name data and end characters can be set or edited Command names can contain up to 32 characters Command data can contain up to 256 characters including spaces Click on Save Change to sto...

Page 69: ...they have already been used in so editing them will immediately change the behavior of the macros they are being used in Note The Device tab is not available when the user is logged in using an Operator level account Device Name Displays the device s name Interface Displays the device s selected interface type Configuration Displays the configuration settings for the device Edit New Click the Edit...

Page 70: ...ed between DHCP or Static IP When the unit is set to DHCP mode it will attempt to automatically obtain an IP address from a DHCP server When the IP mode is set to static IP you can manually set the IP address netmask and gateway address Click on the Save button to save changes made to the IP Configuration To reset the unit s IP Configuration to the factory default press the Network Reset button No...

Page 71: ...r modify the username password and access privileges Administrator or Operator Note The built in admin user can t be modified and the default password is admin Web Login Timeout Manually set the length of time before a connected WebGUI user is automatically logged out due to inactivity Available values range from 0 to 35790 in minutes Setting this value to 0 disables the timeout ...

Page 72: ...playing the unit s serial number System Configutation Clicking the Download button allows the user to save the full system configuration including all macros to a connected PC Laptop A previously saved configuration may be re uploaded to the unit by selecting the file on your local PC Laptop using the Choose File button then clicking the Restore button Factory Reset Click the All Reset button to r...

Page 73: ...allows the user to set the unit s system time which is used by the scheduling function and OSD banner information Synchronise to Windows Selecting ON will allow the system to automatically update the time whenever your computer connects to the WebGUI Modify Allows the user to manually set the date time when the Synchronise to Windows function is set to OFF Click the Modify field to display the cal...

Page 74: ...HDMI OUT 7m 3m 3m 60 1 5m 60 7m 3m 3m 60 1 5m 60 Powered Projector Screen Motorized Blind Display ON Source 1 Source 2 Screen Up Volume Up Screen Down Volume Down Display OFF HDMI Input HDMI Input HDMI Output Cat 5e 6 7 Cable HDMI Output IR In Out UHDTV Projector Power Supply Set top Box AV Receiver Laptop Media Player Network Switch PC RS 232 Input RS 232 Output IR In Out LAN Cable LAN Cable Disp...

Page 75: ...1 IR Extender 3 5mm 1 RS 232 9 pin D sub 1 LAN RJ45 HDMI Cable Length 10m 1080p 60Hz 12 bit 3m 4K 60Hz 4 4 4 8 bit CAT5e 6 Cable Length 100m 1080p 60Hz 12 bit 70m 4K 60Hz 4 2 0 8 bit IR Frequency 30 50kHz 30 60kHz under ideal conditions Baud Rate 115200bps Power Supply 48V PoH Power over HDBaseT ESD Protection Human Body Model 8kV Air Discharge 4kV Contact Discharge Dimensions 231 5mm 25mm 108mm W...

Page 76: ...seT 340MHz 10 2Gbps Input Ports 1 HDMI 1 Cat 5e 6 7 Output Ports 1 HDMI 1 Terminal Block Stereo Audio Control Interfaces 1 IR Blaster 3 5mm 1 IR Extender 3 5mm 1 RS 232 9 pin D sub 1 LAN RJ45 HDMI Cable Length 10m 1080p 60Hz 12 bit 3m 4K 60Hz 4 4 4 8 bit CAT5e 6 Cable Length 100m 1080p 60Hz 12 bit 70m 4K 60Hz 4 2 0 8 bit IR Frequency 30 50kHz 30 60kHz under ideal conditions Baud Rate 115200bps Pow...

Page 77: ...ions 231 5mm 25mm 108mm W H D Case Only 231 5mm 25mm 120mm W H D All Inclusive Weight 430g Chassis Material Metal Silkscreen Colour Black Operating Temperature 0 C 40 C 32 F 104 F Storage Temperature 20 C 60 C 4 F 140 F Relative Humidity 20 90 RH Non condensing Power Consumption 24W ...

Page 78: ...GA HDMI DP HDMI HDBT 640 480p 60 640 480p 72 640 480p 75 640 480p 85 720 400p 70 720 400p 85 720 480i 59 720 480i 60 720 480p 59 720 480p 60 720 576i 50 720 576p 50 800 600p 56 800 600p 60 800 600p 72 800 600p 75 800 600p 85 848 480p 60 1024 768p 60 1024 768p 70 1024 768p 75 1024 768p 85 1152 864p 75 1280 720p 23 ...

Page 79: ... 1280 720p 30 1280 720p 50 1280 720p 59 1280 720p 60 1280 768p 60 1280 768p 60 RB 1280 768p 75 1280 768p 85 1280 800p 60 1280 800p 60 RB 1280 800p 75 1280 800p 85 1280 960p 60 1280 960p 85 1280 1024p 60 1280 1024p 75 1280 1024p 85 1360 768p 60 1366 768p 60 RB 1366 768p 60 1400 1050p 60 1400 1050p 60 RB 1440 900p 60 ...

Page 80: ...p 60 1600 1200p 65 1600 1200p 70 1600 1200p 75 1600 1200p 85 1680 1050p 60 1680 1050p 60 RB 1920 1080p 23 1920 1080p 24 1920 1080p 25 1920 1080p 29 1920 1080p 30 1920 1080p 50 1920 1080p 59 1920 1080p 60 1920 1080i 50 1920 1080i 59 1920 1080i 60 1920 1200p 60 RB 2048 1080p 23 2048 1080p 24 2048 1080p 25 2048 1080p 29 2048 1080p 30 ...

Page 81: ...23 3840 2160p 24 3840 2160p 25 3840 2160p 29 3840 2160p 30 3840 2160p 50 3840 2160p 59 3840 2160p 60 3840 2160p 50 4 2 0 3840 2160p 59 4 2 0 3840 2160p 60 4 2 0 4096 2160p 23 4096 2160p 24 4096 2160p 25 4096 2160p 29 4096 2160p 30 4096 2160p 50 4096 2160p 59 4096 2160p 60 4096 2160p 50 4 2 0 4096 2160p 59 4 2 0 4096 2160p 60 4 2 0 ...

Page 82: ...40 480p 60 640 480p 72 640 480p 75 640 480p 85 720 400p 70 720 400p 85 720 480i 59 720 480i 60 720 480p 59 720 480p 60 720 576i 50 720 576p 50 800 600p 56 800 600p 60 800 600p 72 800 600p 75 800 600p 85 848 480p 60 1024 768p 60 1024 768p 70 1024 768p 75 1024 768p 85 1152 864p 75 1280 720p 23 1280 720p 24 1280 720p 25 ...

Page 83: ... 720p 59 1280 720p 60 1280 768p 60 1280 768p 60 RB 1280 768p 75 1280 768p 85 1280 800p 60 1280 800p 60 RB 1280 800p 75 1280 800p 85 1280 960p 60 1280 960p 85 1280 1024p 60 1280 1024p 75 1280 1024p 85 1360 768p 60 1366 768p 60 RB 1366 768p 60 1400 1050p 60 1400 1050p 60 RB 1440 900p 60 1440 900p 60 RB 1440 900p 75 1600 900p 60 RB ...

Page 84: ...1600 1200p 85 1680 1050p 60 1680 1050p 60 RB 1920 1080p 23 1920 1080p 24 1920 1080p 25 1920 1080p 29 1920 1080p 30 1920 1080p 50 1920 1080p 59 1920 1080p 60 1920 1080i 50 1920 1080i 59 1920 1080i 60 1920 1200p 60 RB 2560 1600p 60 RB 2048 1080p 23 2048 1080p 24 2048 1080p 25 2048 1080p 29 2048 1080p 30 2048 1080p 50 2048 1080p 59 2048 1080p 60 ...

Page 85: ...3840 2160p 25 3840 2160p 29 3840 2160p 30 3840 2160p 50 3840 2160p 59 3840 2160p 60 3840 2160p 50 4 2 0 3840 2160p 59 4 2 0 3840 2160p 60 4 2 0 4096 2160p 23 4096 2160p 24 4096 2160p 25 4096 2160p 29 4096 2160p 30 4096 2160p 50 4096 2160p 59 4096 2160p 60 4096 2160p 50 4 2 0 4096 2160p 59 4 2 0 4096 2160p 60 4 2 0 ...

Page 86: ... YUV 4 2 0 8 YUV 4 4 4 8 YUV 4 2 0 8 YUV 4 2 0 8 YUV 4 2 0 8 YUV 4 2 0 10 YUV 4 2 0 8 YUV 4 2 0 12 YUV 4 2 0 8 8 2 4 Cable Specifications Cable Type Cable Length Supported Video Format Cat 5e 6 6a 7 100 meters Full HD video Up to 1080p 60Hz 12 bit colour Data rates lower than 5 3Gbps or below 225MHz TMDS clock Cat 5e 6 6a 7 70 meters Ultra HD video 4K 24 25 30Hz 4K 50 60Hz YUV 4 2 0 8 bit colour D...

Page 87: ...ta field supports up to a maximum of 256 characters Note that some captured IR commands might exceed this limit and their data will be truncated The serial port RS 232 on the Transmitter may be used for events however the baud rate is locked at 115200bps to maintain support for controlling the Transmitter itself via RS 232 Listening for multiple Serial Port RS 232 events is supported however all a...

Page 88: ...ser Interface HD High Definition HDCP High bandwidth Digital Content Protection HDMI High Definition Multimedia Interface HDR High Dynamic Range HTTP HyperText Transfer Protocol IP Internet Protocol IR Infrared LAN Local Area Network LPCM Linear Pulse Code Modulation OSD On Screen Display PC Personal Computer PoH Power over HDBaseT UHD Ultra High Definition USB Universal Serial Bus VGA Video Graph...

Page 89: ......

Page 90: ......

Page 91: ......

Page 92: ...CIE Group Ltd 3 Widdowson Close Blenheim Industrial Estate Bulwell Nottingham NG6 8WB Tel 44 0 115 977 0075 Fax 44 0 115 977 0081 Email info cie group com www cie group com v1 00 ...

Reviews: