background image

7

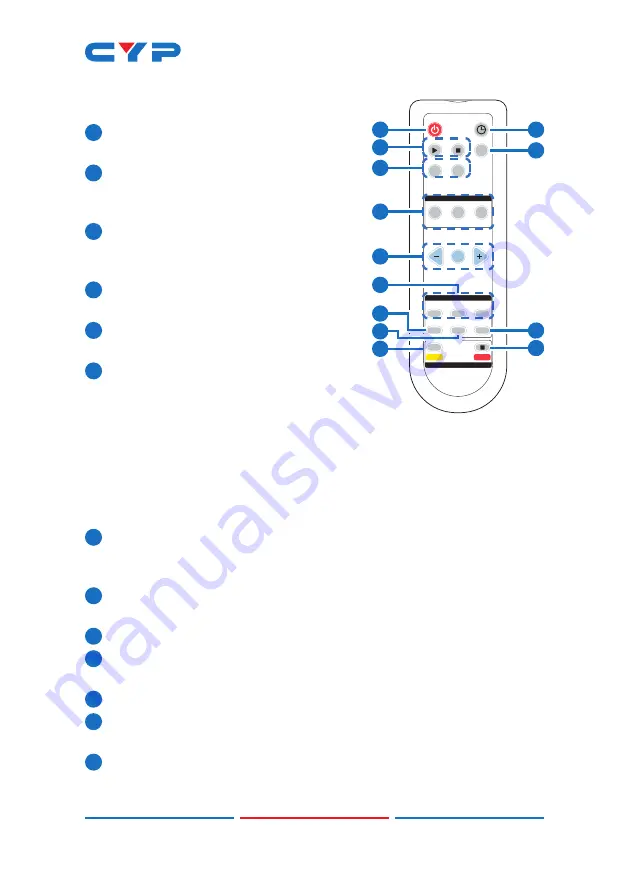
6.3 Remote Control

1

 POWER BUTTON: 

Press to power the unit 

on or place it into stand-by mode.

2

 COUNTDOWN Button:

 Press to enable/

disable the Countdown Timer display on 

the HDMI and streaming output.

3

 PLAY/STOP Buttons: 

Press to start/stop 

streaming to the configured target 

server.

4

 TEXT SCREEN Button:

 Press to enable/

disable the “Text Screen” feature.

5

 HDMI/VGA Buttons:

 Press to select HDMI 

or VGA as the input source.

6

 PICTURE QUALITY (BEST/HIGH/NORMAL) 

Buttons:

 Press these buttons change the 

streaming bitrate and resolution of the 

streaming output. Available options are:

 Best

 (1080p@30fps, 3000Kbps)

 High

 (720p@30fps, 2000Kbps)

 Normal

 (VGA@15fps, 1500Kbps)


Note: Changing the bitrate will force the video stream to restart.

7

  -(MINUS)/OK/+(PLUS)  Buttons:

 Press the OK button to start or stop 

the Countdown Timer. Press the plus and minus buttons to increase 

or decrease the remaining time in 30 second steps.

8

  VOL-/VOL+  Buttons:

 Press to increase or decrease the mixer output 

volume.

9


MIXER Button: 

Press to enable/disable the Audio Mixer function.

10

  SWITCH  Button: 

Press to toggle the audio source for the HDMI input 

between HDMI and analog stereo when the mixer is not enabled.

11


MUTE Button:

 Press to mute/unmute all audio output.

12


RECORD START Button:

 Press to start recording video to the currently 

designated storage location.

13


RECORD STOP Button:

 Press to stop recording video.

PLAY

STOP

SCREEN

NORMAL

MIXER

SWITCH

MUTE

CR-187

POWER

OK

HDMI

VGA

VOL –

AUDIO

HIGH

PICTURE QUALITY

BEST

VOL

+

TEXT

RECORD

STOP

START

COUNT

DOWN

1
3
5

6

7

8

9

10
12

2
4

11
13

Summary of Contents for CDPS-P311R

Page 1: ...CDPS P311R HDMI VGA Video Streamer with Recording Operation Manual Operation Manual ...

Page 2: ......

Page 3: ...Technology reserves the right to make improvements to this document and or product at any time and without notice COPYRIGHT NOTICE No part of this document may be reproduced transmitted transcribed stored in a retrieval system or any of its part translated into any language or computer file in any form or by any means electronic mechanical magnetic optical chemical manual or otherwise without expr...

Page 4: ...nto this product through any openings or empty slots in the unit as you may damage parts inside the unit Do not attach the power supply cabling to building surfaces Use only the supplied power supply unit PSU Do not use the PSU if it is damaged Do not allow anything to rest on the power cabling or allow any weight to be placed upon it or any person walk on it To protect the unit from overheating d...

Page 5: ...treaming Tab 12 6 5 3 Audio Mixer Tab 15 6 5 4 Video Switch Tab 16 6 5 5 EDID Setting Tab 18 6 5 6 Record Setting Tab 20 6 5 7 Time Setting Tab 23 6 5 8 User Config Tab 24 6 5 9 System Setting Tab 25 6 6 Telnet Control 27 6 7 RS 232 and Telnet Commands 28 7 Connection Diagram 44 8 Specifications 45 8 1 Technical Specifications 45 8 2 Video Specifications 46 8 3 Audio Specifications 48 8 3 1 Digita...

Page 6: ...eaming events to a variety of popular online streaming services or within the local network The video may also be recorded locally via SD card or USB thumb drive or to a local network drive while it is being streamed An audio mixer function is included allowing an external audio source to be mixed with the embedded audio of your HDMI source LPCM 2 0 only for your video stream Comprehensive EDID ma...

Page 7: ...e HDMI receiving equipment such as an HDTV monitor or audio amplifier The use of Premium High Speed HDMI cables is highly recommended Video streaming preview support within the WebGUI requires the use of the Chrome Internet Explorer or Safari browser with the appropriate plugins VLC for IE and Safari or VXG Player for Chrome installed Note The Firefox browser does not currently support the WebGUI ...

Page 8: ...protocols or streaming client using the RTMP protocol Audio embedding and mixing support with the analog stereo audio input Note Analog audio can only be mixed with LPCM 2 0 audio from the HDMI source Supports scheduled recording with an internet updated calendar Supports text overlays over live broadcasts including a countdown timer Integrated downscaling function will convert UHD video content u...

Page 9: ...on to immediately start recording to the designated recording target RECORD STOP Button Press this button to immediately stop any current recording session 4 SOURCE Button Press this button to toggle between the HDMI and VGA inputs The status LED will change depending on the input selection Note Changing the input source will cause the video stream to restart Connected stream targets may need to b...

Page 10: ...ently active Note The target streaming service controlled by this button is defined in the WebGUI 8 STOP Button Press this button to stop streaming to the configured target server The Status LED will be lit solidly to indicate the stream is stopped 9 Micro SD STORAGE Slot Insert a standard Micro SD card for storage of recorded video Optional Note SD SDHC SDXC SDUC memory cards are supported Storag...

Page 11: ...udio from this port is embedded with the VGA video source 5 LAN Port Connect to a network switch or router for transmission and distribution of streamed video as well as to control the unit via Telnet or WebGUI Note The maximum number of simultaneous stream connections is limited by available network bandwidth and the unit s CPU load 6 RS 232 Port Connect directly to a PC laptop or other serial co...

Page 12: ... bitrate will force the video stream to restart 7 MINUS OK PLUS Buttons Press the OK button to start or stop the Countdown Timer Press the plus and minus buttons to increase or decrease the remaining time in 30 second steps 8 VOL VOL Buttons Press to increase or decrease the mixer output volume 9 MIXER Button Press to enable disable the Audio Mixer function 10 SWITCH Button Press to toggle the aud...

Page 13: ...6 4 RS 232 Pinout and Defaults Serial Port Default Settings Baud Rate 19200 Data Bits 8 Parity Bits None Stop Bits 1 Flow Control None 1 2 3 4 5 8 7 6 9 DCD RxD TxD DTR GND RI CTS RTS DSR DE 9 Female Port ...

Page 14: ...address is 192 168 1 50 By clicking on one of the listed devices you will be presented with the network details of that particular device 1 IP Mode If you choose you can alter the static IP network settings for the device or switch the unit into DHCP mode to automatically obtain proper network settings from a local DHCP server To switch to DHCP mode please select DHCP from the IP mode drop down th...

Page 15: ...te The default user name and password is admin On the left side of the browser you will see the following menu tabs where all primary functions of the unit are controllable via the built in WebGUI The individual functions will be introduced in the following sections Clicking the red Logout tab will automatically log the currently connected user out of the WebGUI and return to login page ...

Page 16: ...t this is the URL that should be used to connect To view streaming channels 2 4 change ch1 in the address to ch2 ch3 or ch4 as appropriate Note The Channel 1 configuration is set on the Record Setting tab Channels 2 4 contain the same video content presented at different streaming resolutions Channel 2 matches the current settings from the Streaming tab Channel 3 is 640x480 30fps and Channel 4 is ...

Page 17: ... plugins VLC for IE and Safari or VXG Player for Chrome installed 6 5 2 Streaming Tab This tab provides access to the settings and controls for streaming channel 2 which is used when streaming directly to a streaming service such as YouTube or Facebook A live preview of the video stream is also displayed on this page Pressing the Play button will make the unit start streaming to the designated tar...

Page 18: ...ions are 1080p 1920x1080 720p 1280x720 VGA 640x480 or QVGA 320x240 Note The streaming resolution will not exceed the original source s resolution even if a higher maximum is selected 3 Maximum Video Framerate Select the framerate to use for streaming channel 2 Available framerates are 30 or 15 frames per second 4 Maximum Video Quality Select the target bitrate for streaming channel 2 Available bit...

Page 19: ...ervice A typical stream key is a very long string of letters numbers and symbols Click on Save to confirm and store the Stream Key Note The Stream URL and Stream Key will be provided on the service s stream setup page More information can be found within the help files of the specific service Entering incorrect information will result in a failed connection 7 Countdown Timer OSD Enable Enable or d...

Page 20: ...ependently controllable volume levels Note Only LPCM 2 0 audio from the HDMI source is supported by the mixer 1 Audio Mixer Enable or Disable the Audio Mixer function 2 Line In Volume Adjusts the volume of the analog audio source from 0 to 100 3 HDMI In Volume Adjusts the volume of the HDMI audio source from 0 to 100 4 Mixer Out Volume Adjusts the volume of the mixed audio output from 0 to 100 ...

Page 21: ...bled here Note Enabling or disabling this feature may disconnect any currently connected streaming clients 3 Video Switch To assign a new video route please click the Output button and then click on the button of the preferred Input port to route As you select each button they will change their color to orange The new route will become active immediately and the routing information displayed on th...

Page 22: ...HDCP mode supported by the connected sink 4 Output Edit This window is opened after clicking on the Edit icon within the Output button and provides options to rename the Outputs and configure the countdown timer and its associated OSD Click on Save to confirm and activate any changes made to a name or to the countdown timer s default time All other changes are immediate ...

Page 23: ...ng on your browser settings you will either be asked where to save the downloaded file or the file will be transferred to the default download location on your PC Upload To upload a custom EDID please click the Upload button next to the Customer EDID Settings item you would like to change An EDID Upload window will appear allowing you to locate and upload the preferred EDID file bin format from a ...

Page 24: ...s unit provides the following 6 default EDIDs Unit s Default EDID Settings FHD 2CH 1920 1080p 60Hz 4 95Gbps 8 bit color LPCM 2 0 FHD MCH 1920 1080p 60Hz 4 95Gbps 8 bit color LPCM 7 1 Bitstream UHD 2CH 3840 2160p 30Hz 10 2Gbps Deep Color 8 10 12 bit LPCM 2 0 UHD MCH 3840 2160p 30Hz 10 2Gbps Deep Color 8 10 12 bit LPCM 7 1 Bitstream UHD 2CH 3840 2160p 60Hz 18Gbps Deep Color 8 10 12 bit LPCM 2 0 UHD ...

Page 25: ...NFS or network storage using CIFS The file will be placed within an automatically named folder structure based on the current date and time of the recording to facilitate easy sorting and file management It is also possible to set up automatic daily recording times based on a repeating weekly schedule structure 1 Record Enable or disable recording the channel 1 video stream When enabled recording ...

Page 26: ... the framerate to use for streaming channel 1 Available framerates are 25 30 50 or 60 frames per second 6 Record Quality Select the target bitrate for streaming channel 1 Available bitrates are Best 6000Kbps High 3000Kbps or Normal 2000Kbps 7 Remote Storage NAS NFS This section provides a way to configure access to a NAS Network Attached Storage device using the NFS protocol Enable Enable or disab...

Page 27: ...entering the information press the Save button Note The target folder on the CIFS server must at a minimum provide read write and delete permissions for the designated user 9 Schedule Record Timer Enable or disable the scheduled time recording function Each hour of each day is divided into two half hour blocks Currently selected recording times are indicated by white blocks Orange blocks indicate ...

Page 28: ...e year 1 SNTP Configuration GMT Select the preferred time zone from the options in the dropdown NTP Server Enter the address of the network time server to use for automatic time and date configuration Click the Save button to set and store the address in the unit Click the Sync button to force synchronization of the unit s time and date with the defined server Note Time synchronization occurs auto...

Page 29: ...ing Time while outside the configured DST range will result in no change to the current time Start Time Set the month week day and time for the start of DST in the current time zone End Time Set the month week day and time for the end of DST in the current time zone Adjust Time Set the amount of time to add when DST is active 6 5 8 User Config Tab The WebGUI and Telnet username password are set on...

Page 30: ...CP In Static IP mode the IP netmask and gateway addresses may be manually set When in DHCP mode the unit will attempt to connect to a local DHCP server and obtain IP netmask and gateway addresses automatically Please press Save after making any changes to the IP configuration or mode Note The unit s default IP address is 192 168 1 50 If the IP address is changed then the IP address required for We...

Page 31: ...nit s firmware click the Choose File button to open the file selection window and then select the firmware update file bin format located on your local PC After selecting the file click the Upgrade button to begin the firmware update process After the upgrade is complete the unit will reboot automatically 8 Remote Firmware Upgrade To update this unit s firmware using our cloud based firmware serve...

Page 32: ...pplications Utilities Terminal Once in the Command Line Interface CLI type telnet followed by the IP address of the unit and the port number if it is non standard and then hit Enter This will connect us to the unit we wish to control Microsoft Windows Version 6 1 7601 Copyright c 2009 Microsoft Corporation All rights reserved C Users Adminstrator telnet 192 168 1 50 23 Note 1 If the IP address is ...

Page 33: ...how the unit s model type get command ver Show the unit s command protocol version get mac addr Show the unit s MAC address get user config List all current user configuration details set factory default Reset the unit to its factory defaults set factory ipconfig default Reset the unit s IP configuration to the factory defaults set factory out route default Reset the unit s routing to the factory ...

Page 34: ...le values for N1 1 HDMI input 2 VGA input N2 name 32 characters max get in N1 name Show the current name of the specified input set out A name N1 Set the name of the HDMI output N1 name 32 characters max get out A name Show the current name of the HDMI output get in name list List the names of all inputs on the unit get out name list List the names of all outputs on the unit set out auto mode N1 S...

Page 35: ...how the vertical active pixel value of the specified input s cur rent video source Available values for N1 1 HDMI input 2 VGA input Note Values can only be read if the input is currently selected get in N1 refresh rate Show the refresh rate of the specified input s current video source Available values for N1 1 HDMI input 2 VGA input Note Values can only be read if the input is currently selected ...

Page 36: ...A input Note Values can only be read if the input is currently selected get in type list List the port type of all inputs on the unit get out type list List the port type of all outputs on the unit set all out route N1 Route the specified input to all outputs Available values for N1 1 HDMI input 2 VGA input get all out route Show the current routing for all outputs get in port number Show the tota...

Page 37: ... set audio out A route N1 Route the specified audio input to the HDMI output Available values for N1 1 HDMI audio 2 Analog audio get audio out A route Show the current audio input routed to the HDMI output get audio in type list List all available audio input sources get audio out type list List all available audio output destinations set audio mixer N1 Enable or disable the unit s audio mixer fun...

Page 38: ... input volume level for the speci fied audio source Available values for N1 1 HDMI audio 2 Analog audio set audio mixer out A volume N1 Set the audio mixer s output volume level N1 0 100 Volume level get audio mixer out A volume Show the audio mixer s current output volume level set in 1 edid N1 Set the EDID to use on the HDMI input Available values for N1 1 FHD 2CH 2 FHD MCH 3 4K UHD 2CH 4 4K UHD...

Page 39: ...User EDID as HEX data N1 1 4 User EDID number get sink A edid data Show the EDID from the display connected to the HDMI output as HEX data get in 1 edid data Show the EDID currently used by the HDMI input as HEX data get all in edid list List the EDIDs assigned to all inputs get internal N1 edid data Show the specified Internal EDID as HEX data N1 1 6 Internal EDID number set in 1 hdcp mode N1 Set...

Page 40: ... OSD off get out A osd Show the current state of the OSD Countdown Timer banner set out N1 banner text N2 Set the OSD banner text to use on the specified output Available values for N1 A HDMI output B Streaming output N2 Banner text 29 characters max get out N1 banner text Show the current OSD banner text used by the specified output Available values for N1 A HDMI output B Streaming output set out...

Page 41: ...olor MAGENTA Text color YELLOW Text color CYAN Text color GRAY Text color get out A banner font color Show the current color of the font used by the OSD Countdown Timer banner get out banner font color list List all available font colors for the OSD Countdown Timer banner set out A banner font transparency level N1 Set the text transparency level for the OSD Countdown Timer banner N1 1 8 Transpare...

Page 42: ...lor MAGENTA Background color YELLOW Background color CYAN Background color GRAY Background color get out A osd background color Show the current color of the background of the OSD Count down Timer banner get out osd background color list List all available background colors for the OSD Countdown Timer banner set out A countdown timer N1 Set the countdown timer value in seconds N1 0 86400 Time in s...

Page 43: ...rent baud rate of the RS 232 port get uart list List all available RS 232 ports set uart 1 reset Reset the unit s RS 232 settings to the factory defaults set ip mode N1 Set the IP address assignment mode Available values for N1 0 Static IP mode 1 DHCP mode STATIC Static IP mode DHCP DHCP mode get ip mode Show the current IP address assignment mode get ipconfig Show the unit s current IP configurat...

Page 44: ...le N1 resolution N2 Set the maximum resolution for the specified streaming channel profile N1 2 4 Streaming channel Available values for N2 1920x1080 Streaming resolution 1280x720 Streaming resolution 640x480 Streaming resolution 320x240 Streaming resolution get encoder 1 profile N1 resolution Show the current resolution used by the specified streaming channel profile set encoder 1 profile N1 bitr...

Page 45: ... the current frame rate used by the specified streaming channel profile set live stream url N1 Set the URL used to access the current live streaming target ser vice N1 text string Target service Stream URL get live stream url Show the URL used to access the current live streaming target service set live stream key N1 Set the stream key used to authenticate with the current live streaming target se...

Page 46: ... Set the maximum streaming bitrate in Kbps to use with the cur rent live streaming target service N1 1 3000 Max bitrate in Kbps get live encode bitrate Show the maximum streaming bitrate in Kbps used with the cur rent live streaming target service set live encode framerate N1 Set the frame rate to use with the current live streaming target service N1 1 60 Frames per second get live encode framerat...

Page 47: ...ing to SD Card slot NFS Network recording via NFS CIFS Network recording via CIFS get record media path Show the current recording target media selection set schedule record mode N1 Enable or disable scheduled recording support Available values for N1 ON Enable scheduled recording OFF Disable scheduled recording get schedule record mode Show the current state of scheduled recording support set rec...

Page 48: ...arget media N1 1 6000 Max bitrate in Kbps get record bitrate Show the current maximum recording bitrate in Kbps set record framerate N1 Set the frame rate to use when recording to the target media N1 1 60 Frames per second get record framerate Show the current frame rate used when recording Note Commands will not be executed unless followed by a carriage return Commands are not case sensitive ...

Page 49: ...M SERVICE RS 232 LAN HDMI IN HDMI OUT DC 5V AUDIO IN VGA IN Power Supply HDMI Input VGA Input Stereo Input Network Router RS 232 Equipped PC Laptop HDMI Output Media Player PC Laptop Internet Streaming Target LAN RS 232 HDTV ...

Page 50: ...USB 2 0 Type A IR Frequency 30 50kHz 30 60kHz under ideal conditions Baud Rate 19200 Power Supply 5V 2 6A DC US EU standards CE FCC UL certified ESD Protection HBM 8kV Air Discharge 4kV Contact Discharge Dimensions W H D 231 5mm 25mm 108mm Case Only 231 5mm 25mm 117mm All Inclusive Weight 668g Chassis Material Metal Steel Chassis Color Black Operating Temperature 0 C 40 C 32 F 104 F Storage Temper...

Page 51: ...60 720 480i 60 720 480p 60 720 576i 50 720 576p 50 800 600p 56 60 72 75 85 60 60 60 848 480p 60 1024 768p 60 70 75 85 60 60 60 1152 864p 75 1280 720p 25 30 1280 720p 50 60 1280 768p 60 75 85 60 60 60 1280 800p 60 75 85 60 60 60 1280 960p 60 85 60 60 60 1280 1024p 60 75 85 60 60 60 1360 768p 60 1366 768p 60 1400 1050p 60 1440 900p 60 75 60 60 60 1600 900p 60RB 1600 1200p 60 1680 1050p 60 1920 1080i...

Page 52: ... 30 1920 1080p 50 60 1920 1200p 60RB 2560 1440p 60RB 2560 1600p 60RB 2048 1080p 24 25 30 2048 1080p 50 60 3840 2160p 24 25 30 3840 2160p 50 60 4 2 0 3840 2160p 24 HDR10 3840 2160p 50 60 4 2 0 HDR10 3840 2160p 50 60 4096 2160p 24 25 30 4096 2160p 50 60 4 2 0 4096 2160p 24 HDR10 4096 2160p 50 60 4 2 0 HDR10 4096 2160p 50 60 ...

Page 53: ...mpling Rate kHz 32 44 1 48 88 2 96 176 4 192 Bitstream Supported Formats Standard High Definition Bypass only Streaming Output LPCM Max Channels 2 Channels Sampling Rate kHz 44 1 48 Bitstream Supported Formats None 8 3 2 Analog Audio Analog Input Max Audio Level 2Vrms Impedance 20kΩ Type Unbalanced ...

Page 54: ...Cable Cat 5e 6 100m Cat 6a 7 100m Bandwidth Category Examples 1080p FHD Video Up to 1080p 60Hz 12 bit color Data rates lower than 5 3Gbps or below 225MHz TMDS clock 4K30 UHD Video 4K 24 25 30Hz 4K 50 60Hz 4 2 0 8 bit color Data rates higher than 5 3Gbps or above 225MHz TMDS clock but below 10 2Gbps 4K60 UHD Video 4K 50 60Hz 4 4 4 8 bit 4K 50 60Hz 4 2 0 10 bit HDR Data rates higher than 10 2Gbps ...

Page 55: ...dentification Data GUI Graphical User Interface HDCP High bandwidth Digital Content Protection HDMI High Definition Multimedia Interface HDR High Dynamic Range IP Internet Protocol LAN Local Area Network LED Light Emitting Diode LPCM Linear Pulse Code Modulation NAS Network Attached Storage NFS Network File System OSD On Screen Display SNTP Simple Network Time Protocol TCP Transmission Control Pro...

Page 56: ...CYPRESS TECHNOLOGY CO LTD www cypress com tw ...

Reviews: