4
6. OPERATION CONTROLS AND FUNCTIONS
6.1 Front Panel
PWR
AUTO
ADJUST
HDMI IN
LAN
LINK
VGA IN
VGA IN
L/R IN
IN
SEL
6
7
1 2
3
5
4
9
8
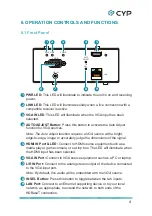
1
PWR LED:
This LED will illuminate to indicate the unit is on and receiving
power.
2
LINK LED:
This LED will illuminate solidly when a live connection with a
compatible receiver is active.
3
VGA IN LED
: This LED will illuminate when the VGA input has been
selected.
4
AUTO ADJUST Button:
Press this button to activate the Auto Adjust
function for VGA sources.
Note: The Auto Adjust function requires a VGA source with a bright,
edge-to-edge, image to accurately judge the dimensions of the signal.
5
HDMI IN Port & LED:
Connect to HDMI source equipment such as a
media player, game console, or set-top box. The LED will illuminate when
the HDMI input has been selected.
6
VGA IN Port:
Connect to VGA source equipment such as a PC or laptop.
7
L/R IN Port:
Connect to the analog stereo output of the device connected
to the VGA input port.
Note: By default, this audio will be embedded with the VGA source.
8
IN SEL Button:
Press this button to toggle between the two inputs.
9
LAN Port:
Connect to an Ethernet supporting device or to your local
network, as appropriate, to extend the network to both ends of the
HDBaseT connection.
Summary of Contents for CH-2538TXM-TB
Page 2: ... registered trademarks of HDMI licensing Administrator Inc ...
Page 33: ......
Page 34: ......
Page 35: ......
Page 36: ...CYPRESS TECHNOLOGY CO LTD www cypress com tw ...


