background image

2

6. OPERATION CONTROLS AND FUNCTIONS

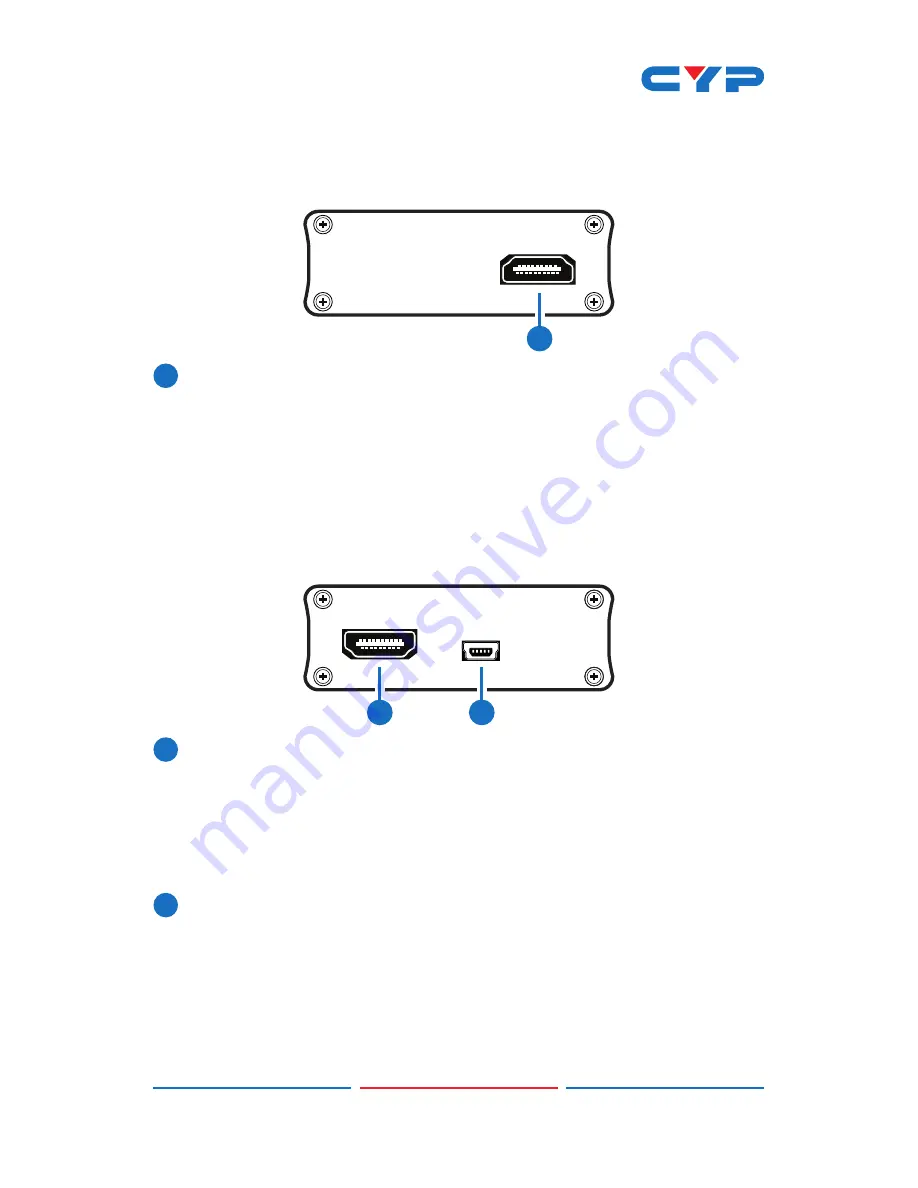
6.1 Front Panel

CLUX-

UCEC

HDMI I

/

O

1

1

 HDMI I/O:

 Connect to the HDMI/DVI output of your source (i.e., 

DVD player or set-top box) or the input ports of an HDMI/DVi 

equipped display using a HDMI or HDMI to DVI adaptor cable. 


Note: When connecting to an input source, the other HDMI I/O 

must be connected to a display device. You cannot control two 

sources or two displays simultaneously.

6.2 Rear Panel

HDMI I

/

O

USB

1

2

1

 HDMI I/O:

 Connect to the HDMI/DVI output of your source (i.e., 

DVD player or set-top box) or the input ports of an HDMI/DVi 

equipped display using a HDMI or HDMI to DVI adaptor cable. 


Note: When connecting to an input source, the other HDMI I/O 

must be connected to a display device. You cannot control two 

sources or two displays simultaneously.

2

 USB:

 Connect to a PC/laptop with a mini-USB to USB-A type cable 

when control of the source/display devices over RS-232 is required.  

Please refer to Section 7 for details. This port provides power for the 

device when the connected PC or laptop is turned on. However 

when the RS-232 mode is not being used, no power is needed, so it 

will bypass the system.

Summary of Contents for CLUX-UCEC

Page 1: ...CLUX UCEC HDMI CEC Controller Operation Manual Operation Manual ...

Page 2: ......

Page 3: ...serves the right to make improvements to this document and or product at any time and without notice COPYRIGHT NOTICE No part of this document may be reproduced transmitted transcribed stored in a retrieval system or any of its part translated into any language or computer file in any form or by any means electronic mechanical magnetic optical chemical manual or otherwise without express written p...

Page 4: ...roduct through any openings or empty slots in the unit as you may damage parts inside the unit Do not attach the power supply cabling to building surfaces Use only the supplied power supply unit PSU Do not use the PSU if it is damaged Do not allow anything to rest on the power cabling or allow any weight to be placed upon it or any person walk on it To protect the unit from overheating do not bloc...

Page 5: ...peration Controls and Functions 2 6 1 Front Panel 2 6 2 Rear Panel 2 7 Software Installation 3 7 1 Installing the RS 232 Driver 3 7 2 Connecting the Hardware 3 7 3 Using the RS 232 Application 8 9 CEC Operation Code 15 10 CEC Logical Address 17 11 Connection Diagram 18 12 Specifications 19 13 Acronyms 20 ...

Page 6: ...e power cables 2 APPLICATIONS CEC system remote control over USB for HDMI devices 3 PACKAGE CONTENTS HDMI CEC Controller User Manual Application CD ROM 4 SYSTEM REQUIREMENTS HDMI source equipment with output to HDMI display that have a built in CEC function HDMI cable PC or laptop with built in RS 232 software and USB cables 5 FEATURES HDMI v1 3 HDCP v1 1 DVI v1 0 compliance Supports full CEC func...

Page 7: ... the HDMI DVI output of your source i e DVD player or set top box or the input ports of an HDMI DVi equipped display using a HDMI or HDMI to DVI adaptor cable Note When connecting to an input source the other HDMI I O must be connected to a display device You cannot control two sources or two displays simultaneously 2 USB Connect to a PC laptop with a mini USB to USB A type cable when control of t...

Page 8: ...2 Connecting the Hardware Once the RS 232 driver is installed connect the device to a PC Laptop with a mini USB to USB A type cable Step 1 Allow the computer to detect the device by following the found new hardware window that will appear After the hardware has been successfully detected confirm the detection in Device Manager Once the device is successfully connected to the PC the connection will...

Page 9: ...appear on your PC screen Choose No not this time and Click Next to continue Select Search for the best Driver in these locations and then Click Browse and navigate to the USB TO RS232 SOFTWAVE folder on the CD Rom Click Next to continue ...

Page 10: ... the Continue Anyway button to continue Click the Finish button to complete this part of the installation Now the PC will show Found New Hardware for the USB Serial Port This means the device has been detected ...

Page 11: ...ardware Wizard again please repeat the same steps to complete the installation Choose No not this time and click the Next button to continue Choose Install from a list or specific location Advanced and click the Next button to continue ...

Page 12: ... and then Click Browse and navigate to the USB TO RS232 SOFTWAVE folder on the CD Rom Click Next to continue Click the Finish button and a confirmation message that confirms the completion of the installation will be displayed in the system as shown below ...

Page 13: ...ance System System Properties Hardware Device Manager Ports COM LPT USB Serial Port COM Note The COM Port number as this will be required when using the RS 232 application 7 3 Using the RS 232 Application Step 1 Please insert the included CD and double click the CLUX_UCEC_ AP exe to install ...

Page 14: ... CLUX UCEC 2 CEC Commands and Data Setting 3 CEC Basic Command Buttons 4 EDID Read Write Save File and Load File Buttons 5 RS232 ComPort Communication Log Window 6 RS232 ComPort Communication Log Window Control Buttons Step 2 1 Select the COM Port Refer to Step 2 in Section 7 2 and set the UART BaudRate to 115200 and press the Connect button From this step onwards users can start to send or receiv...

Page 15: ...xecuted For example if we are simulating a DVD player sending the Active Source 1000 command to a TV based on CEC protocol there are a few bytes in Active Source 1000 command 1 2 3 4 5 6 1 Data Length How many bytes need to be sent The length includes the CEC Header CEC OPCode and CEC Data In this example is 5 Bytes ...

Page 16: ...pend on which command is being used and different commands will have different data bytes In this example the Active Source command has to identify which physical address is needed The address of the port that connects to the TV is 1000 therefore 10 and 00 need to be entered 6 After entering all the necessary bytes press the Transmit button to send the CEC command 7 Details of transmitted data wil...

Page 17: ...12 Step 2 4 Click on the EDID Read button to read EDID settings of the curently connected device and press the SAVE button to save it it to the desired location ...

Page 18: ...to the device and make sure it is well connected and powered up then press the button again to re read the EDID again When the EDID has been read successfully the communications log window will show Read complete Click on the Save File button to save the EDID in the user s desire ...

Page 19: ... EDID Write Fail check the connection to the device and make sure it is well connected and powered up and also check the EDID file is correct then click on the Write button to try again The RS232 COM port communication log window shows a record of all CEC commands The RS232 COM port log window control allows users to adjust the RS232 log window s display ...

Page 20: ...atus 0x0B Record Off 0x04 Image View On 0x05 Tuner Step Increment 0x06 Tuner Step Decrement 0x07 Tuner Device Status 0x08 Give Tuner Device Status 0x09 Record On 0x0A Record Status 0x0B Record Off 0x0D Text View On 0x0F Record TV Screen 0x1A Give Deck Status 0x1B Deck Status 0x32 Set Menu Language 0x36 Standby 0x41 Play 0x42 Deck Control 0x44 User Control Pressed 0x46 Give OSD Name 0x47 Set OSD Na...

Page 21: ...Report Physical Address 0x85 Request Active Source 0x86 Set Stream Path 0x87 Device Vendor ID 0x89 Vendor Command 0x8A Vendor Remote Button Down 0x8B Vendor Remote Button Up 0x8C Give Device Vendor ID 0x8D Menu Request 0x8E Menu Status 0x8F Give Device Power Status 0x90 Report Power Status 0x91 Get Menu Language 0x93 Select Digital Service ...

Page 22: ...o System 6 0x06 STB2 7 0x07 STB3 8 0x08 DVD2 9 0x09 Recording Device 3 10 0x0A Reserved 11 0x0B Reserved 12 0x0C Reserved 13 0x0D Reserved 14 0x0E Free Use 15 0x0F Unregistered as initiator address Broadcast as destination address S 232 Transmission Format Baud Rate 115200 bps Data Bit 8 bit Parity None Stop Bit 1 bit Flow Control None ...

Page 23: ...18 11 CONNECTION DIAGRAM CLUX UCEC HDMI I O HDMI I O USB DVD or Blu ray Player PC or Laptop Display HDMI Input USB Connection HDMI Output HDMI CEC Controller ...

Page 24: ...t HDMI Input Cable Distance 6m 1080p 8 bit or 12 bit HDMI Output Cable Distance 10m 1080p 8 bit or 12 bit HDMI Resolutions VGA WUXGA 480i 1080p 50 60 1080p 24 DVI Resolutions VGA WUXGA 480i 1080p 50 60 1080p 24 ESD Protection Human body model 8kV air discharge 4kV contact discharge Dimensions 114 mm W 65 mm D 26 mm H Weight 200 g Chassis Material Aluminum Silkscreen Color Silver Power Consumption ...

Page 25: ...er Electronics Control DVI Digital Visual Interface EDID Extended Display Identification Data HDCP High bandwidth Digital Content Protection HDMI High Definition Multimedia Interface VGA Video Graphics Array WUXGA Wide Ultra Extended Graphics Array ...

Page 26: ......

Page 27: ......

Page 28: ...Home page http www cypress com tw CYPRESS TECHNOLOGY CO LTD ...

Reviews: