4
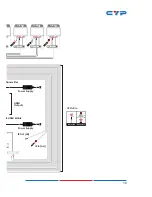
6.2 Rear Panel
RS232
MAIN
RS232
AUX
CAT Out
CAT Out
CAT Out
HDMI In 1
HDMI In 2
HDMI In 3
CAT Out
HDMI In 4
CAT Out
HDMI In 5
CAT Out
HDMI In 6
CAT Out
HDMI In 7
CAT Out
HDMI In 8
DC 24V
1
2
3
4
V+
GND
GND
V+
GND
1
2
3
4
5
6
7
8
All
IR Extender
IR Blaster
2
1
4
3
6
7
5
1
RS-232 AUX:
Connect to a device that can be controlled (via D-Sub
9-pin male cable) by RS-232 commands.
2
RS-232 MAIN:
Connect to a PC or laptop with D-Sub 9-pin male
cable for the transmission of RS-232 commands.
3
IR Blaster 1~All:
Connect the supplied IR blasters (included in the
package) for IR signal transmission, IR signals will be relayed from the
designated output IR extender. For the "All" port, the IR signals will be
relayed from all output at the same time. Place the IR blaster in direct
line-of-sight of the equipment to be controlled.
4
IR Extender 1~All:
Connect the supplied IR extenders (included in
the package) for IR signal reception the signal will be relayed to the
designated output device via the IR blaster. For the "All" port, the
signal will be relayed to all outputs. Ensure that remote being used is
within the direct line-of-sight of the IR extender.
5
HDMI In 1~8:
Connect to the HDMI input source devices such as a
DVD player or a Set-top Box with HDMI cables or DVI to HDMI cables.
6
CAT Out 1~8:
Connect to the CAT in port of receiver units with a
single CAT5e/6/7 cable for HDMI Audio/Video and IR/RS-232 control
signal sending.
Note:
Do NOT connect these CAT outputs to the LAN port of
receiver units—this will cause serious damage to the receiver unit.
7
DC 24V:
Plug the 24 V DC power supply (included in the package)
into the unit and connect the adaptor to an AC outlet. This unit will
also power PoE (Power over Ethernet) capable receiver units.


