8
6. OPERATION CONTROLS AND FUNCTIONS
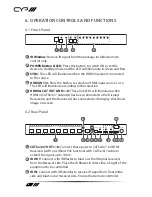
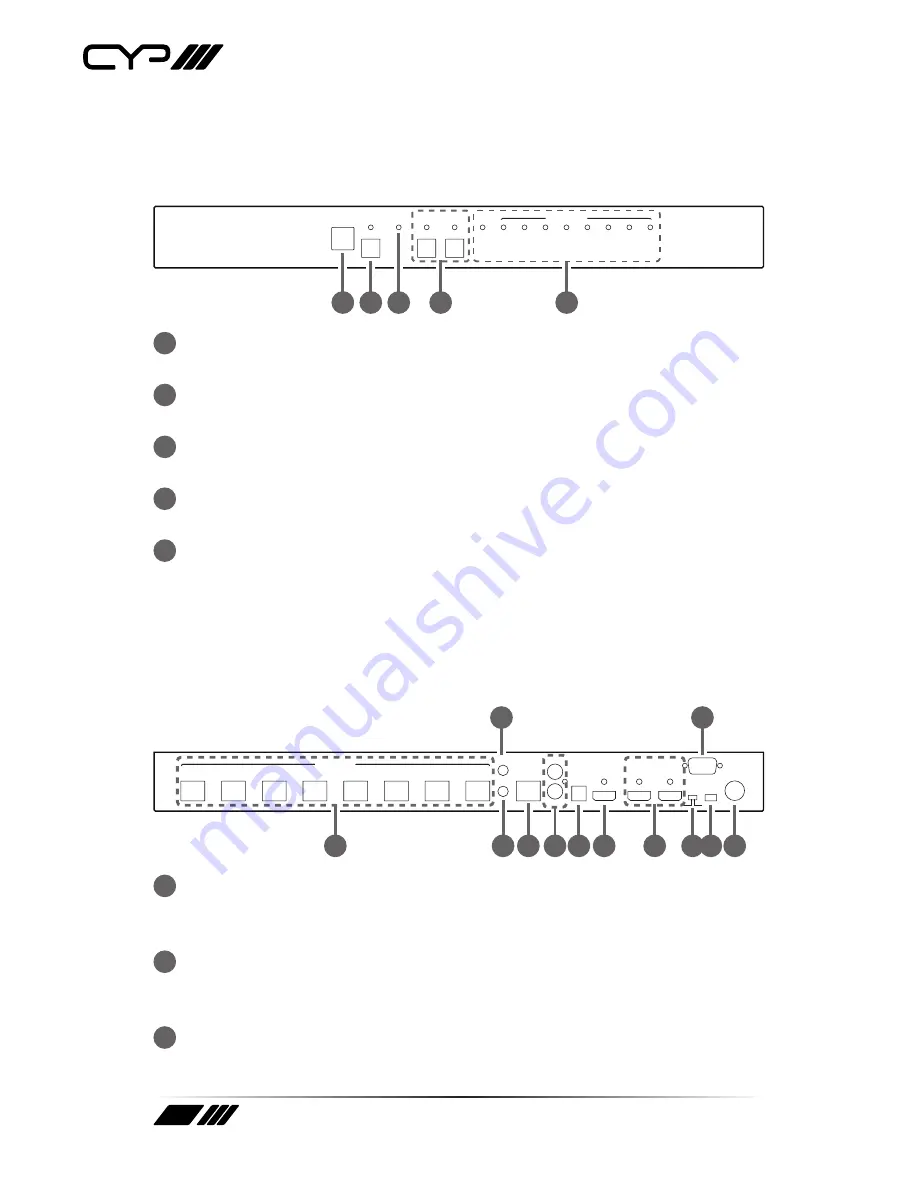
6.1 Front Panel
POWER
SYNC
HDMI
IN 1
HDMI
IN 2
HDMI
LINK
LINK 1
LINK 2
LINK 3
LINK 4
LINK 5
LINK 6
LINK 7
LINK 8
CAT5e/ 6 / 7 OUT
1 2 3
4
5
1
IR Window:
Receive IR signal from the package included remote
control only.
2
POWER Button & LED:
Press this button to switch ON or set the
device to standby mode and the LED will illuminate in Green and Red.
3
SYNC:
This LED will illuminate when the HDMI input port connected
to the source.
4
HDMI IN 1/2:
Press the button to selection HDMI input source 1 or 2.
The LED will illuminate according to the selection.
5
HDMI & CAT OUT LINK 1~8:
These link LEDs will illuminate when
HDMI or CAT5e/6/7 output(s) has been connected to the Display/
Receiver(s) and the Receiver(s) has connected with display that shows
image on screen.
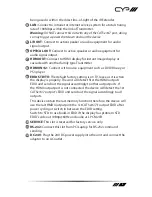
6.2 Rear Panel
8
7
6
5
4
3
2
1
LAN
OPTICAL
OUT
HDMI
OUT
HDMI
IN 2
HDMI
IN 1
RS-232
IR OUT
L/R OUT
IR IN
SERVICE
STD TV
DC 24V
DC 24V
EDID
CAT5e/ 6 / 7 OUT
1
3
2
11
5
4
6 7
8
9 10 12
1
CAT5e/6/7 OUT 1~8:
Connect these ports to CAT5e/6/7 to HDMI
Receivers (with or without PoE function) with CAT5e/6/7 cable to
extend the signal up to 100m.
2
IR OUT:
Connect with IR Blaster to blast out the IR signal received
from the Receiver side. Place the IR Blaster in direct line-of-sight of the
equipment to be controlled.
3
IR IN:
Connect with IR Extender to receive IR signal from Transmitter
side and blast out at Receiver side. Ensure that remote controller
Summary of Contents for PU-2H8HBTE-AD
Page 1: ...PU 2H8HBTE AD 2 x 8 HDBaseT Switch with Audio Dembedding OPERATION MANUAL ...
Page 2: ......
Page 12: ...12 7 CONNECTION DIAGRAM ...
Page 15: ......


