CR-MM-1-0-00
PS-28 Cruiser
PS-28N Cruiser
CHAPTER 6 – CONTROL SYSTEM
Date of issue: 2011-11-08
Revision No.: 2
6 - 25
•
evidence of sleeves deformation and damage on cable surface
•
evidence of cable corrosion
•
cable distortion
c) Exchange the cable in cases as follows:
•
broken any wire
•
wear of cable surface resulted in permanent deformation of cable section.
•
it is not possible to set the rudder to neutral position (see 6.4.4)
d) Check rudder deflections (see 6.4.3).
6.5 Exchanges / Service information
6.5.1 Rudder control cable exchange
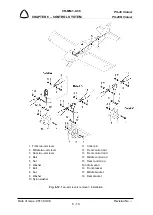
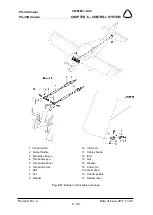
a) Remove the lockwire from the turnbuckle (4; 5; 6, Fig. 6-17).
b) Cut the control cable (1) in the cockpit behind the rudder pedals.
c) Remove the cotter pin (15), unscrew the nut (13), remove the washer (14), bolt (12) and
disconnect the cable shackle (11) from the rudder lever (3).
d) Remove cable on the rudder side from the fuselage.
NOTE:
Grease the new cable with lubricant grease before installing it to the fuselage.
e) Insert the new cable (1) from the rudder side into the fuselage.
f) Set Nicopress sleeve (3) on the cable end in cockpit.
g) Bend the cable end in cockpit around the cable thimble (2), insert the turnbuckle eye (4) to
the cable thimble (2), set Nicopress sleeve (3) close to the cable thimble and press
Nicopress sleeve by Nicopress pliers (see 15.10).
h) Connect new cable with turnbuckle (5; 6) installed on rudder pedal (16).
i) Set the rudder and the pedal and secure them in neutral position.
j) Set on rear end of cable thimble (2) and cable shackle (11) and connect cable shackle with
rudder lever (17) by means of the bolt (12).
k) Remove the cable from the rudder lever (17), cut the cable end to fit to the marked length
and by means of Nicopress pliers (see 15.10) install the Nicopress sleeve (3).
l) Fit the cable shackle (11) to the rudder lever (17), insert the bolt (12) to the hole, install
washer (14), screw and slightly tighten the nut (13).
m) Secure the nut (13) with the new cotter pin (15).
n) Check (see 6.4.3) and adjust (see 6.4.4) rudder deflections.
o) Secure the turnbuckle (4; 5; 6) with the lockwire.

