CR-MM-1-0-00
PS-28 Cruiser
PS-28N Cruiser
CHAPTER 12 – INSTRUMENTS AND AVIONICS
Date of issue: 2018-09-27
Revision No.: 22
12 - 37
CAUTION:
DO NOT OVER-TIGHTEN THE LOCKING SCREW. YOU CAN DAMAGE
THE LOCKING MECHANISM.
(f) Set the
MASTER BAT
,
AVIONICS
switches to ON and
do an operational test.
12.3.19
Removal of intercom
Type of maintenance: line
Authorization to perform:
See point 2.5.3.
Tools needed:
-
Phillips PH1 screwdriver
(a) Set the
MASTER BAT
,
AVIONICS
switches to OFF.
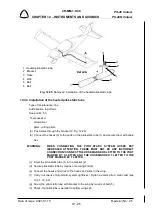
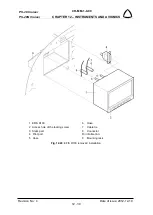
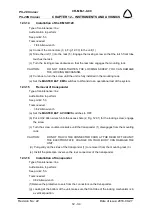
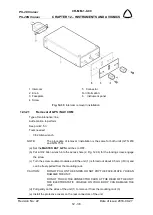
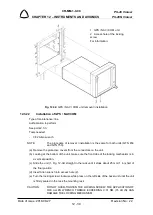
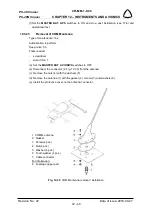
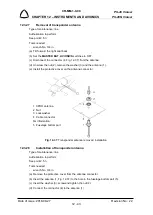
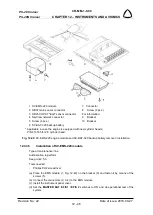
(b) Disconnect the connector (5, Fig. 12-33) from the unit.
(c) Remove the knobs (2) from the volume and squelch control shafts.
(d) Unscrew the screws (4) and remove the faceplate (3).
(e) Carefully remove the unit (1).
CAUTION:
DO NOT TOUCH THE CONNECTOR CARD AT THE REAR OF THE UNIT.
THE ELECTROSTATIC CHARGE ON YOUR BODY CAN DAMAGE THE
UNIT.
(f) Install the protective cover on the rear connector of the unit.
12.3.20
Installation of intercom
Type of maintenance: line
Authorization to perform:
See point 2.5.3.
Tools needed:
-
Phillips PH1 screwdriver
(a) Remove the protective cover from the connector on the unit.
(b) Insert the unit (1, Fig. 12-33) from behind the instrument panel, aligning the holes for the
knobs, LED, and switch.
(c) Place the faceplate (3) over the knob shafts and secure it by means of the two screws
(4).
(d) Install the knobs (2) over the volume and squelch control shafts.
(e) Connect the connector (5) to the unit (1).
(f) Set the
MASTER BAT
,
AVIONICS
switches to ON and
do an operational test.

