CR-MM-1-0-00
PS-28 Cruiser
PS-28N Cruiser
CHAPTER 6 – CONTROL SYSTEM
Date of issue: 2018-09-27
Revision No.: 22
6 - 7
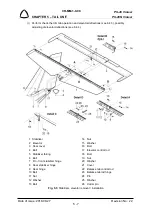
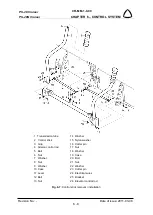
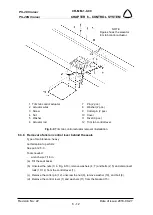
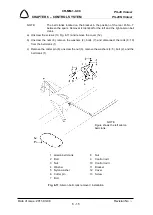
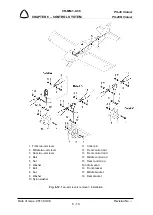
b) Unscrew the nuts (17), remove the washers (18) and disconnect the aileron control rods (4)
from sticks (2); remove the cases (19).
c) Remove the grips (3) and disconnect wires (24) for trim tab switches and PTT on the grips.
d) Remove the cotter pins (16), unscrew the nuts (13), remove the washers (14), bolts (12) and
washers (15).
e) Carefully remove the control sticks assembly from the cockpit.
f) Remove the cotter pin (23), unscrew the nut (21), remove the washers (22) and bolt (20);
turn the stick (2) 90 degree and remove it from the transmission tube (1).
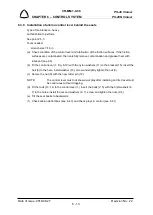
6.3.3 Control stick installation
Type of maintenance: heavy
Authorization to perform:
See point 2.5.3.
Tools needed:
-
wrench size 7/16 in, 3/8 in
-
pliers
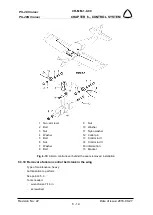
a) Put the stick (2, Fig. 6-7) in the transmission tube (1).
b) Turn the stick (2) 90 degree and insert the bolt (20) with the washer (22) into the transmission
tube (1) and stick (2), insert the washers (22), screw and carefully tighten the nut (21).
c) Secure the nut (21) with the new cotter pin (23).
d) Put the control stick assembly with the washers (17) between the brackets (25).
e) Insert the bolts (12) into the holes, insert the washers (14), screw and carefully tighten the
nuts (13).
f) Secure the nuts (13) with the new cotter pin (16).
g) Connect the wires (24) for trim tab switches and PTT on the grips (3); install grips (see Wiring
Manual).
h) On the control sticks screw insert the cases (19), aileron rods (4), and washers (18), screw
and tighten the nuts (17).
i) Put the control rod (26) to the fork on the transmission tube (1), insert the bolt (5) with washer
(7) into the hole, insert the washer (7), screw and carefully tighten the nut (6).
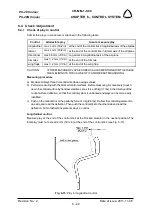
j) Check aileron and elevator deflections (see 6.4.3) and check plays in control (see 6.4.1).

