background image

EN / CZone® Waterproof Keypad User & Installation Manual


8


  NETWORK CONFIGURATION 

CZone modules communicate with each other over a NMEA2000 CAN BUS network. Each module needs a unique 

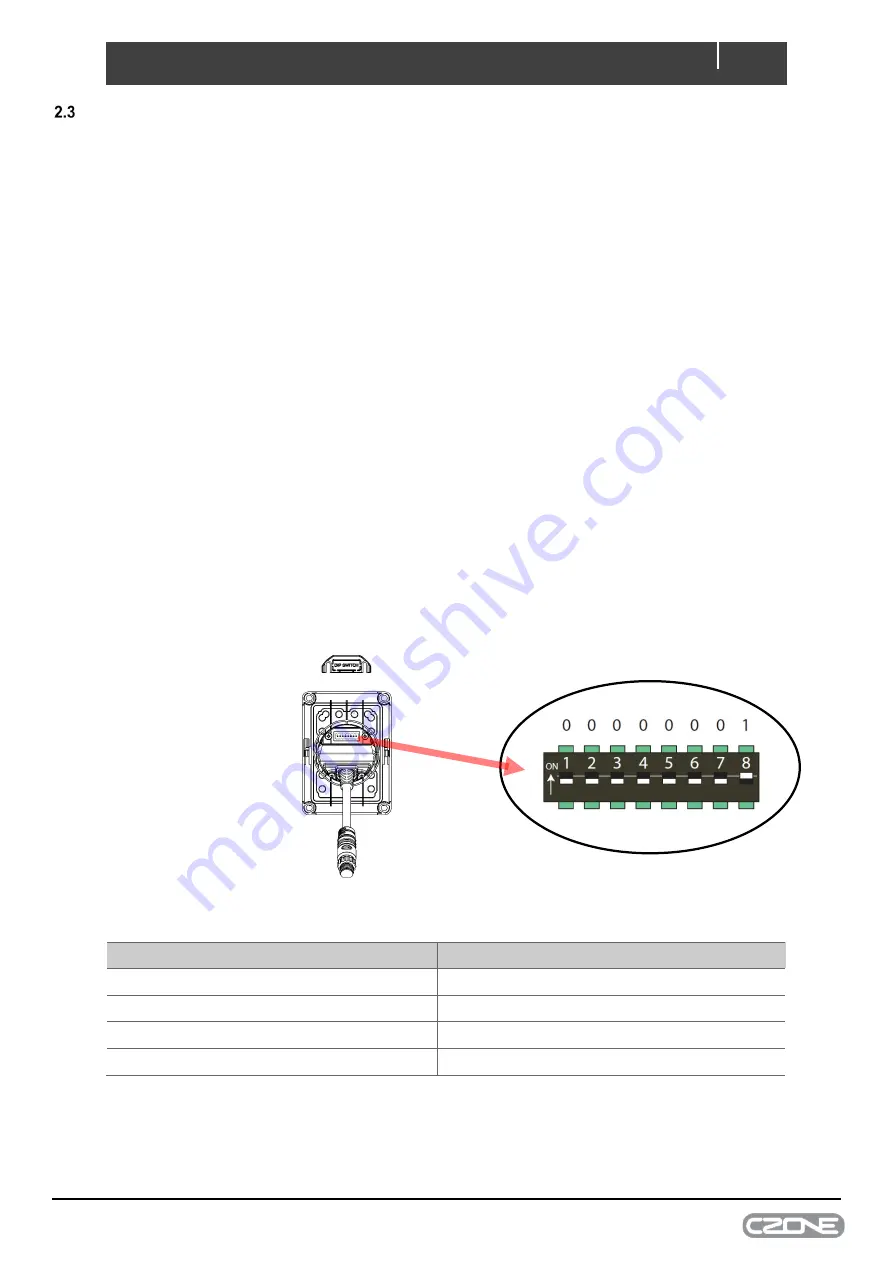
address, this is achieved by carefully setting the dip switch on each module with a small screwdriver. The dipswitch on 

each module must match the setting in the CZone configuration. 
The CZone Waterproof Keypad comes pre-loaded with a factory configuration to provide plug and play functionality 

when installed with a Contact 6 PLUS. The factory configuration provides basic switching functionality with ONE to ONE 

switch input to channel output mapping. For example, button one on the keypad will control output one on the Contact 

6 PLUS, and button five will control output five. 

2.3.1  Standalone Installation with Contact 6 PLUS 

  Set the dipswitch on the Waterproof Keypad and Contact 6 PLUS to match the below table. 

o

  The Waterproof Keypads come with the dipswitch set to the factory configuration as per below table. 

  Connect the Waterproof Keypad to the Contact 6 PLUS with the CZone Smart Harness or NMEA2000 network. 

  Change any desired circuits to have momentary functionality instead of latching (see Initial Power up section). 

2.3.2  Networked Installation 

  To install a Waterproof Keypad with other networked CZone modules, or to achieve advanced functionality such 

as sequential button presses, circuit dimming or one touch modes of operation, a custom configuration needs 

to be installed. 

  Set the dipswitch on the Waterproof Keypad to match the configuration file. 

  All other CZone modules must have the dipswitch set to same as the configuration file. 


The example below shows a dipswitch setting of 0000001 where 0 = OFF and 1 = ON 


1. 

Factory configuration table


Module 

Dipswitch 

Contact 6 PLUS 

10000000 

Portrait Waterproof Keypad


00000001 

Landscape Waterproof Keypad


00000011 

Display Interface 

11101000 

 
NOTE – 

If you have a compatible MFD or Display Interface, the factory configuration will work and populate circuits 1 - 

6 on the display for basic on/off control. 

IMPORTANT - 

Each CZone device must have a unique dipswitch number and the dipswitch of the device must match 

the dipswitch set in the configuration file.


Summary of Contents for 6-Way Waterproof Keypad

Page 1: ...Waterproof Keypad User Installation Manual V1 0...

Page 2: ...tions of either its products or associated documentation Translations In the event that there is a difference between a translation of this manual and the English version the English version should be...

Page 3: ...ontact 6 PLUS 8 2 3 2 Networked Installation 8 Initial Power Up 9 2 4 1 Standalone Installation with Smart Harness 9 2 4 2 Networked Installation existing new NMEA2000 network 9 Additional Features 10...

Page 4: ...d as a standalone plug and play system with a Contact 6 PLUS or can be added to any CZone system as an additional controller PARTS INCLUDED FEATURES Waterproof Keypad for controlling CZone systems Plu...

Page 5: ...Indicators 8 Power button backlight control HARDWARE OVERVIEW 1 LED Indicators Colour Description Extinguished Channel Off White Solid On Channel On 1x White Flash Module Not Configured 2x White Flas...

Page 6: ...it and landscape orientation 1 Drill the main hole with a 2 1 16 52mm hole saw 2 Drill the 4 corner screw holes 3 If using a custom configuration loosen the dipswitch cover screws half a turn and slid...

Page 7: ...Zone Smart Harness Alternatively you can install the Waterproof Keypad with a standard NMEA2000 network backbone IMPORTANT The CZone Smart Harness should NOT be installed to a NMEA2000 network it shou...

Page 8: ...e Connect the Waterproof Keypad to the Contact 6 PLUS with the CZone Smart Harness or NMEA2000 network Change any desired circuits to have momentary functionality instead of latching see Initial Power...

Page 9: ...circuit Refer to LED codes to diagnose any faults which need to be rectified 2 4 2 Networked Installation existing new NMEA2000 network 1 Power up the NMEA2000 network 2 Check that the LED indicators...

Page 10: ...by holding the power button and repeatedly short pressing on button 1 or 2 2 5 3 Momentary Latching Switch Toggle When installed with a Contact 6 PLUS any circuit can be toggled to operate as a momen...

Page 11: ...11 EN CZone Waterproof Keypad User Installation Manual SYSTEM DIAGRAMS Figure 4 Basic System Diagram for Contact 6 PLUS System...

Page 12: ...EN CZone Waterproof Keypad User Installation Manual 12 Figure 5 Basic System Diagram for Contact 6 PLUS with Extra Display...

Page 13: ...13 EN CZone Waterproof Keypad User Installation Manual Figure 6 Advanced System Diagram for Contact 6 PLUS with NMEA2000 Network...

Page 14: ...years Operating temperature range 15C to 55C 5F to 131F Storage temperature range 40C to 85C 40F to 185F Portrait Dimensions W x H x D 77 x 107 x 32mm 3 03 x 4 21 x 1 26 Landscape dimensions W x H x D...

Page 15: ...sories Part Number Description 80 911 0162 00 CZONE WATERPROOF KEYPAD LANDSCAPE 80 911 0163 00 CZONE WATERPROOF KEYPAD PORTRAIT SET KEYPAD 1 LABEL SET FOR CZONE WATERPROOF KEYPAD MARINE 80 911 0174 00...

Page 16: ...EN CZone Waterproof Keypad User Installation Manual 16 5 CE DECLARATION OF CONFORMITY...

Reviews: