JF-1A Conductivity Sensor
A440-009
Page 52 of 56
FEBRUARY 2009
A/D’s etc. are completely incorporated. If you are calibration the current loop
output directly to your PLC proceed to Section 5.0.
Section 4.0 Temperature Current Loop Calibration using DVM and
Reference Resistors:
Equipment Required:
n)
JF-1 Serial Test Cable FSI P/N B440-079
o)
Serial Data Communicating Device, set for operation at 9600
baud, 1 stop, 8 data, No parity
p)
100 ohm or 250 ohm sensing resistor
q)
Digital Multi Meter with 0.001 VDC resolution.
r)
Power 24.0 VDC
Procedure:
1)
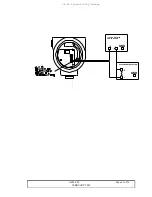
Connect the probe to the power supply as detailed in
the manual in series with either the 100 or 200-ohm
sense resistor to the temperature loop terminals.
2)
Power the JF-1A either from the conductivity loop or
from the 4 –wire connection port (Note the power
supply must be isolated from the supply which is used
to run the sensor see application not 10-006).
3)
Select the range of operation the 4 – 20 ma output is to
represent, as example; say we want 20 mA to equal
50˚C and 4 mA to Equal 0˚C.
4)
Connect the serial cable to the test jack on the JF-1
Sensor. On the PC press enter and confirm connection
is made by the receipt of a single line of data from the
JF-1 Sensor. (Or turn the unit on add see the turn on
banner being received).
5)
Place the unit in open mode using the “***O”
command followed by the enter key. Verify the unit is
in OPEN MODE by pressing an additional entering

