ADJUSTING THE LEVELS:
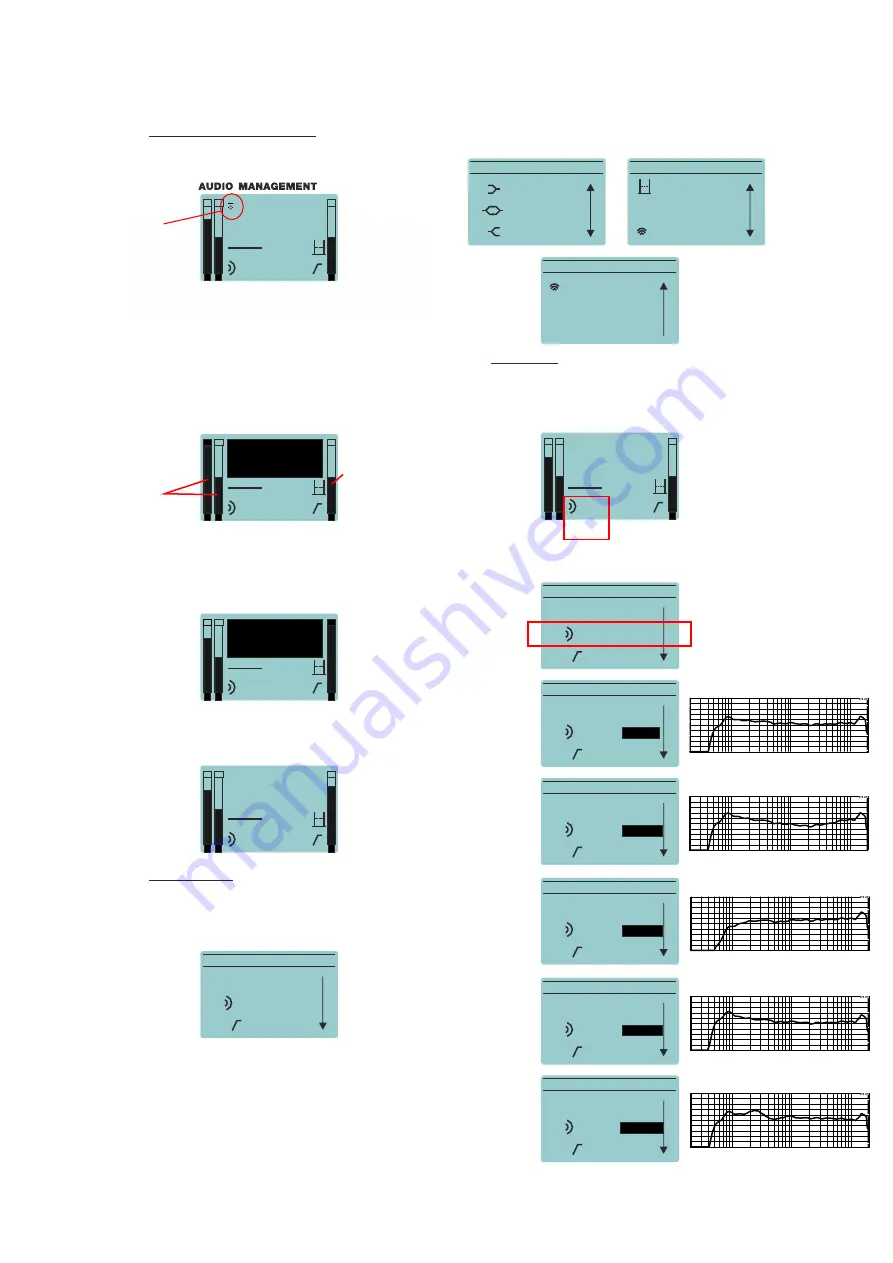
By default the state of the screen is the following:
MAIN MENU:
As stated previously by pushing the encoder the
user can access to the following options in the
MENU:
PRESETS:
Five factory settings (
live, dance, vocals, bboost,
monitor
) depending on the type of music/use that
has been configured inside the unit:
With the encoder go to Preset Sub-menu and press
the knob to access to the different options:
By scrolling down the encoder more options
appear:
1
1
1
1
1
C
L
2
2
2
2
2
live
live
live
live
live
off
off
off
off
off
0,0m
0,0m
0,0m
0,0m
0,0m
O
O
O
O
O
+ 0 dB
+ 0 dB
- 4 dB
MAIN MENU
MAIN MENU
MAIN MENU
MAIN MENU
MAIN MENU
MAIN MENU
MAIN MENU
MAIN MENU
MAIN MENU
MAIN MENU
BACK
BACK
BACK
BACK
BACK
BACK
BACK
LOW: 0 dB
WIRELESS AUDIO
WIRELESS AUDIO
EXPANDER: off
PRESET: Live
PRESET: Live
HIGH: 0 dB
MID: 0 dB
OPTIONS
HPF: Off
HPF: Off
HPF: Off
HPF: Off
HPF: Off
HPF: Off
HPF: Off
Delay: 0,0m
BACK
INPUT
CLIP
LIMIT
Once the input source (s) have been connected to
the amplifier´s cabinet, the user has to adjust the
levels.
For the two input channels (1 and 2), two
independent gain controls are available. Be careful
when setting the input volume and do not exceed
the maximum level shown on the meters: (input clip
shown on channel one)
After having set the input volume values under
the maximum level, user has to adjust ouput
volume with the master control. The level is shown
in the right meter of the screen. As with the inputs be
careful not exceeding the limit: (LIMIT shown)
After these two volume adjustments the screen
will show something like this (when having the input
sources ON):
live preset
PRESET:
Live >
PRESET:
<dance>
PRESET:
<vocals>
PRESET:
<bboost>
PRESET:
<monitor>
Note: to enter and select and option always push the
encoder. For going back in the menu, the user has to
select
Back
on the screen and press the encoder or
just pushing the encoder.
After 30 seconds without using the unit it will go back
to the main screen automatically.
peak
meters
rms
meter
It is highly recommendable
working with output volume
below 0dB. If maximum
level is required user
should increase the output
level (higher than 0dB)
Exceeding the limits may
cause speaker failure!!
Exceeding the limits may
cause speaker failure!!
10k
5k
2k
1k
500
200
100
50
20
20
20k
Hz
120,0
dBSPL
110,0
100,0
90,0
80,0
70,0
DAS Audio SA
LogChirp - Frequency Response
15-07-2015 12,24,23
CH A dBSPL 1/3 Octave 192kHz 32K Rectangular Start 0,00ms Stop 170,66ms FreqLO 5,86Hz Length 170,66ms
File: spl 1m -13 dBu monitor.mls
10k
5k
2k
1k
500
200
100
50
20
20
20k
Hz
120,0
dBSPL
110,0
100,0
90,0
80,0
70,0
DAS Audio SA
LogChirp - Frequency Response
15-07-2015 12,24,23
CH A dBSPL 1/3 Octave 192kHz 32K Rectangular Start 0,00ms Stop 170,66ms FreqLO 5,86Hz Length 170,66ms
File: spl 1m -13 dBu monitor.mls
10k
5k
2k
1k
500
200
100
50
20
20
20k
Hz
120,0
dBSPL
110,0
100,0
90,0
80,0
70,0
DAS Audio SA
LogChirp - Frequency Response
15-07-2015 12,24,23
CH A dBSPL 1/3 Octave 192kHz 32K Rectangular Start 0,00ms Stop 170,66ms FreqLO 5,86Hz Length 170,66ms
File: spl 1m -13 dBu monitor.mls
10k
5k
2k
1k
500
200
100
50
20
20
20k
Hz
120,0
dBSPL
110,0
100,0
90,0
80,0
70,0
DAS Audio SA
LogChirp - Frequency Response
15-07-2015 12,24,23
CH A dBSPL 1/3 Octave 192kHz 32K Rectangular Start 0,00ms Stop 170,66ms FreqLO 5,86Hz Length 170,66ms
File: spl 1m -13 dBu monitor.mls
10k
5k
2k
1k
500
200
100
50
20
20
20k
Hz
120,0
dBSPL
110,0
100,0
90,0
80,0
70,0
DAS Audio SA
LogChirp - Frequency Response
15-07-2015 12,24,23
CH A dBSPL 1/3 Octave 192kHz 32K Rectangular Start 0,00ms Stop 170,66ms FreqLO 5,86Hz Length 170,66ms
File: spl 1m -13 dBu monitor.mls
This icon shows
when Wireless Audio
is activated, from
Firmware v2.1
18
Manual del Usuario
/ vantec series /
User’s Manual


