background image


13 

STEP 3:   HaptiSync Configuration 


A)


Create your D-BOX Connect Account  


Your D-BOX Connect Account is used to manage your subscription and sends HaptiCode tracks to your 
HaptiSync Hub.  


Go to the D-BOX Connect website

https://connect.d-box.com


Create an account using a valid email address 

by clicking the ‘’Register’’ tab


B)


Activate your account  


Activate your D-BOX Connect account by clicking the link in the email you received. You will be 
automatically redirected to the D-BOX Connect home page. 


A)


Enter your payment information  


From the D-BOX Connect home page, edit your payment information 

(please note that a valid credit 

card is required to complete your registration)


B)


Purchase your HaptiSync Subscription  


From the D-BOX Connect home page, purchase your HaptiSync Subscription. Your Subscription is valid 
for a period of one (1) year.  
 

C)


Install the D-BOX HaptiSync App  


The D-BOX HaptiSync App is an application that is compatible with iOS, Android and Windows devices. This 
app allows you to manage and customize your HaptiSync System(s).


Download the D-BOX HaptiSync App from your mobile device

’s

 app store or by using one of the 

following download links: 


Apple App Store 


Google Play Store 


Windows download link  


D)


Connect the HaptiSync Hub to your network  


To use a wireless Wi-Fi network


Open the HaptiSync App. 


Press the ‘’Add’’ button to add your HaptiSync Hub.


Follow the on-screen instructions to complete your network configuration (you must know your Wi-Fi 
password). 


To use a wired Ethernet network: 


Connect a network cable to the ETHERNET port on your HaptiSync Hub. 


Open the HaptiSync App. 


The HaptiSync Hub will automatically be detected. 

Summary of Contents for HaptiSync Hub

Page 1: ...242 914 0003 EN6 April 2021 1 HAPTISYNC SYSTEM User Manual...

Page 2: ...Connection 12 STEP 3 HaptiSync Configuration 13 A Create your D BOX Connect Account 13 B Activate your account 13 C Install the D BOX HaptiSync App 13 D Connect the HaptiSync Hub to your network 13 E...

Page 3: ...A CONNECTIONS FOR JAYMAR LIFESTYLE LIVING MODELS 23 A 1 Single Seat Configuration 24 A 2 Multiple Seat Configuration 24 APPENDIX B CONNECTIONS FOR G1 HAPTIC SYSTEMS 25 B 1 Single Seat Configuration 2...

Page 4: ...ly or those with other pre existing medical conditions All such persons should consult their physicians before using this D BOX Haptic System Use of this D BOX Haptic System is not recommended for chi...

Page 5: ...F Exposure Compliance This equipment complies with FCC radiation exposure limits set forth for an uncontrolled environment This equipment should be installed and operated with a minimum distance of 20...

Page 6: ...installed and operated with minimum distance 20cm between the radiator and your body Cet quipement est conforme aux limites d exposition aux radiations IC CNR 102 tablies pour un environnement non con...

Page 7: ...reate richer fuller experiences and bring the ultimate experience to your home Your new HaptiSyc Hub see section 3 is designed to be used with the D BOX HaptiSync App and features an integrated sound...

Page 8: ...ptiSync Hub using a CAT 5E 6 shielded cable Smartphone tablet or PC required to remotely control your Haptic System s using the D BOX HaptiSync App Required to manage your profile and purchase a Hapti...

Page 9: ...ith the seat assembly see manufacturer s instructions then position your Haptic Seat in your entertainment room Make sure that you respect the following minimum clearance distances Min 4 100mm between...

Page 10: ...e seat C IEC Plug Lock Insert Insert the IEC plug lock on female end of the power cord required only for certain model of seat D Haptic Seat Electrical Connection Your Haptic Seat is equipped with a c...

Page 11: ...a on the back of your HaptiSync Hub if not pre installed Place the antenna upwards for optimal reception B HaptiSync Hub Positioning Install your HaptiSync Hub on a flat surface vertically or horizont...

Page 12: ...ill sense the audio in the room and will automatically synchronize with your Haptic System s C HaptiSync System Interconnection Connect the HaptiSync Hub to the Haptic Seat using the CAT 5E shielded c...

Page 13: ...D BOX Connect home page purchase your HaptiSync Subscription Your Subscription is valid for a period of one 1 year C Install the D BOX HaptiSync App The D BOX HaptiSync App is an application that is c...

Page 14: ...for every location If you experience significant noise you can reduce the vibration intensity by using the intensity slider in the HaptiSync App B HaptiSync delay calibration D BOX s unique and paten...

Page 15: ...favourite source disc streaming video on demand etc and make sure that the sound level is comfortable Using its integrated sound sensor microphone your HaptiSync Hub will automatically recognize any c...

Page 16: ...synchronizing your favourite movies series music and more experiential content using audio Haptic codes are available for more than 2 000 titles and new haptic codes are added weekly internet required...

Page 17: ...ch a movie from your tablet smartphone or laptop with wired headphones If your HaptiSync Hub is located outside of your entertainment room and or connected to your AV Receiver If your HaptiSync Hub ca...

Page 18: ...ecommended Connection Setup Connect the analogue Stereo Downmix output from any AV source to the HaptiSync Hub AUDIO IN jack Alternate HDMI Connection Setup Connect the HDMI OUT from your AV source to...

Page 19: ...timeline the first 15 minutes Recently added D BOX titles 250 latest should be recognized when first played from anywhere in their timeline For example if you want to watch the final scene from an old...

Page 20: ...s upgrade For haptic systems using KAI 1P controllers a KCA or KCA T unit see the red dotted below must be added inside each seat A KCA T T for termination is required only for the last seat on the c...

Page 21: ...1P controller upgrade For haptic systems using a KCU 1P controller you only need to remove the HEMC and the KCU 1P controller then connect the first seat directly into the new HaptiSync Hub HaptiSync...

Page 22: ...tion Communication problem Make sure that the flat cable is properly connected to the NEXT port models with a rear panel or the KineChain OUT port G1 models Try replacing the CAT 5E shielded cable bet...

Page 23: ...23 APPENDIX A CONNECTIONS FOR JAYMAR LIFESTYLE LIVING MODELS These models are equipped with a rear panel to simplify the connections...

Page 24: ...24 A 1 Single Seat Configuration A 2 Multiple Seat Configuration NOTE Up to twenty 20 seats can be connected to the HaptiSync Hub...

Page 25: ...25 APPENDIX B CONNECTIONS FOR G1 HAPTIC SYSTEMS G1 Haptic Systems can be connected to a HaptiSync Hub using a KCA T KineChain Adaptor with termination...

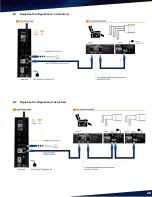
Page 26: ...26 B 1 Single Seat Configuration 2 3 Actuators B 2 Single Seat Configuration 4 Actuators...

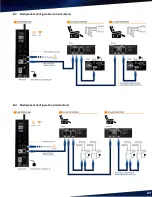
Page 27: ...27 B 3 Multiple Seat Configuration 2 3 Actuators B 4 Multiple Seat Configuration 4 Actuators...

Reviews: