background image

2/36

CPS-M1-MSE

English

99.828.70 1.2/07/22

Introduction

Your D+H service and sales partner

Safety in the building is not only provided by the product. Safety is cre-

ated above all by competence. All D+H service and sales partners are 

certified and regularly trained SHEV specialist companies. They work 

closely with D+H Mechatronic AG as the manufacturer to implement 

comprehensive system solutions for SHEV and natural building venti

-

lation. With holistic support and continuous quality assurance in every 

phase of the project: from consulting, planning and project configuration 

to installation, commissioning, maintenance and service. This means 

that the highest national and international quality standards are reliably 

fulfilled.

Installation and commissioning

The comprehensive network of D+H service and sales partners is avail

-

able to you for proper installation and commissioning. Our partner sys-

tem guarantees that D+H products are installed exclusively by trained 

and experienced technicians in compliance with the technical directives 

and regulations. Personal transfer and instruction of the operators are 

included.

Maintenance and repairs

Building operators are responsible for the functional reliability of safety 

devices in their own buildings.

Regular and proper maintenance ensures that your system will always 

be operational. As SHEV specialist companies, the D+H service and 

sales partners are optimally qualified for the maintenance. Owners/

operators can demonstrate at any time that they have fulfilled their 

obligation by means of a service contract.

Quality with a warranty

You receive extended warranty benefits for all D+H SHEV systems that 

were installed by a D+H service and sales partner and are regularly 

maintained. Ask your local D+H service and sales partner about this.

Always in your neighbourhood

We are represented around the globe with our network of subsidiaries 

and exclusive partners.

Looking for a local D+H partner?

Simply visit our website:

www.dh-partner.com

WARNING

Read all the safety information, instructions, images and technical data 

provided with this product.

Failure to observe the following instructions can result in electric shock, 

fire and/or serious injury.

Keep all the safety information and instructions in a safe place for future 

reference.

Safety information

230 V AC operating voltage!

Risk of injury from electric shock!

• 

Only an authorised, electrically skilled person is allowed to connect 

the power

• 

Keep children away from the controller

•  Only use in dry spaces

•  Only intended for installation indoors

•  Only use unaltered D+H original parts

Content ................................................................................................... 2

Introduction ............................................................................................. 2

Safety information................................................................................... 2

Intended use ........................................................................................... 3

MSE functional principle ......................................................................... 3

Important regulations .............................................................................. 3

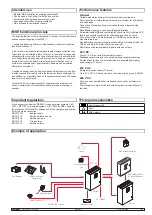
Example of application ........................................................................... 3

Performance features ............................................................................. 3

Pictogram explanation ............................................................................ 3

Overview of components

 ........................................................................ 4

Control module – CM-BT1-D4-P2

 .......................................................... 5

Actuator module – AM-1-2-10-24-D6-D2 ................................................ 5

Digital I/O module - IOM-D1-1212 .......................................................... 5

Supply module – PSM-1-24-40 .............................................................. 5

Trigger module – TMA-1-D4-D12

 ........................................................... 5

Bistable relay module - BRM-1-COC-0006 ............................................ 5

Actuator module - AM-1-1-08-230-D4-D2............................................... 6

Power packs PS-S1-24-20 and PS-S1-24-40

 ........................................ 6

Analog/Digital I/O-Module - ADM-AD1-1212-4 ....................................... 6

Technical data

......................................................................................... 7

24 V emergency supply

 .......................................................................... 7

Declaration of conformity ........................................................................ 7

Arrangement of the modules .................................................................. 8

Installation of the module sockets

 .......................................................... 8

Removal of the module sockets

 ............................................................. 8

General instructions for connection

 ........................................................ 9

Wiring diagram (sample) ........................................................................ 9

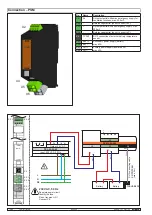
Connection – PSM................................................................................ 10

Connection – Mains switching

 ...............................................................11

Connection – CM .................................................................................. 12

Connection – Digital inputs and outputs ............................................... 13

Further top hat rail levels for additional CPS-M modules ..................... 13

Battery for the clock of the event memory

 ............................................ 13

Connection – soft starter ...................................................................... 14

Connection – BRM ............................................................................... 15

Connection – Frequency converter ...................................................... 16

Connection – IOM................................................................................. 17

Connection – Star-delta circuit ............................................................. 18

Connection – ADM................................................................................ 19

Connection – ADM................................................................................ 20

Connection – AM 24 ............................................................................. 21

Connection – Vent buttons to AM 24

 .................................................... 21

Connection – AM 24 with ACB drives

 ................................................... 22

Connection – AM 24 with ACB drives

 ................................................... 22

Connection – AM 24 with pole-changing drives

.................................... 22

Connection – AM 24 with pole-changing drives

.................................... 22

Connection – Spring return motor ........................................................ 23

Connection – AM 230 ........................................................................... 24

Connection – NSV 401 control and vent button to AM 230

 .................. 24

Connection – 

NSV 401 power supply and D+H ACB drives

 ................. 25

Connection – 

NSV 401 power supply and D+H drives

 ......................... 25

Connection – 

NSV 401 power supply and third-party drives

 ................ 26

Connection – TMA

 ................................................................................ 27

Connection – TMA (2 lines)

 .................................................................. 28

Connection – TMA parallel connection RT

 ........................................... 29

Connection – TMA to fire alarm system (FAS)

 ..................................... 29

Description of the inputs and outputs ................................................... 30

Commissioning and configuration with the SCS software

 .................... 31

Standard configurations

........................................................................ 31

Description of the software functions

.................................................... 32

Operation - Touch panel (optional)

 ....................................................... 33

Operation - Daily ventilation ................................................................. 34

Operation - Weather automation .......................................................... 34

Operation - SHEV

 ................................................................................. 34

Operation - Trigger on alarm

 ................................................................ 35

Operation - Closing after alarm ............................................................ 35

Warranty ............................................................................................... 36

Inspection ............................................................................................. 36

Disposal ................................................................................................ 36

Maintenance and cleaning.................................................................... 36

Content

Summary of Contents for CPS-M1-MSE-020 Series

Page 1: ...CPS M1 MSE D H Downloads 99 828 70 1 2 07 22 en Original instructions Page 2...

Page 2: ...e Safety information 230 V AC operating voltage Risk of injury from electric shock Only an authorised electrically skilled person is allowed to connect the power Keep children away from the controller...

Page 3: ...arm systems VdS 2221 VDE 0100 for electrical systems DIN 18232 for SHEV systems the provisions of the local fire brigade and of the energy supply compa ny for the mains connection EN 12101 10 Energy s...

Page 4: ...bracket optional TP C1 35 RJ12 RJ12 socket C o n t r o l m o d u l e C M B T 1 D 4 P 2 C o n t r o l m o d u l e C M B 1 D 4 P 2 M a i n s s u p p l y m o d u l e P S M 1 2 4 0 4 0 2 4 V D C a c t u...

Page 5: ...26 Ah battery type 6 72 hours of emergency supply time Integrated protection against excessive discharge Temperature controlled charging voltage with external temperature sensor Integrated LED to indi...

Page 6: ...ated LEDs to indicate a fault yellow and alarm red Connection using removable spring type terminals Conductor cross sections max 1 5 mm flexible Dimensions WxHxD 26x130x125 mm Installation on a 35 mm...

Page 7: ...30 0 3 Ah Fire detector 0 005 Ah Smoke vent button 0 014 Ah 24 V DC Drives actuators for 180 sec 0 18 Ah for each 1 A nominal current Alarm devices 250 mA for 180 sec 0 045 Ah Devices and digital outp...

Page 8: ...ght of it Each additional PSM always provides power only to the modules to the right of it This applies also to the emergency battery power Therefore the modules are to be distributed evenly across th...

Page 9: ...upplying the drive Mot a Mot b For pole changing drives 1 additional wire for cable monitoring through which the SHEV high speed HS signal is also transmitted to the drive For ACB drives 2 additional...

Page 10: ...PE Connection PSM RJ12 connecting cable CC TP TCSU max 2 m Battery Battery No Name Description X2 1 N Output potential without an emergency supply for ventilation functions max 500 mA X2 2 Reference...

Page 11: ...T1 L1 L2 L3 T3 T2 T1 Q1 PE 63A T2 T3 X1 2 L1 L2 L3 PE N Q2 1 8 7 Q3 1 2 1 4 3 6 5 F1 L3 L2 L1 T1 8 7 2 1 4 3 6 5 F2 B13A 230V 24V L N PE SNT SNT PS S1 24 40 T1 4 3 2 1 PSM 1 24 40 1 1 2 2 SNT BATT SNT...

Page 12: ...slave interface X5 2 ACN D X5 3 ACN D X6 5 n c n c X6 4 DI 1 2 Freely configurable digital input 0 to 28 V active minus or plus control panel OPEN factory setting can be pro grammed using SCS X6 3 DI...

Page 13: ...ry Battery type Lithium cell CR1216 3 Read in parameterization again Termination The AdComNet segment must be terminated with 2 resistors 110 The resistors must in each case be connected at the end of...

Page 14: ...2 1 2 3 PE M 3 U V W PE 1T1 1T2 1T3 1L3 1L2 1L1 13 14 21 22 HIS HIS HIO HIO PE C13A F1 1 L1 3 L2 5 L3 T1 2 T2 4 T3 6 Q2 2 3 L2 1 L1 5 L3 4 2 6 T2 T1 T3 Q2 3 4 3 2 1 4 3 2 1 BRM 1 COC0006 4 4 4 3 3 3 2...

Page 15: ...output 2 COM X3 1 NC 3 Floating output 3 normally closed X3 2 COM 3 Floating output 3 COM X3 3 NO 3 Floating output 3 normally open X3 4 COM 3 Floating output 3 COM X4 4 COM 4 Floating output 4 COM X...

Page 16: ...1 4 3 2 1 BRM 1 COC0006 4 4 4 3 3 3 2 2 2 1 1 1 X1 X2 X3 X6 X5 X4 COM 6 NO 6 NC 6 COM 6 COM 5 NO 5 NC 5 COM 5 COM 4 NO 4 NC 4 COM 4 4 3 2 1 NO 3 COM 3 COM 3 NC 3 COM 2 NO 2 COM 1 COM 1 COM 2 NC 2 NO 1...

Page 17: ...eely configurable digital output 3 4 X3 2 DO 3 3 freely configurable digital output 3 3 X3 3 Reference potential do not connect to P X3 4 DO 3 2 freely configurable digital output 3 2 X3 5 DO 3 1 free...

Page 18: ...X5 X4 5 4 3 2 1 DO 1 1 DO 1 2 DO 1 4 DO 1 3 DO 2 4 DO 2 4 DO 2 1 DO 2 3 DO 3 2 DO 3 1 DO 3 4 DO 3 3 DI 3 2 DI 3 3 DI 3 4 DI 3 1 DI 2 2 DI 2 3 DI 2 4 DI 2 1 DI 1 2 DI 1 3 DI 1 4 DI 1 1 F1 95 98 95 96 Q...

Page 19: ...output 3 1 max 50 mA short circuit proof X4 5 DI AI 1 1 freely configurable multifunctional input 1 1 digital 0 28 V active minus or plus analog 0 10 V X4 4 DI AI 1 2 freely configurable multifunctio...

Page 20: ...AI 1 4 DI AI 1 1 ADM DO x x X1 X2 X3 ADM DI x x 24 V DC X6 X5 ADM DI AI x x 24 V DC X4 ADM DI AI x x 0 10 V DC X4 24 V DC N in out English 99 828 70 1 2 07 22 Connection ADM either either active plus...

Page 21: ...ACB interface of drive group 2 X3 4 ACB A 2 X4 4 SGI 1 Position transmitter for drive group 1 not yet implemented X4 3 Reference potential do not connect to P X4 2 SGI 2 Position transmitter for drive...

Page 22: ...2 ACB B 1 Mot b 2 Mot a 2 Mot b 1 E HS 1 E HS 2 P Mot a 1 P EM 47 K 2x47kW BK BK OG Mot b ACB a HS Mot b ACB a HS Mot a Mot a Mot b ACB a HS Mot b ACB a HS Mot a Mot a EM 47 K 2x47kW BK BK OG X1 1 X1...

Page 23: ...Mot b 1 E HS 1 E HS 2 P Mot a 1 P EM 47 K 2x47kW BK BK OG Auf Zu 4 3 2 1 4 3 2 1 AM 1 2 10 24 D6 D2 4 4 4 3 3 3 2 2 2 1 1 1 X1 X2 X3 X6 X5 X4 DI 1 1 DI 1 2 DO 1 1 DI 2 1 DI 2 2 DO 2 1 SGI 2 SGI 1 4 3...

Page 24: ...to P X4 4 ACB Supply of the ACB interface X4 3 ACB A ACB interface of drive group X4 2 ACB B X4 1 SGI Position transmitter for drive group not yet implemented X5 4 DO 1 1 Freely configurable digital...

Page 25: ...SES DI 1 1 DI 1 2 DO 1 1 L L N L E N L N NSV L N PE L L N PE L 230 V AC 50 Hz L N PE ION O OFF ION O OFF before vor avant Battery Service switch off the battery Batterieschalter auf OFF schalten d bra...

Page 26: ...AC 50 Hz L N PE ION O OFF ION O OFF before vor avant Battery Service switch off the battery Batterieschalter auf OFF schalten d brancher la batterie ION O OFF L N L N PE K1 K2 K1 K2 K1 1 2 3 4 5 6 7...

Page 27: ...K Freely configurable digital output 4 1 max 50 mA X6 5 DO 3 2 A Freely configurable digital output 3 2 max 50 mA X6 4 DO 3 3 S Freely configurable digital output 3 3 max 50 mA X6 3 Reference potenti...

Page 28: ...7 S 6 A 1 K 2 3 5 T 8 5 R 2 3 bu rd EM L01 5 R 2 3 bu rd EM L01 2 8 3 5 T n c 4 Z 7 S 6 A 1 K OK RT 45 4 Z 7 S 6 A 1 K OK 2 8 3 5 T n c RT 45 OK RT 45 OK SD O 371 FD T 271 SD O 371 FD T 271 rd bu EM...

Page 29: ...Z Z 7 7 S S 6 6 A A 1 1 K K OK rd bu EM L01 X1 1 X1 5 X2 1 X2 5 X3 1 X3 5 5 4 3 2 1 5 4 3 2 1 TMA 1 D4 D12 5 5 5 4 4 4 3 3 3 2 1 2 1 2 1 X1 X2 X3 X6 X5 X4 5 4 3 2 1 A S n c n c T K FE Z R FE n c Z S...

Page 30: ...rrent of 50 mA The connection is permanently short circuit resistant and the fuse used is self resetting If the output is deactivated the output is open has a high resistance Active negative inputs ca...

Page 31: ...be used in conjunction with corresponding D H high speed drives If D H drives without high speed or third party drives are connected activation can destroy the drive Standard configurations Controller...

Page 32: ...ly moves in the CLOSED direction in the event of a mains outage Only the control panel groups move in the CLOSED direction in the event of a mains outage Groups in the same link belonging to another C...

Page 33: ...puts IOM I O module Display of the module status Display of the status of the inputs and outputs Modules Overview of all modules used Display of the respective statuses similar to the LEDs on the resp...

Page 34: ...sing the smoke vent button as otherwise there is a risk of wind or water damage If gap ventilation is desired in bad weather the weather automation can be switched off using an optional automatic swit...

Page 35: ...ration Closing after alarm Manual opening with smoke vent button Automatic opening with fire detector Automatic opening through external control e g central fire alarm For manual triggering using smok...

Page 36: ...stems etc must not be impaired by stored articles or structural changes Maintenance and cleaning Carried out once a year by a specialist company authorised by the device manufacturer Carry out cleanin...

Reviews: