background image

- GB

GB - 

2

ENGLISH

ENGLISH

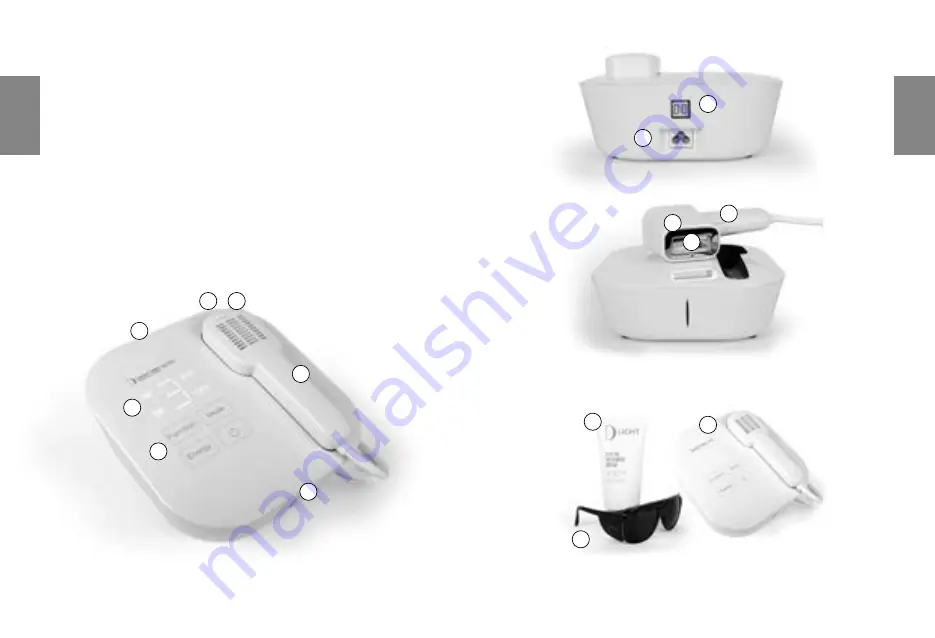
1.

 The Host 

2.

 Charge Indicator

3. 

Unlock Indicator     

4.

 Handle    

5.

 Power-on & Trouble Indicator

6. 

Function Area

7.

 Parameter Display Area

8.

 Total Shots & Error Code      

  Display Area

ILLUSTRATED GUIDE

 9.

  Power Socket

10.

 Flash Outlet

11.

 Trigger

12. 

Cooling Area

13.

 Post treatment cream  


with Bio formulation

14.

 Certified Protector 


Glassess OD4+

1

1

2

3

4

5

6

7

Packing list

13

14

8

9

11

12

10

Summary of Contents for PRO Ultra

Page 1: ...User Manual LIGHTPRO PROFESSIONAL RESULTS ULTRA Please read the operating instructions carefully particularly the safety precautions before using the appliance ...

Page 2: ...ouble Indicator 6 Function Area 7 Parameter Display Area 8 Total Shots Error Code Display Area ILLUSTRATED GUIDE 9 Power Socket 10 Flash Outlet 11 Trigger 12 Cooling Area 13 Post treatment cream with Bio formulation 14 Certified Protector Glassess OD4 1 1 2 3 4 5 6 7 Packing list 13 14 8 9 11 12 10 ...

Page 3: ...ction concerning safe and proper use of the device by a person responsible for their safety Children should not use play with maintain or clean the devise If you are using the appliance in bathroom premises disconnect the plug from the socket after use proximity to water is also dangerous even the appliance is switched off In order to ensure better protection it is advisable to install the power c...

Page 4: ...used by anyone Read and take into account the information included on the following paragraph before use For more information and personal advice you can visit the website www dlight ipl com If you are unsure if the appliance is safe for you to use please ask your doctor or dermatologist DO NOT USE DEVICE IF ANY OF THE FOLLOWING CONDITIONS IS PRESENT AT THE TIME OF TREATMENT Pregnant or breast fee...

Page 5: ...ation therapy or chemotherapy treatments within the past 3 months If you have any other condition which in your physician s opinion would make it unsafe for you to be treated In case of doubt consult with your physician OTHER SAFETY PRECAUTIONS ENERGY LEVEL Choose your energy levels CAREFULLY Energy level refers to the light pulse that is projected on the skin during use from the lower level to th...

Page 6: ...d of the 3 core power cord into the power socket of the host and the other end into a well grounded socket or wall socket 2 Start the instrument Click the Power ON OFF button on the operation panel Power on Trouble Indicator shows white Parameter Display Area shows the default parameters Charge Indicator is on Function Energy Mode HR EXP WORKING ENVIRONMENT Working Environment Temperature 10ºC 30º...

Page 7: ...F WORKING METHODS 7 Unlock Function For safety this instrument is equipped with unlock function Double click the handle s trigger the unlock indicator lights and the unlock is successful After successful unlocking if there is no light emitting operation within 30 seconds the unlocking indicator is off and that means the flashes cannot be released Double click the handle trigger to unlock again 8 M...

Page 8: ... machine and contact the manufacturer or authorized service center 11 Turn off Machine Manner 1 After operation press to turn off machine Power on Trouble Indicator will be off Manner 2 If no operation machine will be off in one minute automatically DAILY MAINTENANCE After each use shut down and unplug the power cord of the host After 5 minutes of natural placement wipe the light outlet and coolin...

Page 9: ...tart from the lowest level and gradually increase the power according to your tolerance if you feel discomfort reduce the power B Use a lower power level for darker skin Precautions during operation A For greater effectiveness shave the hair leaving 1 2mm to get this length you can use a hair trimmer or shave the hair with the razor blade 2 days before the treatment B It is recommended to use a lo...

Page 10: ...ore than 2 flashes on the same area SR mode Skin Rejuvenation EXP mode when the fire button is pressed a flash is emitted which is used to treat the area once the flash is over move to the next area and press the fire button again to treat it Avoid overlapping more than one flash on each area to be treated OPT mode hold down the firing button and slide the head over the area to be treated while th...

Page 11: ...pt the use because your skin is not able to tolerate epilation treatment or the energy level is too high Skin Redness Skin may be reddened immediately after using appliance or during the following 24 hours Redness generally disappears within 24 hours Consult your physician if the redness does not disappear within 2 or 3 days Increased Skin Sensitivity The skin of the treated area becomes more sens...

Page 12: ...zed by the SMA S R L Under no circumstances shall the seller or buyer of the product be able to or by third parties other than authorized light centres repairs or replacements of the product In the case of infringement of this prohibition the product will not be considered in warranty It will be the buyer s responsibility to communicate to the D Light Center or to the direct seller of the product ...

Page 13: ...ni 7 Area di visualizzazione dei parametri 8 Area di visualizzazione dei colpi totali e dei codici di errore GUIDA ILLUSTRATIVA 9 Presa di alimentazione 10 Uscita fascio di luce 11 Pulsante di sparo 12 Area di raffreddamento 13 Crema Post Trattamento Con Ingredienti Bio 14 Occhiali Protettivi Certificati OD4 1 1 2 3 4 5 6 7 Contenuto della confezione 13 14 8 9 11 12 10 ...

Page 14: ...e inesperte solo se preventivamente istruite sull utilizzo in sicurezza e solo se informate dei pericoli legati al prodotto stesso I bambini non possono giocare con l apparecchio La pulizia e la manutenzione dell apparecchio non possono essere fatte da bambini senza la supervisione di un adulto Se si utilizza l apparecchio in locali da bagno staccare la spina dalla presa dopo l uso perché la vicin...

Page 15: ... apparecchio è altamente consigliato l uso di occhiali protettivi CONTROINDICAZIONI ALL USO DEL PRODOTTO Importanti Informazioni di Sicurezza Leggere Prima dell Uso Questo apparecchio non è destinato a essere usato da chiunque Leggi e tieni conto delle informazioni contenute nel paragrafo seguente prima dell uso Per ulteriori informazioni e consigli personalizzati puoi visitare il sito www dlight ...

Page 16: ...uro per te In caso di dubbio consultati con il tuo medico ALTRE PRECAUZIONI PER UN USO SICURO IL LIVELLO DI ENERGIA Scegliere ATTENTAMENTE il livello di energia da utilizzare Il livello di energia si riferisce all intensità dell impulso di luce che viene proiettato sulla pelle durante l uso dal livello più basso al livello più alto I numeri sul display di stato 7 indicano il livello di energia imp...

Page 17: ...ntazione alla presa di alimentazione dell apparecchio e l altra estremità a una presa con messa a terra o a muro 2 Avviare il dispositivo Fare clic sul pulsante di accensione spegnimento sul pannello operativo L indicatore di accensione e guasto è bianco L area di visualizzazione dei parametri mostra l impostazione predefinita dei parametri L indicatore di carica è acceso Function Energy Mode HR E...

Page 18: ... dotato della funzione di sblocco Fare doppio clic sul grilletto della maniglia l indicatore di sblocco si accende e lo sblocco ha esito positivo Dopo aver sbloccato con successo se non c è alcuna operazione di emissione di luce entro 30 secondi l indicatore di sblocco si spegne e ciò significa che i flash non possono essere rilasciati Fare doppio clic sul grilletto della maniglia per sbloccare nu...

Page 19: ...ontattare il produttore o il centro di assistenza autorizzato 11 Spegnere il dispositivo Modo 1 Dopo il trattamento premere per spegnere la macchina L indicatore di accensione e guasto sarà spento Modo 2 Se non viene fatta nessuna operazione la macchina si spegnerà automaticamente in un minuto MANUTENZIONE QUOTIDIANA Dopo ogni utilizzo spegnere e scollegare il cavo di alimentazione dell host Dopo ...

Page 20: ...ropria tolleranza se si avverte fastidio ridurtre la potenza B Usa un livello di potenza inferiore per la pelle più scura Precauzioni durante il funzionamento A Per una maggiore efficacia radere i peli lasciando 1 2 mm per ottenere questa lunghezza è possibile usare un trimmer per capelli o radere i peli con la lametta 2 giorni prima del trattamento B Si consiglia di utilizzare un livello di poten...

Page 21: ...nuazione Evitare di sovrappore più di 2 flash sulla stessa area Modalità SR Fotoringiovanimento EXP mode alla pressione del pulsante sparo viene emesso un flash che serve per trattare l area terminato il flash passare all area successiva e premere nuovamente il pulsante sparo per trattarla Evitare di sovrappore più di un flash su ogni area da trattare OPT mode tenere premuto il pulsante di sparo e...

Page 22: ...i tollerare il trattamento di epilazione o che l impostazione del livello di energia è troppo alto Rossore della Pelle La pelle potrebbe arrossarsi subito dopo l uso dell apparecchio o nell arco delle 24 ore successive Il rossore generalmente scompare entro 24 ore Consultare il proprio medico se il rossore non scompare entro 2 o 3 giorni Maggiore Sensibilità della Pelle La pelle della zona trattat...

Page 23: ...e solo con la presentazione del Prodotto al centro D Light autorizzato da SMA s r l o al diretto venditore Il Prodotto dovrà comunque essere riparato presso uno dei centri D Light autorizzati dalla SMA s r l In nessun caso il venditore o l Acquirente del Prodotto potranno effettuare direttamente o tramite terzi soggetti diversi dai centri D Light autorizzati riparazioni o sostituzioni del Prodotto...

Page 24: ...CALENDAR OF TREATMENTS CALENDAR OF TREATMENTS ...

Page 25: ...zed service centers that will perform technical intervention with the use of original spare parts Issued by SMA s r l Via Bianche 3 Aura10 Carrè VI Italy P IVA 03547050249 Name and Surname Street and number CAP City Province Country CLIENT DATA WARRANTY CERTIFICATE English customers support 39 0445 1740014 Supporto clienti in italiano 39 0445 1740014 Multilanguage support support dlight ipl com LI...

Page 26: ...2 1 Light Blond 3 2 3 2 3 1 2 1 Red 3 2 3 2 3 1 2 1 Grey White Hair Energy Skin Type GUIDA ALLA REGOLAZIONE DELLA POTENZA I II III IV V VI Nero 3 2 3 2 3 1 2 1 Castano Scuro 3 2 3 2 3 1 2 1 Castano 3 2 3 2 3 1 2 1 Biondo scuro 3 2 3 2 3 1 2 1 Biondo chiaro 3 2 3 2 3 1 2 1 Rosso 3 2 3 2 3 1 2 1 Grigio Bianco Pelo Enegia Tipo di Pelle ...

Page 27: ...MADE IN PRC LIGHTPRO PROFESSIONAL RESULTS ULTRA ...

Reviews: