background image


Continued...

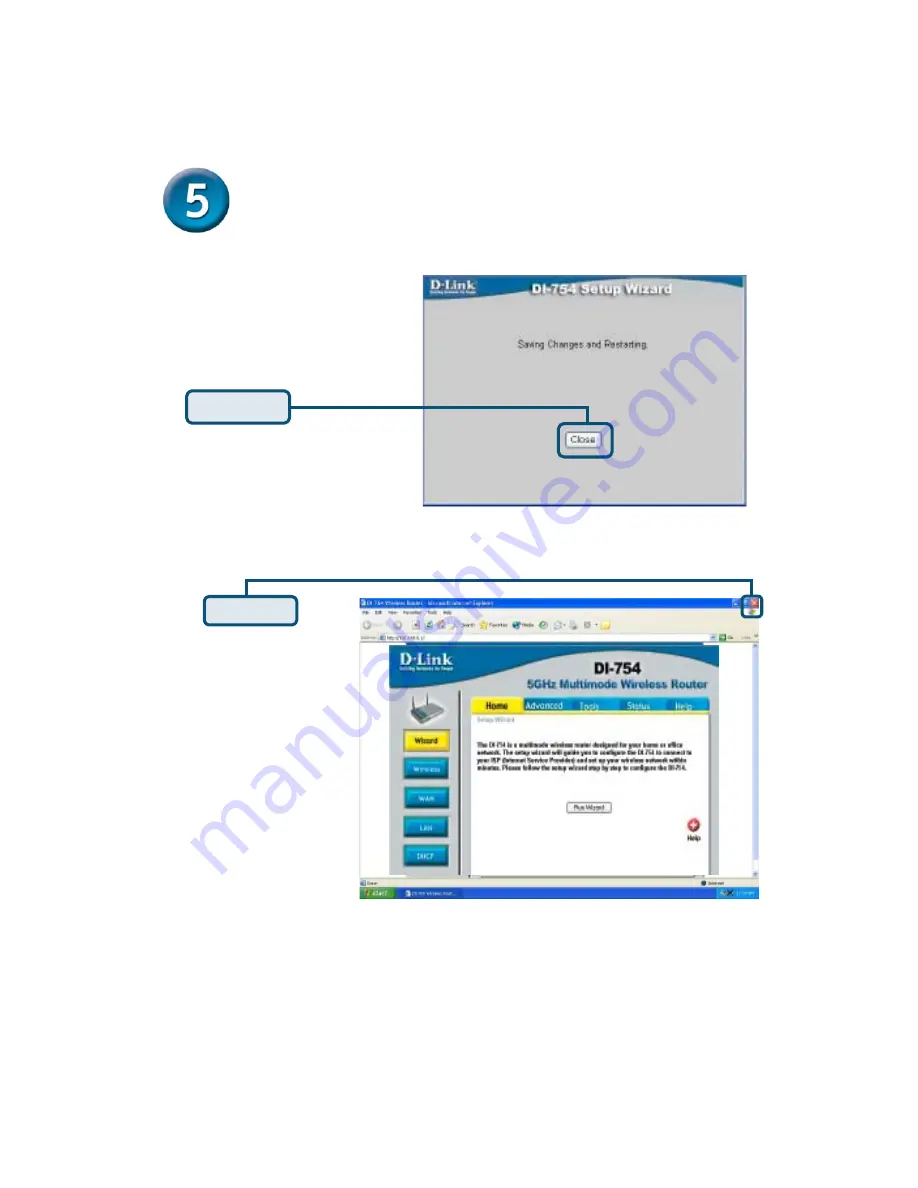
Click


Close


You will be returned to the 

Home

 tab.

Click


Exit


For additional settings
or information, select
HELP


or refer to the

manual located on the
CD.

Then 

relaunch

 your

Web browser (i.e.,

Internet Explorer

 or

Netscape Navigator

),

to link to your favorite
Web site to test your
Internet connection.

Test your Internet connection.

Summary of Contents for AirPro DI-754

Page 1: ...d Internet account from an Internet Service Provider ISP 2 It s best to use the same computer that is connected to your modem for configuring the DI 754 Multimode Wireless Router The DI 754 acts as a DHCP Server by default and will assign all the necessary IP address information on your network See Appendix at the end of this Quick Installation Guide or the Manual on the CD ROM for setting each ne...

Page 2: ...LAN Port 1 will illuminate to indicate proper connection Note The LAN ports on the DI 754 will automatically sense the cable type when connecting Ethernet enabled computer meaning it will work with either a straight through or cross over cable D Computers equipped with 802 11a wireless adapters will be able to connect to the DI 754 The DWL A650 AirPro Wireless CardbusAdapter and the DWL A520 AirPr...

Page 3: ... able to connect to the DI 754 The DWL 650 AirPlus Wireless Cardbus Adapter and the DWL 520 AirPlus Wireless PCI Adapter will be able to connect out of the box with the router using their default wireless settings Continued The Expansion Slot on the DI 754 will only work with a D Link DWL 650 Make sure the DI 754 Router is completely powered off before inserting the DWL 650 into the Expansion Slot...

Page 4: ...light indicates connection on the WAN port This LED blinks during data transmission When you have completed the steps in this Quick Installation Guide your connected network should look similar to this Local Network LEDs a solid light on the port indicates a connection to an Ethernet enabled computer on ports 1 4 This LED blinks during data transmission 11a 11b Wireless LEDs a solid light indicate...

Page 5: ... Open your Web browser and type http 192 168 0 1 into the URL address box Then press the Enter or Return key If the logon screen does not automatically appear please follow the step shown below If the logon screen does appear proceed to the next screen Click Configure DI 754 Insert the DI 754 CD ROM The Install Screen will appear ...

Page 6: ...ard continued Click Run Wizard Once you have logged in the Home screen will appear You will see the following screens Step 1 Set up your new password You have the option to establish a password Click Next Click Next ...

Page 7: ...our time zone for your router Step 3 Select your Internet Connection You will be prompted to select the type of Internet connection for your router Select one of these settings Click Next If you are unsure of which setting to select please contact your Internet Service Provider Click Next ...

Page 8: ...ess Note that some computers and peripherals may already include built in network adapters Click Next If you selected Dynamic IP Address this screen will appear Enter the IP address information originally provided to you by your ISP You will need to complete all the required fields Click Next If your ISP requires a Static IP Address and this option is selected then this screen will appear Do not u...

Page 9: ...ware installed on your computers If your ISP uses PPPoE Point to Point Protocol over Ethernet and this option is selected then this screen will appear Click Next Step 4 Wireless Setup The default wireless settings for your 802 11a wireless network are SSID default Channel 52 Turbo Mode Off You can change these settings to match an existing wireless network ...

Page 10: ... communication Click Next The default wireless settings for your 802 11b wireless network are SSID default Channel 6 You can change these settings to match an existing wireless network Click Next If you enable encryption on the DI 754 make sure to also enable encryption on all 802 11a wireless clients or wireless connection will not be established The following steps are required if you have added...

Page 11: ...64 bit 128 bit and 256 bit By default the encryption is disabled You can change the encryption settings for more secure wireless communication Click Next Your Setup is Complete Click Restart If you enable encryption on the DI 754 make sure to also enable encryption on all 802 11b wireless clients or wireless connection will not be established ...

Page 12: ...xit For additional settings or information select HELP or refer to the manual located on the CD Then relaunch your Web browser i e Internet Explorer or Netscape Navigator to link to your favorite Web site to test your Internet connection Test your Internet connection ...

Page 13: ...pter i e D Link DFE 530TX Click Internet Protocol TCP IP Click Properties Select Obtain an IP address automatically Click OK Restart your computer To connect to the DI 754 make sure the network adapter in your computer is configured properly Here s how to configure the network adapter to obtain an IP address automatically for the DI 754 5GHz Multimode Wireless Router ...

Page 14: ...ect System Preferences Click on Network Select Built in Ethernet in the Show pull down menu Select Using DHCP in the Configure pull down menu Click on Apply Now The IP address information the Subnet Mask the Router s IP address and the Ethernet adapter address will appear ...

Page 15: ...NOTES ...

Page 16: ...omers within the United States for the duration of the warranty period on this product U S customers can contact D Link technical support through our web site or by phone D Link Technical Support over the Telephone 877 453 5465 24 hours a day seven days a week D Link Technical Support over the Internet http support dlink com email support dlink com ...

Reviews: