background image


AirPro


DWL-6000AP


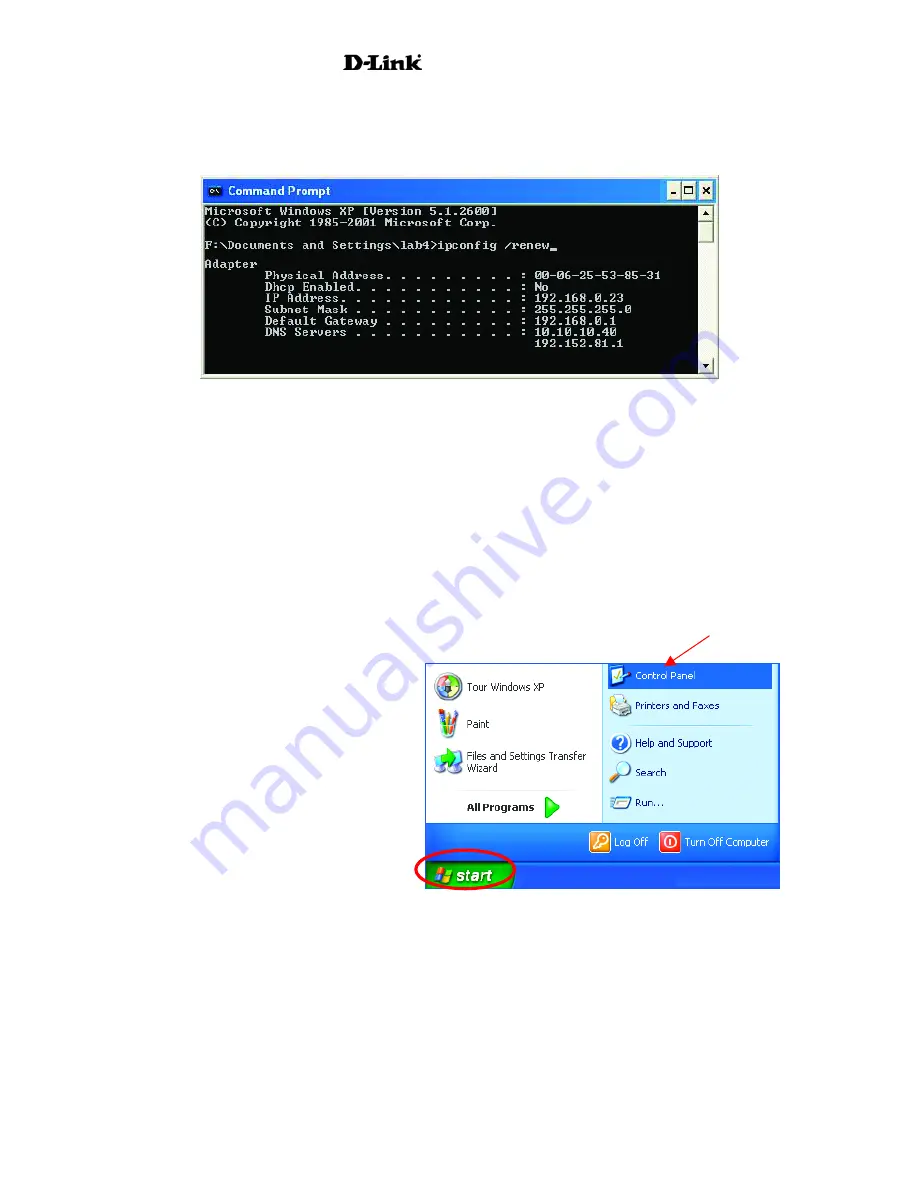
Checking the IP Address in Windows XP/2000


Type 

ipconfig /renew

 at the prompt to get a new IP Address.  Press 

Enter

. The new IP Address is 

shown below. 


(

Windows 98/ME


users:  

go to 

Start

 > 

Run

.  Type 

Command

.  Type 

winipcfg 

at the prompt. The 

Windows IP Configuration menu will come up. Click 

Release, then Renew

 to obtain a new IP 

Address.) 


Assigning a Static IP Address 

Note:  Residential Gateways/Broadband Routers will automatically assign IP Addresses to the 
computers on the network, using DHCP (Dynamic Host Configuration Protocol) technology.  If 
you are using a DHCP-capable Gateway/Router you will not need to assign Static IP Addresses. 

If you are not using a DHCP capable Gateway/Router, or you need to assign a Static IP 
Address, please follow these instructions: 


• 

Go to 

Start


• 

Double-click

 on 

Control Panel


37

Summary of Contents for AirPro DWL-6000AP

Page 1: ...AirPro DWL 6000AP 2 4 GHz 5 GHz Multimode Wireless Access Point User s Manual Rev 101802 Building Networks for People ...

Page 2: ...3 Wireless Basics 4 4 Getting Started 6 5 Using the Configuration Menu 8 6 Using the Multiple AP Manager 20 7 Troubleshooting 23 8 Networking Basics 27 9 Technical Specifications 61 10 Contacting Technical Support 63 11 Warranty and Registration 64 ...

Page 3: ...view and HP Open View Quick Installation Guide Ethernet Cable WARNING Using a power supply with a different voltage rating than the one included with the DWL 6000AP will cause damage and void the warranty for this product If any of the above items are missing please contact your reseller System Requirements Computer with Windows Macintosh or Linux based operating system with an installed Ethernet ...

Page 4: ...roperability Armed with powerful management and security capabilities the D Link Air Pro DWL 6000AP has an intuitive and secure web based interface that is powered by an embedded web server The included D Link Device View Software allows for easy monitoring and management of the access point through Simple Network Management Protocol SNMP functionality After completing the steps outlined in the Qu...

Page 5: ...Wireless Access Point has 5 LEDs as shown below LED LED Activity Power Steady light indicates a connection to a power source 10M Link Act Flashes steadily to indicate connection intermittent flashes indicate activity at 10Mbps 100M Link Act Flashes steadily to indicate connection intermittent flashes indicate activity at 100Mbps 11a WLAN Flashes steadily to indicate a wireless 802 11a connection 1...

Page 6: ...based on real time information can significantly improve worker efficiency Low Implementation Costs WLANs Wireless Local Area Networks are easy to set up manage change and relocate Networks that frequently change both physically and logically can benefit from WLANs ease of implementation WLANs can operate in locations where installation of wiring may be impractical Installation Speed and Simplicit...

Page 7: ...tion of walls ceilings or other objects that the wireless signals must pass through may limit the range Typical ranges vary depending on the types of materials and background RF radio frequency noise in your home or business The key to maximizing wireless range is to follow these basic guidelines 1 Keep the number of walls and ceilings to a minimum The signal emitted from Wireless LAN devices can ...

Page 8: ...se remember that the IP Address for each computer must be in the same IP Address range as all the computers in the network and the Subnet mask must be exactly the same for all the computers in the network For example If the first computer is assigned an IP Address of 192 168 0 2 with a Subnet Mask of 255 255 255 0 then the second computer can be assigned an IP Address of 192 168 0 3 with a Subnet ...

Page 9: ...an install the D Link AirPro DWL A520 wireless PCI adapter into an available PCI slot See the Quick Installation Guide included with the DWL A520 Install the drivers for the wireless cardbus adapter D Link AirPro DWL A650 into the laptop computer See the Quick Installation Guide included with the DWL A650 for installation instructions Please refer to the following sections of this manual for addit...

Page 10: ... Point Skip to Fig 5 1 entering the IP address If you are not using a DHCP enabled router to assign IP settings on your network you will need to assign a Static IP Address to the computer that you are using to configure the DWL 6000AP within the IP Address Range of the DWL 6000AP Please see Networking Basics in this manual for information on Assigning a Static IP Address Please make a note of your...

Page 11: ...o their default settings If you have changed the IP Address of the DWL 6000AP to conform to a network other than one with D Link devices at their default setting then input that IP Address in the web browser instead of the default IP Address shown Type admin in the User Name field Leave the Password blank Click OK admin Home Wizard The first page you see displays the Home tab You may opt to use th...

Page 12: ...racters in length Channel Available channels depend on the regulations in you are or country Use the Setup Wizard to select the country or region for your Access Point The Setup Wizard is described in the Quick Installation Guide and you can launch it from the Home tab by clicking Wizard All devices on the network must be set to the same channel to communicate on the network Radio Frequency This r...

Page 13: ...P address is a router or other gateway device used to access IP networks that are outside the chosen subnet If you select Dynamic DHCP you will obtain a dynamic IP Address from a DHCP server on your network This is not advisable since it will be difficult to determine the dynamic IP address assigned to the DWL 6000AP Using DHCP automatically configures all IP settings upon restart therefore the IP...

Page 14: ...ication Message DTIM A DTIM is a countdown informing clients of the next window for listening to broadcast and multicast messages Fragment Length 256 2346 This value should remain at its default setting of 2346 If you experience a high packet error rate you may slightly increase your Fragmentation Threshold within the value range of 256 to 2346 Setting the Fragmentation Threshold too low may resul...

Page 15: ...elect the Wireless Band you wish to control from the drop down menu 2 Type in the list of MAC addresses you want to specify in the spaces provided 3 In the Access Control drop down menu choose the action you want to take for the listed MAC addresses If you choose to Accept the devices only the devices listed are allowed to associate with the Access Point through the wireless interface If you choos...

Page 16: ... this is enabled there is no barrier to communication among wireless stations using the Access Point If this is disabled wireless stations of the selected band 802 11a 0r 802 11b are not allowed to exchange data through the Access Point Ethernet to WLAN Access When this is enabled there is no barrier to data flow from the Ethernet to wireless devices using the Access Point If this is disabled all ...

Page 17: ...t use the Access Point must use the same type of authentication 3 Next to WEP choose the Enabled option to enabled encryption 4 Choose the WEP Key Type from the drop down menu 5 Choose the WEP Key Size from the drop down menu 6 Elect the Valid Key chosen from the list of keys you must define below All wireless devices that use the Access Point must use the same valid key The valid keys that are av...

Page 18: ... server or a local server or switch for Authentication Use the Encryption menu to select where authentication information comes from and what size key to use WEP Key Type and Size WEP keys are defined by the type HEX or ASCII of characters entered and size in bits HEX or Hexadecimal characters are numbers and the letters A F upper and lower case are recognized as the same for HEX characters ASCII ...

Page 19: ...u have made any changes Note If you intend to use the AirPro Multiple AP Manager you may want to use the same password for all the DWL 6000 Access Points connected to the Ethernet See Using the Multiple Access Point Manger beginning on page 21 for more information Tools System The current system settings can be saved as a file onto the local hard drive by clicking Save The saved file can be loaded...

Page 20: ...r every firmware upgrade After the DWL 6000 has been upgraded and reboots hold down the reset button on the rear panel for a few seconds The device will reset and reboot Upon rebooting after this manual reset the Access Point is ready to use See the Troubleshooting section for complete instructions for manually resetting the Access Point Tools Misc The Miscellaneous menu is used to set up Telnet f...

Page 21: ...ce MAC address Ethernet LAN IP information and Wireless settings information for both 802 11a and 802 11b Status Stats Network traffic statistics for both received and transmitted communications through the Ethernet port and wireless connections associated with the Access Point are displayed here 19 ...

Page 22: ...tware should be installed a system connected to the Ethernet and running a Windows OS Windows XP 2000 NT 4 0 Me or 98 Once the Multiple AP Manager is installed it can be launched from the Start menu Start Programs D Link AirPro Multiple AP Manager AirPro Multiple AP Manager The AP Manager window appears Click the Discover icon to locate Access Points Click on the Discover icon to locate other DWL ...

Page 23: ... device The selected devices will appear highlighted To change the IP settings click the icon This lets you change the IP address and subnet mask of the device If you are configuring IP settings for multiple devices the IP settings are configured for each device in the order they appear in the Device List To change device settings click the icon A new windows appears Use the Device Configuration m...

Page 24: ...as SSID and WEP so that the Access Points are configured simultaneously Since many wireless functions require that the settings be entered exactly the same way for all devices you can reduce the likelihood of problems caused by settings entry error Enter the Access Password used for device configuration and click the OK button If you attempt to change configuration settings for a device that is no...

Page 25: ...k that the IP Address is in the same range and subnet as the DWL 6000AP Please see Checking the IP Address in Windows XP in the Networking Basics section of this manual Note The IP Address of the DWL 6000AP is 192 168 0 50 All the computers on the network must have a unique IP Address in the same range e g 192 168 0 x Any computers that have identical IP Addresses will not be visible on the networ...

Page 26: ...e IP Address will be displayed Please refer to Checking the IP Address in the Networking Basics section of this manual If it is necessary to assign a Static IP Address to the wireless adapter please refer to the appropriate section in Networking Basics If you are entering a DNS Server address you must also enter the Default Gateway Address Remember that if you have a DHCP capable router you will n...

Page 27: ... Tab Click Device Manager Double click on Network Adapters Right click on D Link AirPlus DWL 650 Wireless Cardbus Adapter Select Properties to check that the drivers are installed properly D Link AirPlus DWL 650 Wireless Cardbus Adapter 25 ...

Page 28: ... may choose to Reset the DWL 6000AP to the factory default settings Remember that D Link AirPro products network together out of the box at the factory default settings To hard reset the D Link AirPro DWL 6000AP to Factory Default Settings please do the following Locate the Reset button on the back of the DWL 6000AP Use a paper clip to press the Reset button Hold for about 5 seconds and then relea...

Page 29: ...t home or work using Microsoft Windows XP Note Please refer to websites such as http www homenethelp com and http www microsoft com windows2000 for information about networking computers using Windows 2000 ME or 98 Go to Start Control Panel Network Connections Select Set up a home or small office network When this screen appears Click Next 27 ...

Page 30: ...w all the instructions in this window Click Next In the following window select the best description of your computer If your computer connects to the internet through a gateway router select the second option as shown Click Next 28 ...

Page 31: ... Computer description and a Computer name optional Click Next Enter a Workgroup name All computers on your network should have the same Workgroup name Click Next Please wait while the Network Setup Wizard applies the changes 29 ...

Page 32: ...AirPro DWL 6000AP When the changes are complete click Next Please wait while the Network Setup Wizard configures the computer This may take a few minutes 30 ...

Page 33: ...le Create a Network Setup Disk has been selected You will run this disk on each of the computers on your network Click Next Insert a disk into the Floppy Disk Drive in this case drive A Format the disk if you wish and click Next Please wait while the Network Setup Wizard copies the files 31 ...

Page 34: ...e information under Here s how in the screen below After you complete the Network Setup Wizard you will use the Network Setup Disk to run the Network Setup Wizard once on each of the computers on your network To continue click Next 32 ...

Page 35: ...ngs will take effect when you restart the computer Click Yes to restart the computer You have completed configuring this computer Next you will need to run the Network Setup Disk on all the other computers on your network After running the Network Setup Disk on all your computers your new wireless network will be ready to use 33 ...

Page 36: ...ws XP Click Start in the lower left corner of the screen Right click on My Computer Select Properties and click Select the Computer Name Tab in the System Properties window You may enter a Computer description if you wish this field is optional To rename the computer and join a domain Click Change 34 ...

Page 37: ...dow enter the Computer name Select Workgroup and enter the name of the Workgroup All computers on your network must have the same Workgroup name Click OK Checking the IP Address in Windows XP 2000 Go to Start All Programs Accessories Command Prompt 35 ...

Page 38: ...ss in Windows XP 2000 Type Command Click OK Checking the IP Address in Windows XP 2000 Type ipconfig all at the prompt Press Enter All the configuration settings are displayed as shown below D Link AirPlus DWL 650 Wireless Cardbus Adapter 36 ...

Page 39: ...hen Renew to obtain a new IP Address Assigning a Static IP Address Note Residential Gateways Broadband Routers will automatically assign IP Addresses to the computers on the network using DHCP Dynamic Host Configuration Protocol technology If you are using a DHCP capable Gateway Router you will not need to assign Static IP Addresses If you are not using a DHCP capable Gateway Router or you need to...

Page 40: ...AirPro DWL 6000AP Assigning a Static IP Address Double click on Network Connections Right click on Local Area Connections Double click Properties 38 ...

Page 41: ...s and subnet mask The IP Addresses on your network must be within the same range For example if one computer has an IP Address of 192 168 0 2 the other computers should have IP Addresses that are sequential like 192 168 0 3 and 192 168 0 4 The subnet mask must be the same for all the computers on the network Input your DNS server addresses Note If you are entering a DNS server you must enter the I...

Page 42: ...the Apple Menu and select System Preferences Click on Network Select Built in Ethernet in the Show pull down menu Select Manually in the Configure pull down menu Input the Static IP Address the Subnet Mask and the Router IP Address in the appropriate fields Click Apply Now 40 ...

Page 43: ...o to the Apple Menu and select System Preferences Click on Network Select Built in Ethernet in the Show pull down menu Select Using DHCP in the Configure pull down menu Click Apply Now The IP Address Subnet mask and the Router s IP Address will appear in a few seconds 41 ...

Page 44: ...My Network Places select Properties double click on the Wireless Network Connection associated with the DWL 650 select Properties select Internet Protocol TCP IP click Properties Connecting to a Wireless Network with a Wireless Router or an Access Point using a DHCP server in Windows XP Select Obtain an IP address automatically if the Wireless Router or Access Point has DHCP server enabled Select ...

Page 45: ...s Router or Access Point 192 168 0 1 IP address 192 168 0 51 Subnet mask 255 255 255 0 Default Gateway Enter the LAN IP address of the Wireless Router Select Use the following DNS server address Enter the LAN IP address of the Wireless Router Click OK Connecting to a Wireless Network in Windows 2000 D Link AirPlus DWL 650 Wireless Cardbus Adapter Go to Start Settings Network and Dial up Connection...

Page 46: ...atically Click OK Connecting to a Wireless Network with a Wireless Router or an Access Point using a static IP address in Windows 2000 192 168 0 1 Select Use the following IP address Input a static IP Address within the same IP Address range as the wireless router or the access point IP address 192 168 0 51 Subnet mask 255 255 255 0 Default Gateway 192 168 0 1 Select Use the following DNS server a...

Page 47: ...ntrol Panel Double click on the Network associated with the DWL 650 click Properties select Internet Protocol TCP IP click Properties Connecting to a Wireless Network with a Wireless Router or an Access Point using a DHCP server in Windows Me and 98 Select the IP Address tab Then select Obtain an IP address automatically Select Detect connection to network media Click OK 45 ...

Page 48: ...e as the wireless router or access point IP address 192 168 0 51 Subnet mask 255 255 255 0 Select Detect connection to network media Click OK Checking the Wireless Connection by Pinging For Windows XP and 2000 Go to Start Run type cmd A window similar to Fig 9 25 will appear Type ping xxx xxx xxx xxx where xxx is the IP address of the Wireless Router or Access Point A good wireless connection will...

Page 49: ...ee the Network Setup Wizard section at the beginning of Networking Basics you can use the Add Printer Wizard to add or share a printer on your network Whether you want to add a local printer a printer connected directly to one computer share an LPR printer a printer connected to a print server or share a network printer a printer connected to your network through a Gateway Router use the Add Print...

Page 50: ...r A printer that is not shared on the network and is connected directly to one computer is called a local printer If you do not need to share your printer on a network follow these directions to add the printer to one computer Go to Start Printers and Faxes Click on Add a printer 48 ...

Page 51: ...this computer Deselect Automatically detect and install my Plug and Play printer if it has been selected Click Next Select Use the following port From the pull down menu select the correct port for your printer Most computers use the LPT1 port as shown in the illustration Click Next 49 ...

Page 52: ...If the correct driver is not displayed insert the CD or floppy disk that came with your printer and click Have Disk At this screen you can change the name of the printer optional Click Next Select Yes to print a test page A successful printing will confirm that you have chosen the correct driver Click Next 50 ...

Page 53: ...AirPro DWL 6000AP Adding a local printer This screen gives you information about your printer Click Finish When the test page has printed Click OK 51 ...

Page 54: ...u have successfully added a local printer Sharing a network printer After you have run the Network Setup Wizard on all the computers on your network you can run the Add Printer Wizard on all the computers on your network Please follow these directions to use the Add Printer Wizard to share a printer on your network Go to Start Printers and Faxes 52 ...

Page 55: ...AirPro DWL 6000AP Sharing a network printer Click on Add a Printer Click Next Select Network Printer Click Next 53 ...

Page 56: ...AirPro DWL 6000AP Sharing a network printer Select Browse for a printer Click Next Select the printer you would like to share Click Finish 54 ...

Page 57: ...installation You have completed adding the printer To share this printer on your network Remember the printer name Run the Add Printer Wizard on all the computers on your network Make sure you have already run the Network Setup Wizard on all the network computers After you run the Add Printer Wizard on all the computers in the network you can share the printer 55 ...

Page 58: ...nt Server such as the DP 101P Please make sure that you have run the Network Setup Wizard on all the computers on your network To share an LPR printer please follow these directions Go to Start Printers and Faxes Click on Add a Printer The screen to the right will display Select Local printer Click Next 56 ...

Page 59: ...haring an LPR printer Select Create a new port From the pull down menu select Standard TCP IP Port as shown Please read the instructions on this screen Enter the Printer IP Address and the Port Name as shown Click Next 57 ...

Page 60: ...LPR printer In this screen select Custom Click Settings Enter the Port Name and the Printer Name or IP Address Select LPR Enter a Queue Name if your Print Server Gateway has more than one port you will need a Queue name Click OK 58 ...

Page 61: ...ou information about your printer Click Finish Select the printer you are adding from the list of Printers Insert the printer driver disk that came with your printer Click Have Disk If the printer driver is already installed Select Keep existing driver Click Next 59 ...

Page 62: ...ill display information about your printer Click Finish to complete the addition of the printer Please run the Add Printer Wizard on all the computers on your network in order to share the printer Note You must run the Network Setup Wizard on all the computers on your network before you run the Add Printer Wizard Other Tasks For help with other tasks in home or small office networking see Using th...

Page 63: ...networks via Access Points with Roaming Diagnostic LED Power 100M Link Act 10M Link Act 11a WLAN 11b WLAN Range Indoors up to 328 feet 100 meters Outdoors up to 1 312 feet 400 meters Temperature Operating 0ºC to 40ºC 32ºF to 104ºF Storing 25ºC to 65ºC 77ºF to 140ºF Humidity 5 95 non condensing EMI Safety IEEE 802 11a EMC EN 301 489 1 and 17 EN 60950 DFS TPC 301 893 Draft IEEE 802 11b EMC EN 300 32...

Page 64: ...Frequency Range 5 150 5 825 GHz Modulation Technology Orthogonal Frequency Division Multiplexing OFDM Modulation Techniques BPSK QPSK 16 QAM 64 QAM 802 11b Specifications Data Rates 1 2 5 5 11 22Mbps Data Security 64 128 256 bit WEP Wired Equivalent Privacy Encryption Antenna Type 2dBi antenna with diversity Available Channels Subject to local regulatory restrictions Frequency Range 2 4 2 4835 GHz...

Page 65: ...ftware and user documentation on the D Link website D Link Technical Support over the Internet http support dlink com When contacting technical support please provide the following information Serial number of the unit Model number or product name Software type and version number 63 ...

Page 66: ... und Warnungen die sich am Geräten befinden sind zu beachten 12 Wird das Gerät über einen längeren Zeitraum nicht benutzt sollten Sie es vom Stromnetz trennen Somit wird im Falle einer Überspannung eine Beschädigung vermieden 13 Durch die Lüftungsöffnungen dürfen niemals Gegenstände oder Flüssigkeiten in das Gerät gelangen Dies könnte einen Brand bzw Elektrischen Schlag auslösen 14 Öffnen Sie niem...

Page 67: ...acement then the defective product becomes the property of D Link Warranty service may be obtained by contacting a D Link office within the applicable warranty period and requesting a Return Material Authorization RMA number If a Registration Card for the product in question has not been returned to D Link then a proof of purchase such as a copy of the dated purchase invoice must be provided If Pu...

Page 68: ...o this warranty but shall not apply to any update or replacement which may be provided for download via the Internet or to any update which may otherwise be provided free of charge D Link s sole obligation under this software warranty shall be to replace any defective software product with product which substantially conforms to D Link s applicable product documentation Purchaser assumes responsib...

Page 69: ...G OUT THE INSTALLATION MAINTENANCE USE PERFORMANCE FAILURE OR INTERRUPTION OF A D LINK PRODUCT HOWEVER CAUSED AND ON ANY THEORY OF LIABILITY THIS LIMITATION WILL APPLY EVEN IF D LINK HAS BEEN ADVISED OF THE POSSIBILITY OF SUCH DAMAGE IF YOU PURCHASED A D LINK PRODUCT IN THE UNITED STATES SOME STATES DO NOT ALLOW THE LIMITATION OR EXCLUSION OF LIABILITY FOR INCIDENTAL OR CONSEQUENTIAL DAMAGES SO TH...

Page 70: ... accept any interference received including interference that may cause undesired operation CE Mark Warning This is a Class A product In a domestic environment this product may cause radio interference in which case the user may be required to take adequate measures Warnung Dies ist ein Produkt der Klasse A Im Wohnbereich kann dieses Produkt Funkstoerungen verursachen In diesem Fall kann vom Benut...

Page 71: ...n installant et utilisant les produits réseaux sans fils de la gamme proposée par D Link vous vous engagez donc à respecter cette réglementation et à n utiliser que ces 4 canaux WARNING The Decision N 01 480 taken by ART Autorité de Régulation de Télécommunications on May 23 2001 authorizes the utilisation of a part of the 2400 2483 5MHz band for Radio Local Area Network RLAN in France Only the 24...

Page 72: ...AirPro DWL 6000AP 70 ...

Page 73: ... Egypt D Link Middle East 7 Assem Ebn Sabet Street Heliopolis Cairo Egypt TEL 20 2 635 6176 FAX 20 2 635 6192 URL www dlink me com E MAIL support dlink me com fateen dlink me com Finland D Link Finland Thlli ja Pakkahuone Katajanokanlaituri 5 FIN 00160 Helsinki TEL 358 9 622 91660 FAX 358 9 622 91661 URL www dlink fi com France D Link France Le Florilege 2 Allee de la Fresnerie 78330 Fontenay le F...

Page 74: ...FAX 34 93 4910795 URL www dlinkiberia es E MAIL info dlinkiberia es Sweden D Link Sweden P O Box 15036 S 167 15 Bromma Sweden TEL 46 0 8 564 61900 FAX 46 0 8 564 61901 E MAIL info dlink se URL www dlink se Taiwan D Link Taiwan 2F No 119 Pao Chung Rd Hsin Tien Taipei Taiwan TEL 886 2 2910 2626 FAX 886 2 2910 1515 URL www dlinktw com tw E MAIL dssqa tsc dlinktw com tw Turkey D Link Middle East Deniz...

Reviews: