background image

99 


Step 5: 

Connect to your VPN server: 


Summary of Contents for COVR-3902

Page 1: ...COVR 3902 DKT 883 FAQ _English Ver 1 3 HW Version Firmware Version App Name App Version A1 1 00 D Link Wi Fi 1 0 9 Written By Customer Service Department I of DHQ on Sept 14th 2017 ...

Page 2: ...12 How do I configure DHCP reservation 27 Q13 How do I configure 802 11 mode on my router 29 Q14 How do I change the router s IP address 31 Q15 How do I enable remote management for my router 33 Q16 How to access the USB on my router 35 Q17 Does DIR 883 support bridge mode 39 Q18 Does DIR 883 support VLAN 40 Firmware Upgrade Checking 41 Q19 How to upgrade firmware for router 41 Q20 How to check fi...

Page 3: ... router 71 Q34 How to check statistics for router 75 DNS DDNS 76 Q35 How do I configure Dynamic DNS on my router 76 Q36 Why am I unable to register my device with dlinkddns 78 Q37 How do I disable DNS relay 79 QoS Setting 81 Q38 How do I configure QoS on my router 81 Time Schedule 83 Q39 How do I configure the time on my router 83 Q40 How do I create schedule on my router 86 VPN Setting 88 Q41 How...

Page 4: ...llow about one minute to boot up Once the power LED is green it s ready Do not plug the extender yet Step 2 You can use either a wired Ethernet or wireless Wi Fi connection to set up your Covr Wi Fi System Step 3 Launch a web browser such as Internet Explorer and enter http covr local or the IP address of the router default 192 168 0 1 or http dlinkrouter local into the address bar ...

Page 5: ... password blank by default and click Log in From the Home screen hover over Settings at the top and click Wizard Click Next to continue Step 5 Connect the power adapter to the COVR extender and plug it in near the router Click Next and allow up to two minutes for the extender to boot up and connect to the router ...

Page 6: ...5 Step 6 Once the following screen appears click Next to continue ...

Page 7: ...dynamic connections if detected skip to step 7 If the router cannot detect the connection type the following screen will appear Select the type of Internet connection you have and click Next If you have a static connection select Static IP Address Connection and you will be prompted to enter the IP address subnet mask default gateway and DNS server s address es Skip to step 9 ...

Page 8: ...our PPPoE user name and password Click Next to continue Step 9 Enter a Wi Fi network name SSID and a Wi Fi password This name and password will be assigned to both the 2 4GHz and 5GHz bands on both the router and extender Click Next to continue ...

Page 9: ...word will be used to access the web UI and the Wi Fi app for both the router and extender Write it down and then click Next to continue Step 11 A summary page will display your settings If you want to make changes click Back otherwise click Finish to continue ...

Page 10: ...the extender and place in a location between your router and any dead zones When you plug the extender in allow up to two minutes to boot The LEDs will indicate your connection quality to the router Green means it is a good connection orange means a fair connection and red means a poor connection If orange or red move the extender closer to the router ...

Page 11: ...et to Wi Fi SSID password written on the label at the bottom of your DIR 883 router Step 2 Install D Link Wi Fi App to your mobile device It s supportable by both Android and iOS Step 3 Launch D Link Wi Fi App If your device is connected to SSID on the label Covr 2600R will be automatically scanned ...

Page 12: ...11 Step 4 Follow the instruction to power up Covr Extender Step 5 Input the PPPoE connection username and password If you re not sure about it please contact your ISP ...

Page 13: ...12 Step 6 Input the SSID and password you d like to set Step 7 Input the admin password you d like to set ...

Page 14: ... related information again If there s no problem click SAVE Step 9 You can place your Covr Extender to where you would like to place now Make sure all 5 LEDs do turn solid green If not move the Extender closer to the router ...

Page 15: ...ection to set up the router and the extender There is a wired backhaul option You can connect the Covr router to the Covr extender using an Ethernet cable for better performance However the guest zone setting will not be supported ...

Page 16: ...nge extender solutions Unlike traditional routers plus range extender solutions where you need to switch from one to another to get the best connection COVR 3902 works as one network and automatically connects you to the strongest most robust signal as you move throughout your home ...

Page 17: ...le change 2 3 feet can make a big difference Make sure that you move DAP 1655 to the place that the uplink LEDs can be solid green which indicates a solid connection to the uplink router 3 Other devices that use 2 4GHz 5GHz wireless band will interfere with your wireless network including Microwave wireless cameras baby monitors etc Place other devices in a different area if they are close to each...

Page 18: ...o turn the Wi Fi On or Off from the router or the extender Do not push the Wi Fi button on the back of the Covr Router or Extender unless you would like to turn the Wi Fi off Note If the 2 4Hz and 5GHz lights are not lit on the device push and hold the Wi Fi button on the back for 1 second Covr router Covr Extender ...

Page 19: ... Inc That allows wireless streaming between devices of audio video device screens and photos together with related metadata Originally implemented only in Apple s software and devices it was called AirTunes and used for audio only Apple has since licensed the AirPlay protocol stack as a third party software component technology to manufacturer partners for them to use in their products in order to...

Page 20: ...al and dramatically speeds up your network Considering that the average household has upwards of eight devices battling for bandwidth simultaneously MU MIMO will increasingly improve your Wi Fi experience To use MU MIMO you must first have a router that supports the technology Wi Fi Routers operating on older standards such as Wireless A B G and N do not support MU MIMO and it s only a feature in ...

Page 21: ...router local Step 2 You should be taken to a D Link login page By default the username is admin and no password is required Note Administering a Router over Wi Fi Setting up a router for the first time is best done over a wired connection so that your connection isn t dropped if the security or wireless settings are changed the process However it can be done over wireless too When connecting to a ...

Page 22: ...rd Please launch your browser and enter http dlinkrouter local or http 192 168 0 1 into the address bar Then login and follow the steps below Step 1 Click Management System Admin Step 2 Fill in the password you d like to set and click Save ...

Page 23: ...o I set up and secure my wireless connection Please launch your browser and enter http dlinkrouter local or http 192 168 0 1 into the address bar Then login and follow the steps below Step 1 Click Settings Wireless ...

Page 24: ...fault name dlink xxxxx and enter a unique wireless network name This is the name you will see when scanning for wireless networks on your computer wireless device In the password field remove the default password and enter a new one of your choice Must be a minimum of 8 characters then click Save ...

Page 25: ... Mac address in order to go online through the router It is recommended to clone MAC address from computer which was able to go online when connected to modem Please launch your browser and enter http dlinkrouter local or http 192 168 0 1 into the address bar Then login and follow the steps below Step 1 Click Setting Internet ...

Page 26: ...25 Step 2 Click Advanced Setting ...

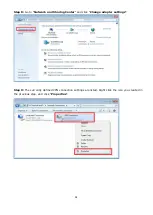
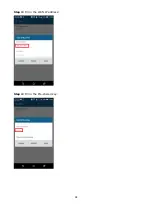
Page 27: ...26 Step 3 Key in Mac address or select one Mac address from the drop down menu and click Save ...

Page 28: ... launch your browser and enter http dlinkrouter local or http 192 168 0 1 into the address bar Then login and follow the steps below Step 1 Click Connected Clients from the Home Tab Step 2 Click the Pencil Icon next to your client you d like to adjust ...

Page 29: ...28 Step 3 Click Reserve IP to enable the function Fill in the reserved IP address then click Save ...

Page 30: ...w do I configure 802 11 mode on my router Please launch your browser and enter http dlinkrouter local or http 192 168 0 1 into the address bar Then login and follow the steps below Step 1 Click Settings Wireless ...

Page 31: ...30 Step 2 Click Advanced Settings and select Security Mode Step 3 Click Save to save your configuration ...

Page 32: ...How do I change the router s IP address Please launch your browser and enter http dlinkrouter local or http 192 168 0 1 into the address bar Then login and follow the steps below Step 1 Click Settings Network ...

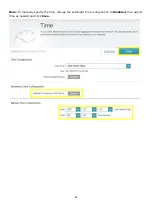
Page 33: ...32 Step 2 Change the IP address as needed under Network Setting and click Save ...
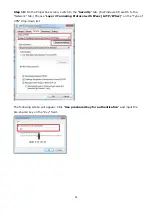
Page 34: ...168 0 1 into the address bar Then login and follow the steps below Step 1 Click Management System Admin Step 2 Click Advanced Settings and enable Remote Management then click Save The default remote management port 8080 Note To access your router remotely from a web browser enter http your WAN IP 8080 e g http 172 17 2 37 8080 ...

Page 35: ...34 You can find your WAN IP by clicking on the Home tab It will be displayed under the Internet Section ...

Page 36: ...35 Q16 How to access the USB on my router Step 1 Connect your USB drive to the USB port on your router Step 2 Click on the Setting USB Sharing and confirm if Windows File Sharing SAMBA is enabled ...

Page 37: ...36 ...

Page 38: ...lick on Windows key R on your key board Then type 192 168 0 1 and press OK 192 168 0 1 Your router IP address Then your USB drive shall be accessible Step 4 Right click your USB Drive and select Map Network Drive ...

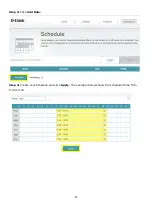
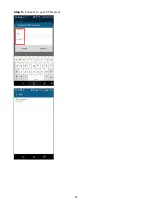
Page 39: ...38 Step 5 Select your desired Drive Letter and Click Finish ...

Page 40: ...39 Q17 Does DIR 883 support bridge mode DIR 883 does not support bridge mode Currently the models support bridge mode are DIR 895L DIR 885L DIR 880L DIR 868L DIR 865L DIR 605L ...

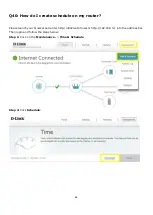
Page 41: ...40 Q18 Does DIR 883 support VLAN No DIR 883 does not support VLAN feature ...

Page 42: ...e Checking Q19 How to upgrade firmware for router Please launch your browser and enter http dlinkrouter local or http 192 168 0 1 into the address bar Then login and follow the steps below Step 1 Click Management Upgrade ...

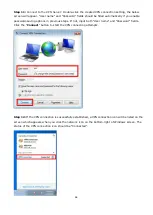
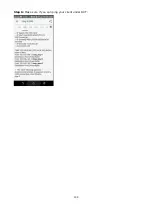
Page 43: ...42 Step 2 Click Select File to browse for the firmware ...

Page 44: ...43 Step 3 Click Upload Firmware you selected to upload ...

Page 45: ...ware version of router 1 Please launch your browser and enter http dlinkrouter local or http 192 168 0 1 into the address bar The firmware version can be found at the upper right of the page 2 Or click Management System Admin ...

Page 46: ...or the Administrator Admin account will be reset to the default 3 Resetting the router does not reset the firmware to the previous version Step 1 With the unit on use the end of a paperclip to press the reset button for seven seconds which is located inside a small hole on the base of the unit The power light on the front of the router will turn orange to indicate that the unit is restarting Step ...

Page 47: ...re the configuration on my router Please launch your browser and enter http dlinkrouter local or http 192 168 0 1 into the address bar Then login and follow the steps below Step 1 Click Management System Admin Step 2 Click System ...

Page 48: ...47 Step 3 Click Save to save the configuration to local hard drive ...

Page 49: ...48 Step 4 To restore your configuration click the Select File button and select your configuration backup file from your local hard drive Once selected click Restore configuration file you selected ...

Page 50: ...duct must support WPS and be compatible with WPA WPA2 security To use simply press the WPS button on your router or access point and then press the WPS button on your wireless client sometimes may be enabled by software within 2 minutes The router access point will automatically configure your client with your Wi Fi name SSID and Wi Fi password ...

Page 51: ...le Guest Zone Guest Access on my router Please launch your browser and enter http dlinkrouter local or http 192 168 0 1 into the address bar Then login and follow the steps below Step 1 Click Settings Wireless Step 2 Click the Guest Zone tab ...

Page 52: ...51 Step 3 Configure Guest Zone and click Save ...

Page 53: ...w many simultaneous users can my Wi Fi network handle The more devices that are simultaneously connected to your device the slower the transfer speed will be for each device D Link recommends 15 simultaneously connected users as the maximum number ...

Page 54: ...rflow it could overheat 2 Ensure the firmware is up to date Firmware is the brain of the router it is the programming that tells it how to work D Link will release new firmware versions when bugs are reported and fixed Upgrading the firmware may correct issues you are experiencing Please follow this link for instructions of how to upgrade the firmware How to upgrade firmware for router 3 Perform a...

Page 55: ... your router Even a subtle changes 2 3 feet can make a big difference Ensure the router is in a well ventilated and open area Do not put the router in a cabinet or enclosed area Other devices that use the 2 4GHz 5GHz wireless band will interfere with your wireless network these include microwaves wireless cameras baby monitors If needed place the router or the other devices in a different area if ...

Page 56: ...ter 2 Disable the SIP ALG feature on your router SIP ALG allows devices and applications using VoIP Voice over IP to communicate across NAT Some VoIP applications and devices have the ability to discover NAT devices and work around them This ALG may interfere with the operation of such devices If you are having trouble making VoIP calls try turning this ALG off Please launch your browser and enter...

Page 57: ...56 Step 2 Then click Advanced Settings ...

Page 58: ...57 Step 3 Then try to click SIP to disable SIP ALG and click Save ...

Page 59: ...zed Zone feature you are allowing the router to forward all incoming traffic from the internet to the device specified virtually disabling the routers firewall protection This may expose the device to a variety of security risks so only use this option as a last resort Please launch your browser and enter http dlinkrouter local or http 192 168 0 1 into the address bar Then login and follow the ste...

Page 60: ...59 Step 2 Click Enable DMZ to toggle the DMZ state and fill in the IP address of the specified device One device only then click Save ...

Page 61: ...nections to the Internet In some cases you may need to allow some connections into your network for Example Using the Remote Desktop Application To do this you must open ports on your router Please launch your browser and enter http dlinkrouter local or http 192 168 0 1 into the address bar Then login and follow the steps below Step 1 Click Feature Port Forwarding ...

Page 62: ...then apply Name Enter a name for the rule i e Web Server 1 Local IP Specify the IP address of the device you are opening the port for Protocol Specify the traffic type TCP or UDP Note If you are not sure choose BOTH External Internal Port Enter the port number you want to open i e 21 for FTP ...

Page 63: ...62 Step 4 Click Save after finish adding your rule ...

Page 64: ...rwarding Step 2 Enter the TCP port numbers you want to open Name Enter a name for the rule i e Web Server 1 Local IP Specify the IP address of the device you are opening the port for TCP Port Enter the TCP port numbers you want to open UDP Port Enter the UDP port numbers you want to open Note You can enter the ports in multiple different ways Range 50 100 Individual 80 68 888 Mixed 1020 5000 689 ...

Page 65: ...64 Step 3 Click Save after finish adding your rule ...

Page 66: ... be used for limiting access to a server on your network to a system or group of systems Filter rules can be used with Virtual Server Gaming or Remote Administration features Each filter can be used for several functions For example a Game Clan filter might allow all of the members of a particular gaming group to play several different games for which gaming entries have been created Meanwhile an ...

Page 67: ...66 Step 2 Click on IPV4 Rules then select Turn IPV4 Filtering ON and ALLOW rules listed then click Add Rule Step 3 Create your rule ...

Page 68: ...67 Step 4 Click Save after adding your rule Note If you d like to block specific IP addresses accessing your router please select Turn IPV4 Filtering ON and DENY rules listed from the drop down menu ...

Page 69: ...g Q32 How do I set up website filter on my router Please launch your browser and enter http dlinkrouter local or http 192 168 0 1 into the address bar Then login and follow the steps below Step 1 Click Features Website Filter ...

Page 70: ...ck select DENY clients access to ONLY these sites from the drop down menu All other sites will be accessible If you want to specify a list of sites to allow select ALLOW clients access to ONLY these sites from the drop menu All other sites will be blocked ...

Page 71: ... to edit a rule simply replace the URL or domain 2 The https website can t be blocked by website filter For example Facebook YouTube Amazon etc If necessary please apply OpenDNS paid service to fulfill your requirement The service website is as below https www opendns com setupguide There are 15 days for free trial Sign up for new account follow the setup guide to establish the service and start e...

Page 72: ...71 System Log Statistics Q33 How to check system log for router There are 3 methods to check system log of router Select Management System Log and follow the methods as below ...

Page 73: ...Kiwi Syslog Server http www kiwisyslog com free tools kiwi free syslog server Step 2 Click File Setup and fill in the IP address of your network device then click Add Step 3 Enable Enable Logging to Syslog Server and fill in the IP address of the PC installing Kiwi Syslog Server ...

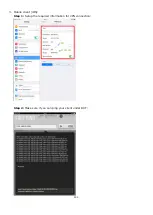
Page 74: ...73 Step 4 You ll be able to check the log in Kiwi Syslog Service Manager as below ...

Page 75: ...74 Method 2 E mail Settings Step 1 Setup the e mail information as below Step 2 You will receive the log email ...

Page 76: ...75 Q34 How to check statistics for router Click Management Statistics ...

Page 77: ...er Please launch your browser and enter http dlinkrouter local or http 192 168 0 1 into the address bar Then login and follow the steps below Step 1 Click Features Dynamic DNS Step 2 Enable Dynamic DNS and enter your Dynamic DNS account information then save ...

Page 78: ...77 Note To register to get the dlinkddns service please enter the website https www dlinkddns com signin then fill in the required information ...

Page 79: ...ve an Unknown Serial Number Unknown MAC Address error Please confirm the information you are entering is correct You can find the needed information on the product label of the back bottom of the router device Note When entering the MAC address you MUST enter it in the following format including colons e g 12 34 56 78 91 01 ...

Page 80: ...enabling DNS relay your computers will use the router for a DNS server Please launch your browser and enter http dlinkrouter local or http 192 168 0 1 into the address bar Then login and follow the steps below Step 1 Click Settings Network ...

Page 81: ...80 Step 2 Click to disable DNS Relay then click Save ...

Page 82: ...ng Q38 How do I configure QoS on my router Please launch your browser and enter http dlinkrouter local or http 192 168 0 1 into the address bar Then login and follow the steps below Step 1 Click Features QoS Engine ...

Page 83: ...y slot If you want to remove a priority assignment from a device and return it to the All Devices list click the cross icon in the top right of the device card A maximum of one device can be assigned Highest priority A maximum of two devices can be assigned High priority A maximum of eight devices can be assigned Medium priority Step 3 Click Save to save the current configuration ...

Page 84: ...ow do I configure the time on my router Please launch your browser and enter http dlinkrouter local or http 192 168 0 1 into the address bar Then login and follow the steps below Step 1 Click on the Maintenance Time Schedule ...

Page 85: ...84 Step 2 By default the D Link NTP server is enabled Specify the Time Zone if you need to synchronize the time with the specific region and enable daylight saving if required and click Save ...

Page 86: ...85 Note To manually specify the time change the automatic time configuration to Disabled then adjust time as needed and click Save ...

Page 87: ...hedule on my router Please launch your browser and enter http dlinkrouter local or http 192 168 0 1 into the address bar Then login and follow the steps below Step 1 Click on the Maintenance Time Schedule Step 2 Click Schedule ...

Page 88: ...87 Step 3 Click Add Rule Step 4 Create your Schedule and click Apply The example below shows the scheduled time from 8 00 19 00 ...

Page 89: ...88 VPN Setting Q41 How to setup VPN connection First and foremost please enable L2TP over IPSec and setup Username password PSK to vpn vpn 11111111 respectively Step 1 Click Features Quick VPN ...

Page 90: ...89 Step 2 Enable L2TP over IPSec and setup Username password PSK as vpn vpn 11111111 respectively then click Save ...

Page 91: ... configurations only once at the first time Right click the network icon on the bottom right side of Windows screen and click Open Network and Sharing Center Step 2 Click Set up a new connection or network on the Network Sharing Center ...

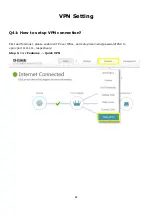
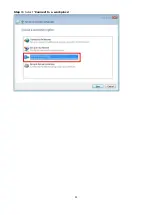
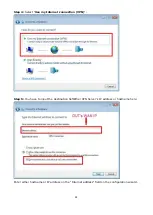
Page 92: ...91 Step 3 Select Connect to a workplace ...

Page 93: ... Use my Internet connection VPN Step 5 You have to input the destination SoftEther VPN Server s IP address or hostname here Enter either hostname or IP address on the Internet address field on the configuration wizard ...

Page 94: ...93 Step 6 Type your username and password you set on the router Step 7 When The connection is ready to use message appears click the Close button Do not click the Connect now button ...

Page 95: ... 8 Go to Network and Sharing Center and click Change adapter settings Step 9 The currently defined VPN connection settings are listed Right click the icon you created in the previous step and click Properties ...

Page 96: ...ty tab In Windows XP switch to the Network tab Choose Layer 2 Tunneling Protocol with IPsec L2TP IPSec on the Type of VPN drop down list The following screen will appear Click Use preshared key for authentication and input the pre shared key on the Key field ...

Page 97: ...rd saving options in previous steps If not input both User name and Password fields Click the Connect button to start the VPN connecting attempts Step 12 If the VPN connection is successfully established a VPN connection icon will be listed on the screen which appears when you click the network icon on the bottom right of Windows screen The status of the VPN connection icon should be Connected ...

Page 98: ...97 2 Mobile client Android Step 1 Go to Settings More VPN then add new VPN profile Step 2 Edit the name of VPN connection and select VPN type as L2TP IPSec PSK ...

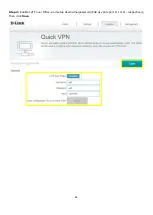
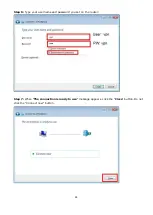
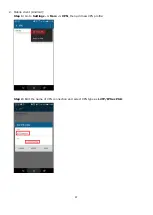
Page 99: ...98 Step 3 Fill in the WAN IP address Step 4 Fill in the Pre shared key ...

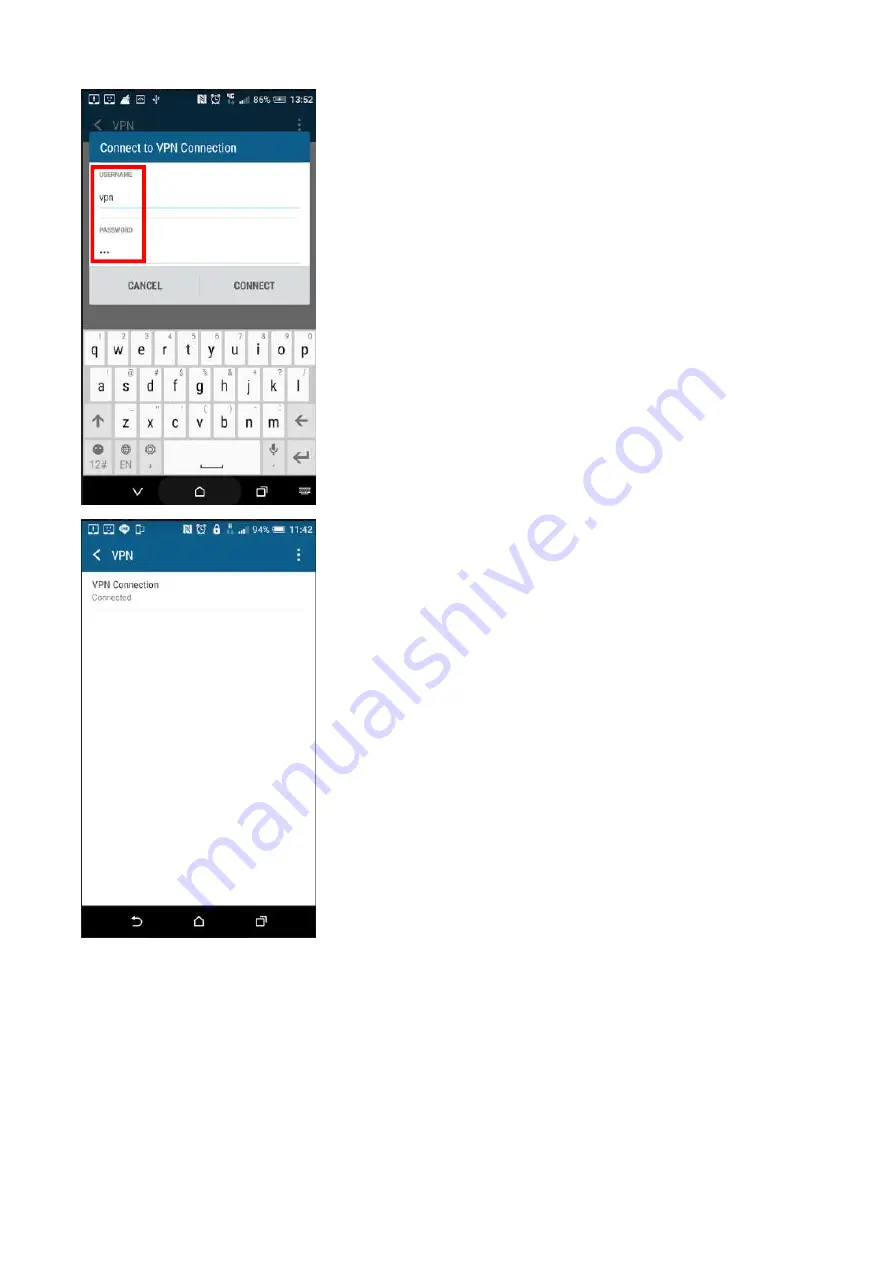
Page 100: ...99 Step 5 Connect to your VPN server ...

Page 101: ...100 Step 6 Make sure if you can ping your client under DUT ...

Page 102: ...101 3 Mobile client iOS Step 1 Setup the required information for VPN connection Step 2 Make sure if you can ping your client under DUT VPN 11111111 ...

Page 103: ...ternet provider has provided you a Modem Router two in one and you want to connect a new router to it You want to expand the amount of Ethernet ports in your network without a switch You want to extend the range of the wireless signal in your home by using the 2nd router as an access point Note DO NOT Connect the routers together until these settings have been changed ...

Page 104: ...and enter http dlinkrouter local or http 192 168 0 1 into the address bar Then login and follow the steps below Step 1 Change the IP address to 192 168 0 2 Then click advanced settings on the bottom right and Disable the DHCP Server ...

Page 105: ...ote NAT defined in RFC 3022 allows a host that does not have a valid registered globally unique IP address to communicate with other hosts through the Internet The hosts might be using private addresses or addresses assigned to another organization In either case NAT allows these addresses that are not Internet ready to continue to be used and still allows communication with hosts across the Inter...

Page 106: ...105 ...

Reviews: