background image

Summary of Contents for DCS-6111

Page 1: ......

Page 2: ...nnection Setup Wizard 33 Motion Detection Setup Wizard 38 Network Setup 41 Dynamic DNS 48 Image Setup 49 Audio and Video 51 Motion Detection 53 Time and Date 56 Event Setup 57 Add Server 59 Add Media 60 Add Event 63 Add Recording 64 Advanced 65 DI and DO 65 ICR 66 HTTPS 67 Access List 69 Maintenance 71 Device Management 71 Backup and Restore 72 Firmware Update 73 Status 74 Device Info 74 Logs 75 H...

Page 3: ...3 D Link DCS 6111 User Manual Table of Contents Reset and Restore 82 External I O Port 83 Technical Specifications 84 Contacting Technical Support 86 Warranty 87 Registration 93 ...

Page 4: ...for multiple camera viewing and recording in IP surveillance program Product Overview Package Contents Screws I O Connector Plug Alignment Stencil Manual and Software on CD Quick Install Guide D Link DCS 6111 Fixed Dome Day Night Network Camera with WDR Sensor CAT5 Ethernet Cable Power Adapter Dome Enclosure Ring Enclosure Screw Driver Note Usingapowersupplywithadifferentvoltagethantheoneincludedw...

Page 5: ...an available power outlet The DCS 6111 provides high quality real time videos in MPEG 4 and JPEG compression modes It also supports the 3G mobile video feature that allows users to view a live video feed on a compatible 3G mobile phone or PDA anywhere in your 3G coverage area In addition the DCS 6111 supports dual stream output for simultaneous live monitoring and high resolution recording This de...

Page 6: ...camera can be pulled from the 3G cellular network by using a compatible cell phone or PDA with a 3G video player Anywhere within the 3GPP service area users are offered a flexible and convenient way to remotely monitor a home or office in real time VariousInstallationMethodsatDifferentAngles The DCS 6111 has a unique built in three axis mechanism that can be drop mounted to the ceiling for an unob...

Page 7: ... multicast IP address on the network and the clients need to subscribe to the IP address in order to receive the stream DCS 6111 features a built in Samba client for NAS and hence does not require a direct connection to a PC or any other hardware or software to capture and transfer images Alarm Inputs Outputs for External Devices This network camera features an integrated 2 way audio support via e...

Page 8: ... 2 way audio connection Microphone not included may be connected to the camera for 2 way audio communication Microphone On Off Switch To turn the microphone on off Ethernet Cable Connector PoE The network camera s side panel features an RJ 45 connector for connections to 10Base T Ethernet cabling or 100Base TX Fast Ethernet cabling This networkportsupportstheNWayprotocol allowingthis network camer...

Page 9: ... Status LED Blinking Red indicates power is being supplied to the camera Solid Green indicates that a connection has been established via Ethernet port Blinking Green indicates traffic movement in the camera The Status LED will not glow if an Ethernet connection is not established ...

Page 10: ... camera Use a screwdriver to tighten and secure When Mounting to a Wall Find a suitable place to install the camera by using the alignment stencil to find a desired operating location on the wall Drill two pilot holes where the holes of the alignment stencil are located Insert the supplied plastic anchors into the drilled holes and align the holes at the base of the camera with the plastic anchors...

Page 11: ...ect the network camera to a switch via an Ethernet cable Connect the supplied power cable from the camera to a power outlet Connection with a PoE Switch If using a PoE switch connect the network camera to the switch via an Ethernet cable which will provide both power and data transmission over a single cable ...

Page 12: ...he following step by step instructions displayed are shown when using Windows Vista operating system The steps and screens are similar when using other Windows operating systems Software Installation Click on Installation Wizard to begin software installation The Installation Setup Wizard window will pop up Click Next to continue Click Next ...

Page 13: ...ion Click I Agree to accept the License Agreement Click I Agree Click the Browse button if you would like to change the destination of installation Otherwise click Install to continue Note Installation may take several minutes to complete Click Install ...

Page 14: ...lation To start the installation click Install Note The installation may take several minutes to complete Click Finish Click Finish to complete installation and the D Link Installation Wizard window will pop up for camera configuration Click Install ...

Page 15: ...he Installation Wizard will appear and show the MAC address and IP address of your DCS 6111 which may appear to be different from the actual address depending on what your device is connected to If you have a DHCP server on your network there will be a valid IP address displayed here Note A DHCP server is a device that supplies the same IP address To begin setup single click on the DCS 6111 locate...

Page 16: ... 3 Configuration Click Next Enter a password and confirm the password for your admin acccount and click Next Note The default administrator username is admin and the password is left blank The password can also be changed after installation ...

Page 17: ...he setup screen as seen in page 19 The NetworkType screen displays will pop up to ask if you want to setup PPPoE for the device Click No for quick setup and skip to page 18 PPPoE Setup Note By using PPPoE users can virtually dial from one machine to another over an Ethernetnetwork establishapointtopointconnectionbetweenthemandthensecurely transport data packets over the connection Click Next Click...

Page 18: ...HCP Server automatically box to obtain a new IP address every time the camera starts up Click Next to continue Select UPnP Port Forwarding if your router supports this function If not choose Manual to manually enter your port numbers Click Next to continue Click Next Click Next ...

Page 19: ...1 User Manual Section 3 Configuration Click Next A window will pop up asking you if you want to access the DCS 6111 via mobile phone Clicking Yes will set the video resolution to 176x144 Click Next to continue Click Yes ...

Page 20: ...ation may take a few minutes to process Click Apply A window will pop up to confirm that the application was successfully configured Click OK to continue A new window will pop up displaying the links addresses to access your device Click Add to my favorite to save the address and then click Exit to complete the installation Click Exit ...

Page 21: ...Double click DCS 6111 in the Installation Wizard window to launch the camera s web configuration page Note Please refer to the user manual for more information Enter admin as the default username and leave the password blank by default Click OK to continue ...

Page 22: ...r Manual Section 3 Configuration This section shows your camera s live video You can configure your settings using the buttons in the window For more information on using the web configuration please refer to the user manual ...

Page 23: ...desired position is achieved tighten the tilt screws once completed Loosen the image adjustment screw and turn the lens to adjust the network camera s image until the desired orientation is achieved tighten the image adjustment screw once completed Adjusting Zoom and Focus Loosenthezoomcontrollerandadjustthezoomfactorbymoving the controller left and right until the desired range is achieved tighte...

Page 24: ...nsert the supplied screws into the two holes located at the base of the dome enclosure tighten until secure Place the ring enclosure over the dome enclosure Once placed gently turn the ring enclosure clockwise until it locks and is securely attached to the dome enclosure Note When attaching the ring enclosure be sure to first align the line on the ring enclosure with the triangle on the dome enclo...

Page 25: ...s of your Network Camera http 192 168 0 120 Note In the example this address is 192 168 0 120 Your address may differ Type Admin in the user name field and leave the password blank by default Note You may refer to page 71 to change the password for your admin account This section will show you how to configure your new D Link Network Camera using the Web based Configuration Utility Click OK ...

Page 26: ...26 D Link DCS 6111 User Manual Section 3 Configuration Live Video As seen by Mozilla Firefox and Netscape users Quick Time player is invoked to stream the live video ...

Page 27: ...pe the URL command in the text box and then click OK URL command rtsp ip address of your camera rtsp port access name for stream1 or stream2 Note Please refer to pages 44 45 for the RSTP port settings and streaming files For example 4 You can view the live video in your player as shown in the figure Use one of the following media players that support RTSP streaming to view MPEG 4 streaming media ...

Page 28: ...e 3G network bandwidth is limited therefore users cannot use large size videos Please set the video and audio streaming parameters as listed below For more information see Audio and Video on page 51 Video Mode MPEG 4 Frame size 176 x 144 Maximum frame rate 5 fps Intra frame period 1S Video quality Constant bit rate 40kbps Audio type GSM AMR 12 2kbps 3 Set the RTSP port to 554 since most ISPs and p...

Page 29: ...hows your camera s live video You can configure the settings using the buttons listed below Disable Digital Zoom Zoom Factors Enable Disable the digital zoom feature After selecting this icon a small pop up window will appear see below Select this to disable the digital zoom feature Adjust the threshold of the zoom factor You can also adjust and position the zoom area by dragging the box in the wi...

Page 30: ...eaming Click the button again 7 the video will pause 9 Stop Click to stop the transmission of video streaming Click the resume button 8 to begin streaming 10 Speaker Volume When the mute function is not active move the slider bar to adjust the volume of the speakers that are connected to your network camera 11 12 Speaker Mute Unmute Click 12 to mute the external speaker that is connected to the ne...

Page 31: ...31 D Link DCS 6111 User Manual Section 3 Configuration Snapshot This page shows a snapshot image of a live video taken from DCS 6111 network camera ...

Page 32: ...streaming than UDP and provides error correction However transmission speed will be reduced Offers the highest image and video quality However packet loss will diminish image quality when bandwidth becomes restricted If the network is protected by a firewall and it opens only HTTP port 80 HTTP protocol must be selected In this mode audio is disabled and only video can be viewed UDP connections wil...

Page 33: ...To quickly configure your network camera s motion detection settings click Motion Detection SetupWizard and skip to page 38 If you want to enter your settings without running the wizard click Manual Motion Detection Setup and skip to page 41 Internet Connection Setup Wizard This wizard will guide you through a step by step process to configure your new D Link Camera and connect the camera to the i...

Page 34: ...ra is directly connected to the Internet through a DSL modem and your ISP Internet Service Provider requires you to use PPPoE for the Internet connection Click Next to continue and skip to Step 2 on page 35 Select DHCP if you are unsure which settings to pick Click Next to continue and skip to page 35 ...

Page 35: ...u have selected PPPoE enter your username and password Click Next to continue SelectStaticIPifyourInternetServiceProviderhasprovided you with connection settings or you wish to set a static address within your home network Enter all the relevant LAN information Click Next to continue ...

Page 36: ...S account the camera automatically updates your IP address To enable DDNS enter your host information Click Next to continue Enter a name for your camera and click Next to continue Configure the correct time to ensure all the events will be triggered and scheduled at the correct time Click Next to continue ...

Page 37: ... Link DCS 6111 User Manual Section 3 Configuration Click Apply Once you have selected Dynamic PPPoE or Static you will see a summary of your camera s settings Click Apply to save and activate your settings ...

Page 38: ...on detection functions Click Next to begin the process Click Next This screen will allow you to enable or disable the motion detectionfeature ClickNewtocreateanddrawthemotion detection window Then configure the type of recording snapshot video clip Window Name Sensitivity of detection andPercentageofthewindowrequiredinorder to set off motion detection Click Next to continue Click Next ...

Page 39: ...nue Note Recording camera footage will take up space on your hard drive It is recommended that you have sufficient disk space for Always function This step allows you to specify your event notification either via email or FTP Enter the relevant information of your email account or FTP settings and then click Next to continue Click Next ...

Page 40: ...40 D Link DCS 6111 User Manual Section 3 Configuration Click Apply You have completed the Motion Detection Wizard Click Apply to activate and save your settings ...

Page 41: ... to destinations in a different subnet Invalid gateway settings may cause the failure of transmissions to a different subnet Usually the IP address of your router Primary domain name server that translates names to IP addresses Secondary domain name server to backup the primary one Allows a user to find view and control this camera via a presentation page or Network Neighborhood without configurat...

Page 42: ...t working restore the Network Camera to factory default settings Enables the camera to automatically add the port forwarding entry into the router Allows users to adopt and deploy IPv6 IPv6 is a new version of IP which is designed to be an evolutionary step from IPv4 IPv6 has a much larger address space than IPv4 which allows flexibility in allocating addresses and routing traffic The very large I...

Page 43: ... must be opened on the router For example if the port is changed to 1010 users must type in the web browser http 192 168 0 100 1010 instead of http 192 168 0 100 Choose either Basic where the password is not encrypted or Digest where the password is encrypted during the transmission to the web server Note Restart your browser if you select Digest mode Basic authentication The password is sent in p...

Page 44: ...ideo mjpg The URL command is http 192 168 0 051 80 video mjpg 1 Launch Mozilla Firefox or Netscape 2 Type the URL command in the address field Press Enter 3 The JPEG image will be displayed in your web browser The default value is 443 Default port is 21 If you want to change the port number you will need to specify the port when connecting to the FTP server For example FTP 68 5 1 81 60 if you use ...

Page 45: ...yer Access name for stream 1 Access name for stream 2 The access name is used to differentiate the streaming source When using a RTSP player to access the Network Camera and the video mode is set to MPEG 4 use the following RTSP URL command to request a transmission of streaming data rtsp ip address rtsp port access name for stream1 or stream2 For example when the access name for stream 1 is set t...

Page 46: ...and RTP audio port plus one repetitively Default port number is 5556 Default port number is 5557 You may choose to enable multicast for your camera audio and video streaming so that your cameras sources and the receivers clients can establish the connection to send and receive contents An IP Multicast group address is used to send and receive content Sources use this group address as the destinati...

Page 47: ...on so that operators can transmit and receive audio simultaneously By using an external microphone and speaker users can communicate with people present around the camera Note JPEG only transmits a series of JPEG images to the client In order to utilize this audio feature make sure the video mode is set to MPEG 4 refer to page 51 and the media option is set to Video and Audio refer to page 32 Mult...

Page 48: ...er the host name of the DDNS server Enter your username or e mail used to connect to the DDNS server Enter your password used to connect to the DDNS server Indicates the current connection status Dynamic DNS DDNS Dynamic Domain Name Server will hold a DNS host name and synchronize the public IP address of the modem when it has been modified The username and password are required when using the DDN...

Page 49: ...2X 4X or 8 X field time multiples The default value is 4X The higher the value the brighter the image will be but this also increasesthenoiseratioaccordingly Thisoptionisonly available when WDR is unchecked Select to set the exposure level from the drop down box The range included is from 1 to 8 and the default value is 4 A higher value produces a brighter image This option is only available when ...

Page 50: ...etwork Camera The range varies from 5 to 5 Select to change the saturation value of the camera The default value is 0 Select to change the contrast value of the camera The default value is 0 Select to add a date and time stamp on the video Select Privacy Mask to open the Privacy Mask page In this page you can block out certain sensitive zones for privacy concerns To set up a Privacy Mask Window fo...

Page 51: ...fps and the maximum is 30fps We recommend 30fps for computer monitors and 5fps for mobile viewing This setting limits the maximum refresh frame rate To set a fixed bandwidth regardless of the video quality select Constant bit rate and the desired bandwidth Select Fixed Quality to optimize the bandwidth utilization and video quality Select to mute audio Set the microphone input gain at either 0dB o...

Page 52: ...AC bit rate from the drop down list Higher bit rate means higher audio quality but it takes more network bandwidth to transmit A standard adapted audio codec by the 3GPP video 3rd Generation Partnership Project It is an Adaptive Multi Rate Narrow Band AMRNB speech codec Select a higher bit rate number for better audio quality Select the GSM AMR bit rate from the drop down list Higher bit rate mean...

Page 53: ...this means that motion must be detected within the whole window to trigger a snapshot Note Settingahighersensitivityandalowerpercentage will make motion easier to be detected Click to add a new window A maximum of three motion windows can be opened simultaneously Use your mouse to drag the window frame to re size or the title bar to move Clicking on the x at the upper right corner of the window wi...

Page 54: ... close the window The Percentage Indicator will rise or fall depending on the image variation When motions are detected by the Network Camera andarejudgedtoexceedthedefinedthreshold aredbarrises Meanwhile themotiondetectionwindowwillbeoutlinedinred Utilizing this device as a trigger source photos or videos can be captured instantly and sent to the remote server Email FTP A green bar indicates that...

Page 55: ...ity settings are expected to sense a slight movement while smaller sensitivity settings tend to neglect it When the sensitivity is set to 70 the Network Camera defines the pixels in the purple areas as alerted pixels frame D Percentage is a value that expresses the proportion of alerted pixels to all pixels in the motion detection window In this case 50 of pixels are identified as alerted pixels W...

Page 56: ...e time zone of your network camera Then starting and ending time of the DST is displayed upon selecting the option You may configure the daylight saving date and time Enable this feature to obtain time configuration automatically from NTP server Network Time Protocol NTP synchronizes the DCS 6111 with an Internet time server Choose the one that is closest to your location The time interval for upd...

Page 57: ...a Recording 1 To add a new item event server or media click Add A pop up will appear and update the fields accordingly 2 To delete the selected item from the pull down menu of event server or media click Delete 3 Click on the item name for further modification Note You can add up to four events five servers and five media fields ...

Page 58: ...al input devices When an event is triggered you can specify what kind of action will be performed You can configure the Network Camera to send snapshots or videos to your email address or FTP site To start plotting an event it is suggested to configure server and media columns first so that the Network Camera will know what action shall be performed when a trigger is activated ex Motion detection ...

Page 59: ...f your server Select this to enable and apply your email account setting for your camera Select this to access a granted folder on the external FTP server Select this to use a web server to store the media Only one network storage device is supported Add Server You may configure up to 5 servers for media storage ...

Page 60: ...ages Refer page 61 for more information The prefix name will be added on the file name Check it to add timing information as file name suffix Refer page 61 for more information Select this feature to enable camera to take video clip The source of stream stream1 or stream2 The interval of pre event recording in seconds The maximal recording file duration in seconds Refer page 62 for more informatio...

Page 61: ...s and Send post event images are set to seven a total of 15 images are generated after a trigger is activated Add date and time suffix to file name Select this option to add date and time to the file name suffix 1 pic 2 pic 3 pic 4 pic 5 pic 6 pic 7 pic 8 pic 9 pic 10 pic 11 pic 10 pic 12 pic 13 pic 14 pic 15 pic The moment the trigger is activated SNAPSHOTS20080104_100341 Date and time suffix The ...

Page 62: ...ds and the Maximum duration is set to ten seconds the Network Camera continues to record for another four seconds after a trigger is activated File name prefix Enter the text that will be added at the beginning of the file name 1 sec 2 sec 3 sec 4 sec 5 sec 6 sec 7 sec 8 sec 9 sec 10 sec The moment the trigger is activated VIDEOS20080104_100341 Date and time suffix The format is YYYYMMDD_HHMMSS Fil...

Page 63: ...It is being used for both events of motion detection and digital input trigger The input type that triggers the event Motion is detected during live video monitoring Select the windows that need to be monitored The event is triggered in specified intervals The unit of trigger interval is minute External trigger input to the camera Triggers an event when the system boots up Select Always or enter t...

Page 64: ... recording space The recording data will replace the oldest one when total recording size exceeds this value For example if each recording file is 6MB and the total cycling recording size is 600MB then the camera will record 100 files to the specified location folder and then will delete the oldest file and create new file for cycling recording Please note that if the HDD empty space is not enough...

Page 65: ...rnal device is connected to the digital input pins the state of the voltage will be monitored Max Input 500mA 12Vdc Select Grounded or Open to define normal status of the digital output The camera will show whether the trigger is activated or not Advanced DI and DO The I O connector provides the physical interface for digital output DO and digital input DI that is used for connecting such external...

Page 66: ...d cut filter at all times which will block the infrared light from reaching the sensor so that the colors are not distorted The Network Camera switches off the infrared cut filter to allow the infrared light to pass through This helps the Network Camera to see more clearly in low light conditions The Network Camera switches between day and night mode based on a specific schedule Ensure to enter th...

Page 67: ...rtificate Method 1 Create self signed certificate automatically Method 2 Create self signed certificate manually Select to create a certificate signing request for your server If there is no certificate available on the remote client device it automatically generates one when Enable HTTPS secure connection and Create self signed certificate automatically is selected ClickCreatetomanuallyupdatethei...

Page 68: ...upload a signed certificate ensure to create a certificate request After creating the request click Browse to upload the certificate file which has been signed by the third party Once uploaded the Certificate Information section displays the information of the certificate and the status is changed to Active ...

Page 69: ...ed setting from the Delete List Select to enter an IP address The administrator always has access to this device Access List The Access List page will allow you to configure access permissions for each user Note Please do not remove the default access list 1 0 0 0 255 255 255 255 before adding a new one otherwise you will not be able to access the camera anymore If removed accidentally please pres...

Page 70: ...s set from 1 1 1 0 to 170 255 255 255 Only users IP located between 171 0 0 0 and 192 255 255 255 can access the Network Camera Alowed List Denied List Single Network Range Add a single IP address Add a network IP addresses with subnet mask Specify the range of IP addresses There are three different IP formats to choose from the list Click Add to save the IP formats ...

Page 71: ...nt Enter a username for the new account Enter a password for the new account Select the access rights for the new user Manage the accounts for existing users The access rights for existing users Create a unique name for your camera and you can access the camera using this name in your web browser For example http DCS 6111 by default You can modify both the camera s name and the administrator s pas...

Page 72: ...ngtheoperation of the network camera Click the Restore button to reset the camera back to its factory default settings This will remove all the configuration settings that were previously made Click the Reboot button to restart the camera Backup and Restore The Backup and Restore page will allow you to turn the front panel LED off restore factory default settings and reboot the camera ...

Page 73: ...t uploading and upgrading the new firmware to your camera Firmware Update Your current firmware version and date will be displayed on your screen You may go to the D Link Support page to check for the latest firmware version available To upgrade the firmware on your DCS 6111 please download and save the latest firmware version from the D Link support site to your local hard drive Locate the file o...

Page 74: ...74 D Link DCS 6111 User Manual Section 3 Configuration Status Device Info This page displays all the details information about your device and network connection ...

Page 75: ...s for the log server The IP address of the remote server The port number of the remote log server The default port is 514 Click to save the settings Displaysthethesystem slogfile Thecontentof thefilerevealsusefulinformationaboutcamera configuration and connectivity status after the camera boots up Logs This page displays the log information of your camera You can configure a remote log server so t...

Page 76: ...76 D Link DCS 6111 User Manual Section 3 Configuration Help ...
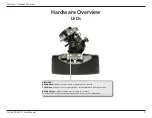
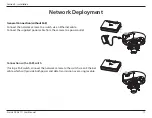
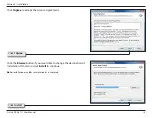
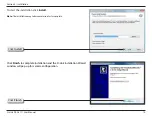
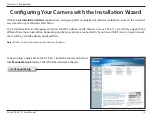
Page 77: ...he same time is 10 Please keep in mind the overall performance of the transmission speed will be reduced if many users have logged on to the camera simultaneously There is no limit on the number of users when a multicast enabled router is being used The multicast protocol helps reduce the network bandwidth consumption Note that the Network Camera must be configured to enable multicast streaming Fo...

Page 78: ... the Network Camera be installed and work if a firewall exists in the network If a firewall exists in the network port 80 is open for ordinary data communication and HTTPS port 443 for The DCS 6111 uses RTSP port 554 RTP port 556 and RTP port 558 for streaming audio and video These ports or the ports you have specified in the Setup Tab in the Configuration screen need to be opened on the firewall ...

Page 79: ...etwork Camera With WDR Sensor is connected to a computer that is not properly configured with a valid IP address Turn off DHCP from the Network Settings in Windows and configure the computer with a valid IP address or connect the camera to a router with DHCP enabled This error can also occur if the Installation Wizard icon had been clicked more than once from the setup wizard 9 Noisy images occur ...

Page 80: ...d and click OK Windows 7 Vista users type cmd in the Start Search box At the prompt type ipconfig and press Enter This will display the IP address subnet mask and the default gateway of your adapter Iftheaddressis0 0 0 0 checkyouradapterinstallation security settings and the settings on your access point Some firewall software programs may block a DHCP request on newly installed adapters If you ar...

Page 81: ...d select Properties Step 3 Highlight Internet Protocol TCP IP and click Properties Step 4 Click Use the following IP address and enter an IP address that is on the same subnet as your network or the LAN IP address on your access point Example If the network camera s LAN IP address is 192 168 0 1 make your IP address 192 168 0 X where X is a number between 2 and 99 Make sure that the number you cho...

Page 82: ...normal state If the system still has problems after reset restore the factory settings and install again RESET 1 Lightly insert a paper clip or a similar sized tool into the reset hole on the back of the camera press lightly and then release the button 2 The LED on the front of the camera will begin blinking red and green 3 When the LED stops the blinking the reset has completed RESTORE 1 Insert t...

Page 83: ...on or off the external device DI and DI can be connected to an external sensor and the state of voltage will be monitored from the initial state LOW External I O Port The digital input is used for connecting external alarm devices and once triggered images will be taken and e mailed The I O connector provides the physical interface for digital output DO and digital input DI that is used for connec...

Page 84: ... 4M SENSOR LENS SPECIFICATIONS 1 4 WDR VGA CMOS sensor 3 3 12mm vari focal lens F1 4 F2 9 auto iris Built in IR cut Removable ICR filter Auto Schedule Manual Minimum illumination 1 5 Lux F1 4 IR LED 20M illumination distance with 12 LEDs and light sensor EVENT MANAGEMENT Motion detection weekly schedule Event notification and upload snapshots video clips via HTTP SMTP or FTP Multiple HTTP SMTP or ...

Page 85: ...o by SIP protocol Supports hardware and software audio mute EXTERNAL DEVICE INTERFACE One D I and one D O for external sensor and alarm DIAGNOSTIC LED 2 color LED POWER INPUT 100 240VAC 50 60Hz 12VDC 1 25A POWER CONSUMPTION MAX 11 W DIMENSIONS 194 W X 180 D X 107 H mm WEIGHT 650 grams OPERATION TEMPERATURE 0º to 40º C 32º to 104º F STORAGE TEMPERATURE 20º to 70º C 4º to 158º F HUMIDITY 20 to 80 no...

Page 86: ...rdware Revision located on the label on the bottom of the Network Camera e g rev A2 Serial Number s n number located on the label on the bottom of the Network Camera You can find software updates and user documentation on the D Link website as well as frequently asked questions and answers to technical issues For customers within the United States Phone Support 877 354 6555 Internet Support http s...

Page 87: ...its suppliers under this Limited Warranty will be at D Link s option to repair or replace the defective Hardware during the Warranty Period at no charge to the original owner or to refund the actual purchase price paid Any repair or replacement will be rendered by D Link at an Authorized D Link Service Office The replacement hardware need not be new or have an identical make model or part D Link m...

Page 88: ...l licensee for the non conforming Software will be refunded by D Link provided that the non conforming Software and all copies thereof is first returned to D Link The license granted respecting any Software for which a refund is given automatically terminates Non Applicability of Warranty The Limited Warranty provided hereunder for Hardware and Software portions of D Link s products will not be ap...

Page 89: ...ng and return shipping charges for any product that is not packaged and shipped in accordance with the foregoing requirements or that is determined by D Link not to be defective or non conforming What Is Not Covered The Limited Warranty provided herein by D Link does not cover Productsthat inD Link sjudgment havebeensubjectedtoabuse accident alteration modification tampering negligence misuse faul...

Page 90: ...LE REMEDY FOR A BREACH OF THE FOREGOING LIMITED WARRANTY IS REPAIR REPLACEMENT OR REFUND OF THE DEFECTIVE OR NONCONFORMING PRODUCT THE MAXIMUM LIABILITY OF D LINK UNDERTHISWARRANTY IS LIMITEDTOTHE PURCHASE PRICE OFTHE PRODUCT COVERED BYTHEWARRANTY THE FOREGOING EXPRESS WRITTEN WARRANTIES AND REMEDIES ARE EXCLUSIVE AND ARE IN LIEU OF ANY OTHER WARRANTIES OR REMEDIES EXPRESS IMPLIED OR STATUTORY Gov...

Page 91: ...r Connect the equipment into an outlet on a circuit different from that to which the receiver is connected Consult the dealer or an experienced radio TV technician for help FCC Caution Any changes or modifications not expressly approved by the party responsible for compliance could void the user s authority to operate this equipment This device complies with Part 15 of the FCC Rules Operation is s...

Page 92: ...nce and 2 this device must accept any interference received including interference that may cause undesired operation IMPORTANT NOTE Radiation Exposure Statement This equipment complies with IC radiation exposure limits set forth for an uncontrolled environment This equipment should be installed and operated with minimum distance 20cm between the radiator your body This device has been designed to...

Page 93: ... DCS 6111 User Manual Appendix F Registration Version 2 2 August 13 2014 Product registration is entirely voluntary and failure to complete or return this form will not diminish your warranty rights Registration ...

Reviews: