background image


3.  Place 

the 

mounting 

brackets 

(attached  to  the  device)  on  the 
location where you want to mount it, 
and  use  the  brackets  as  a  guide  to 
mark where to drill the screw holes. 


4.  Drill  holes  on  the  marks  and  insert 

wall  anchors  appropriate  for  the 
material of the wall. 


5. 

Align the device with the wall anchors and 
secure  it  to  the  wall  using  appropriate 
screws for the wall anchors. 


Installing the Device on a DIN Rail 


The DIS-2650AP can be mounted on a standard 

DIN rail using the included DIN mounting kit. 


Use the following instructions to install the 


DIS-2650AP on a rail: 


1. 

Check that the DIN rail is installed properly 
using at least two screws on each end. 

2.  Fasten  the  DIN  mounting  clip  to  the 

rear  panel  of  the  device  using  the 
included mounting screws. 


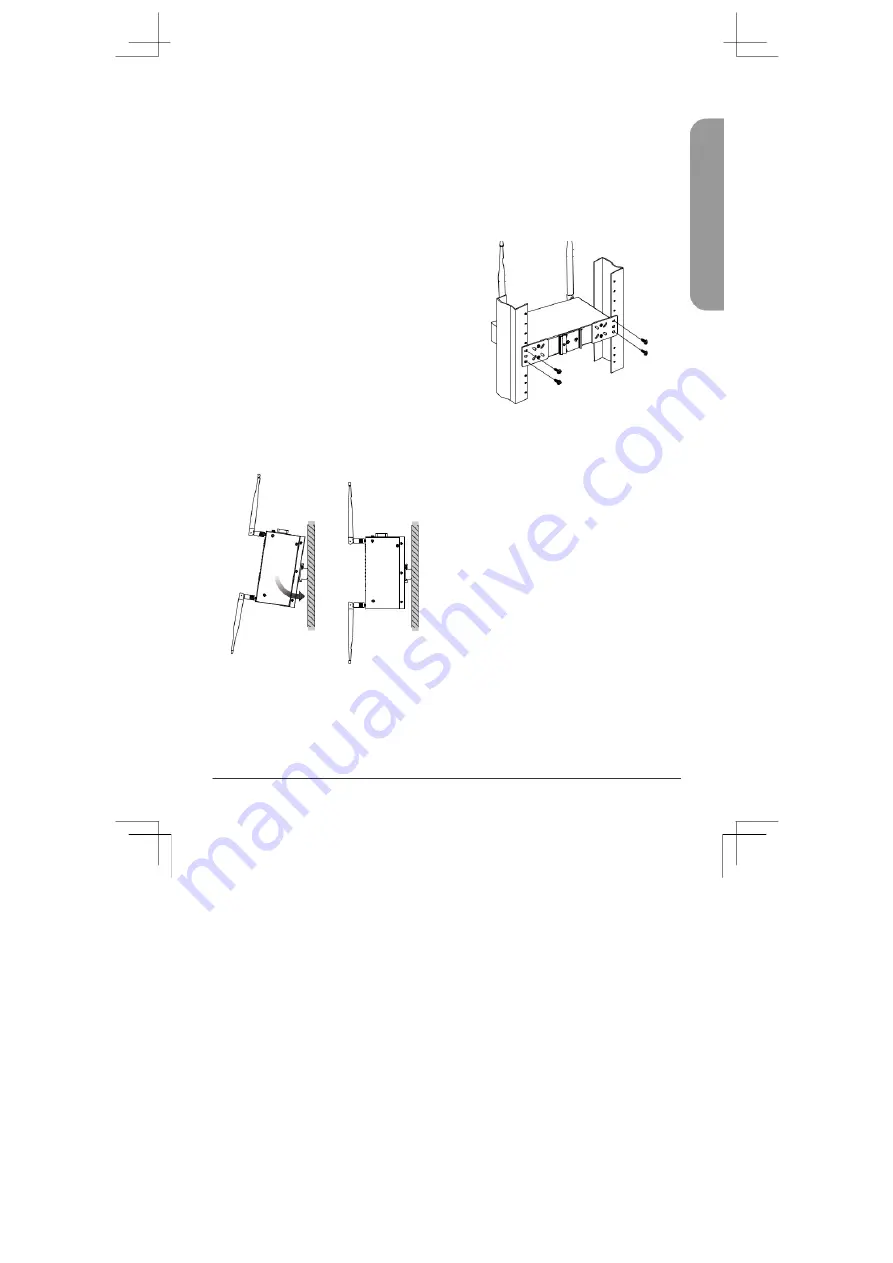
Installing the Device into a Rack 


The  DIS-2650AP  can  be  mounted  on  a 
standard  rack  using  the  included  mounting 
plates. To install the device on a rack: 


1. 

Attach the mounting brackets to the rear 


panel of the device using the 
provided installation screws. 


Figure 5: Installing onto a Rack 


2. 

Use the provided screws to attach the 
two rear mounting plates to the rack. 


Figure 4: Hooking onto the Rail 


3. 

Position  the  DIS-2650AP  against  the 
rail,  then  tilt  it  upwards  and  hook  the 
DIN  rail clip  on the  back  of  the  device 
against  the  rail.  Snap  the  device  into 
place to complete the installation. 


Grounding the Device 


To use the DIS-2650AP safely, it needs to 
be  grounded.  Please  complete  these 
steps before powering on the device. 


1.  Remove  the  grounding  screw  from 

the top of the DIS-2650AP and place 
the  grounding  cable  lug  ring  on  top 
of the grounding screw opening. 


2.  Insert the grounding screw back into 

the  grounding  screw  opening  and 
use  a  screwdriver  to  tighten  the 
grounding  screw,  securing  the 
grounding cable to the DIS-2650AP. 


3.  Attach  the  terminal  lug  ring  at  the 

other  end  of  the  grounding  cable  to 
an appropriate grounding source. 


DIS-2650AP Quick Installation Guide


Summary of Contents for DIS-2650AP

Page 1: ... Guide Wireless AC1200 Wave 2 Industrial Indoor Access Point DIS 2650AP DIS 2650AP 5G 2 4G ALARM POE PW R2 PW R1 STATUS SIGN AL CONSOLE RESET LAN2 LAN1 POE Additional documentation is also available on the D Link website ...

Page 2: ...Contents English 1 ...

Page 3: ...lled Ethernet Adapter Front Panel Features 1 2 3 4 5 6 7 8 9 10 DIS 2650AP 5G 2 4G ALARM POE PWR2 PWR1STATUS SIGNAL CONSOLE RESET LAN2 LAN1 POE Figure 1 Front Panel Feature Description 1 Console Console port which is used to connect to the device using an Port RJ 45 to serial cable 2 Reset Press and hold to perform a Button factory reset 3 LAN2 10 100 1000 Mbps Ethernet LAN port 4 LAN1 PoE PoE cap...

Page 4: ...at it is fully secure Do not stack any devices on top of the DIS 2650AP Attach the External Antennas The DIS 2650AP requires two external antennas to function correctly The included antennas are interchangeable 1 Attach the two included antennas to the RP SMA connectors on the side of the DIS 2650AP Turn clockwise to fasten the antennas 2 Arrange the antennas so that they re pointing upwards and i...

Page 5: ...ting plates To install the device on a rack 1 Attach the mounting brackets to the rear panel of the device using the provided installation screws Figure 5 Installing onto a Rack 2 Use the provided screws to attach the two rear mounting plates to the rack Figure 4 Hooking onto the Rail 3 Position the DIS 2650AP against the rail then tilt it upwards and hook the DIN rail clip on the back of the devi...

Page 6: ... switch Figure 7 Removing the Terminal Block 3 Use a flat head screwdriver to unscrew the terminal connections that you wish to use 4 Insert the wires into the terminal connectiosn and use the screwdriver to tighten the screws to secure the wires Figure 8 Connecting a Power Source to the Terminal Block 5 Re insert the terminal block into the socket on the device Connecting Devices The Ethernet por...

Page 7: ...address field of your browser 3 Log in to the administration user interface The default information is Username admin Password admin Connecting Wirelessly 1 Connect the management computer to the default SSID of the DIS 2650AP dlink 2 Manage the access point from a computer Enter dis2650ap local in the address field of your browser 3 Log in to the administration user interface The default informat...

Page 8: ...ween the equipment and receiver Connect the equipment into an outlet on a circuit different from that to which the receiver is connected Consult the dealer or an experienced radio TV technician for help Non modifications Statement Any changes or modifications not expressly approved by the party responsible for compliance could void the user s authority to operate this equipment Caution This device...

Page 9: ...eux conditions suivantes 1 l appareil ne doit pas produire de brouillage et 2 l utilisateur de l appareil doit accepter tout brouillage radioélectrique subi même si le brouillage est susceptible d en compromettre le fonctionnement i the device for operation in the band 5150 5250 MHz is only for indoor use to reduce the potential for harmful interference to co channel mobile satellite systems i les...

Page 10: ...ce Install and use the equipment according to the instruction manual 電波法により 5GHz 帯は屋内使用に限ります Product and Warranty Information To find out more about D Link Nuclias product or marketing information please visit the website http www dlink com or https www nuclias com The D Link Limited Lifetime Warranty information is available at http www dlink com warranty VCCI B 低功率電波輻射性電機管理辦法 第十二條 經型式認證合格之低功率射頻電...

Page 11: ...d 5150 5250 MHz is only for indoor use to reduce the potential for harmful interference to co channel mobile satellite systems ii where applicable antenna type s antenna models s and worst case tilt angle s necessary to remain compliant with the e i r p elevation mask requirement set forth in section 6 2 2 3 shall be clearly indicated Avertissement i les dispositifs fonctionnant dans la bande 5150...

Page 12: ...Notes ...

Page 13: ...Notes ...

Page 14: ...Notes ...

Page 15: ...Notes ...

Page 16: ...Ver 1 00 WW _130x183 2020 12 07 5300 00007836 01W ...

Reviews: