Summary of Contents for DSL-2320B
Page 1: ......
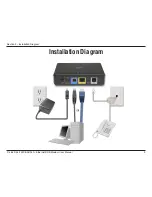
The D-Link DSL-2320B is a reliable and high-performance DSL modem. To quickly set it up, users can refer to the Quick Install Manual, available for free download from 88.208.23.73:8080. This comprehensive manual provides step-by-step instructions, ensuring a hassle-free installation experience.
Page 1: ......


