background image

xStack Storage DSN-3200 & DSN-3400 
ECN – Drive Activity Light Fix 


D-Link Systems, Inc.                                                                                                                             Page 

3


February 7, 2007 


1 Introduction 

 
Note: For the remainder of this document, issues that pertain to both the DSN-3200 and DSN-3400 units 
will be identified as DSN-3200/3400. 
 
D-Link Systems, Inc.™ has identified an issue wherein the drive activity light is constantly illuminated 
when using a Seagate Barracuda ES.2 1TB SATA-II hard drive (Seagate part number ST31000340NS). 
This issue affects DSN-3200/3400 units shipped before January 2008.   Please review section 1.3 of this 
document for a detailed description of how to determine if your system is in need of this resistor pack 
update.  If you determine that your system is affected, then please proceed to the step-by-step update guide 
in Section 2. 
 

1.1 Purpose 

The purpose of this document is to communicate the steps required to identify affected DSN-3200/3400 
units shipped before January 2008.  This document will include how to identify affected systems and the 
steps required to fix the issue. 
 

1.2 Scope 

This document is an ECN (Engineering Change Notice) concerning the identification of affected DSN-
3200/3400 units shipped before January 2008 and the installation of four resistor packs to fix the issue. 


This ECN relates to any DSN-3200/3400 units shipped from D-Link before 
January 2008. 

This issue does not affect the functionality of the DSN-3200/3400 unit, nor 
does it affect the data storage functionality of the Seagate ST31000340NS 1TB 
hard drive.  The drive activity light simply remains illuminated at all times. 


1.3 Identification of Affected Systems 

DSN-3200/3400 units shipped after January 2008 will be modified at the factory to contain the four resistor 
packs described in this document.  However, any units shipped before this date will need to be examined. 
 
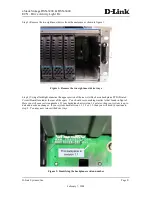
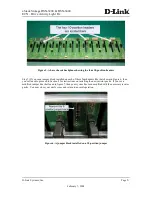
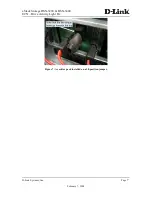
Definitive identification of affected DSN-3200/3400 units will require two steps.  For this procedure it is 
highly recommended that the system be shut down and power cords removed to minimize the electrical 
shock risk.   
 
Please follow these steps for inspection: 
 
Step 1) Shut down the DSN-3200/3400 through your management GUI.  Please follow the instructions in 
your xStack Storage User’s Guide. 
 
Step 2) In order to minimize electrical shock risk, remove the three power cords from your DSN-3200/3400 
unit’s power supply. 


Summary of Contents for DSN-3200 - xStack Storage Area Network Array Hard Drive

Page 1: ...D Link Systems Inc Page 1 February 7 2008 D Link Systems Inc xStack Storage DSN 3200 DSN 3400 ECN Drive Activity Light Fix rev 1 ...

Page 2: ...ranty of any kind and is subject to change without notice The only warranties for D Link Systems products and services are set forth in the express warranty statements accompanying such products and services Nothing herein should be construed as constituting an additional warranty D Link Systems shall not be liable for technical or editorial errors or omissions contained herein Copyright 2008 D Li...

Page 3: ...ECN Engineering Change Notice concerning the identification of affected DSN 3200 3400 units shipped before January 2008 and the installation of four resistor packs to fix the issue This ECN relates to any DSN 3200 3400 units shipped from D Link before January 2008 This issue does not affect the functionality of the DSN 3200 3400 unit nor does it affect the data storage functionality of the Seagate...

Page 4: ...pper portion of the now visible chassis backplane PCB Printed Circuit Board located at the rear of the space You should see something similar to that found in figure 2 Here you will see a revision number If your backplane has revision 1 4 or later then your system is up to date and needs no changes If your system has Revision 1 1 1 2 or 1 3 then you will need to continue to step 5 You may now rein...

Page 5: ...ackplane are four 10 position headers labeled NA1315 NA0912 NA0508 and NA0104 The labels themselves are extremely small and difficult to read Please see figure 4 to identify these headers Note that the two right most headers are made difficult to see because of the placement of four 4 four position Molex power connectors In order to better orient you to the position of these jumpers please see the...

Page 6: ...nstalled on each of these four headers like that shown in Figure 6 then you will need to proceed to Section 2 for instructions on installing the new resistor packs If you see a modified jumper like that found in figure 7 then your system has been modified with the necessary resistor packs You may close your unit s cover and return to normal operation Figure 6 A jumper block installed on a 10 posit...

Page 7: ...xStack Storage DSN 3200 DSN 3400 ECN Drive Activity Light Fix D Link Systems Inc Page 7 February 7 2008 Figure 7 A resistor pack installed on a 10 position jumper ...

Page 8: ...SN 3200 3400 through your management GUI Please follow the instructions in your xStack Storage User s Guide Step 2 In order to minimize electrical shock risk remove the three power cords from your DSN 3200 3400 unit s power supply Step 3 Please remove the cover from your DSN 3200 3400 to gain access to the chassis backplane PCB The backplane is identified in figure 3 Step 4 Identify the four 10 po...

Page 9: ... in figure 9 The top right pin is removed and will provide a guide for installation of the new resistor pack Figure 9 The empty 10 position header Step 7 Familiarize yourself with the resistor pack Note that two of the positions are empty as seen in figure 10 Also be aware that one of the holes on the connector has been blocked as shown in figure 11 This blocked hole will need to match with the mi...

Page 10: ...resistor pack connector view Step 8 Carefully orient the resistor pack over the 10 position header making sure the keyed hole matches the missing pin on the header Press the resistor pack inwards until it is firmly seated Figures 12 13 will give you a guide to what it will look like Figure 12 An installed resistor pack ...

Page 11: ...ition headers Step 10 Install the two 2 Molex power connectors labeled CN4 and CN7 These were removed earlier as shown in figure 8 Step 11 Replace the cover of the unit reattach all cabling and power up the unit normally Step 12 Your DSN 3200 3400 is now ready to accept Seagate Barracuda ES 2 1TB SATA II hard drives Seagate part number ST31000340NS The drive activity lights will blink when drive a...

Reviews: