background image

xStack

®

 DGS-3600 Series Layer 3 Managed Gigabit Ethernet Switch 

Database Description packet  

Link-State Request packet  

Link-State Update packet  

Link-State Acknowledgment packet 

OSPF Packet Header 

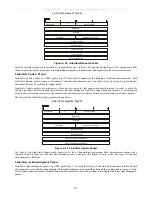
Every OSPF packet is preceded by a common 24-byte header. This header contains the information necessary for a receiving 
router to determine if the packet should be accepted for further processing. 

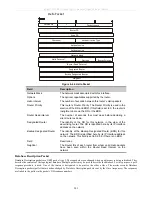
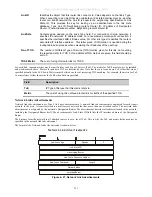
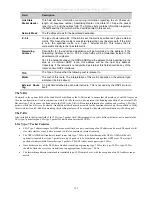
The format of the OSPP packet header is shown below: 

OSPF Packet Header

Type

Packet Length

Router ID

Version No.

Area ID

Checksum

Authentication Type

Authentication

Authentication


Figure 4- 39. OSPF Packet Header Format 

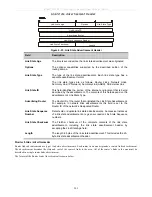
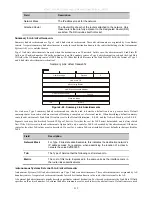
Field 

Description 

Version No. 

The OSPF version number 

Type 

The OSPF packet type. The OSPF packet types are as follows: Type  
Description Hello Database Description Link-State Request Link-State 
Update Link-State Acknowledgment 

Packet Length 

The length of the packet in bytes. This length includes the 24-byte header. 

Router ID 

The Router ID of the packet’s source. 

Area ID 

A 32-bit number identifying the area that this packet belongs to. All OSPF 
packets are associated with a single area. Packets traversing a virtual link 
are assigned the backbone Area ID of 0.0.0.0 

Checksum 

A standard IP checksum that includes all of the packet’s contents except for 
the 64-bit authentication field. 

Authentication Type 

The type of authentication to be used for the packet. 

Authentication 

A 64-bit field used by the authentication scheme. 

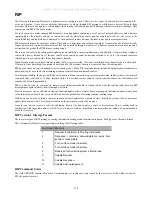
Hello Packet 

Hello packets are OSPF packet type 1. They are sent periodically on all interfaces, including virtual links, in order to establish and 
maintain neighbor relationships. In addition, Hello Packets are multicast on those physical networks having a multicast or 
broadcast capability, enabling dynamic discovery of neighboring routers. 

All routers connected to a common network must agree on certain parameters such as the Network Mask, the Hello Interval, and 
the Router Dead Interval. These parameters are included in the hello packets, so that differences can inhibit the forming of 
neighbor relationships. A detailed explanation of the receive process for Hello packets is necessary so that differences cannot 
inhibit the forming of neighbor relationships. 

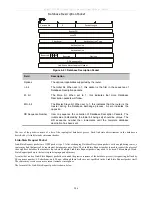
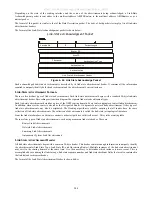
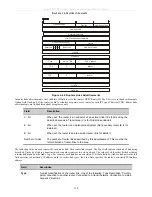
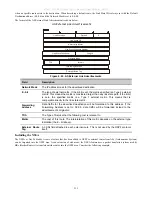
The format of the Hello packet is shown below: 


204

Summary of Contents for xStack DGS-3612G series

Page 1: ...Web UI Reference Guide Product Model xStack DGS 3600 Series Layer 3 Managed Gigabit Ethernet Switch Release 2 8...

Page 2: ...strictly forbidden Copyright 2010 All rights reserved Trademarks used in this text D Link and the D LINK logo are trademarks of D Link Corporation Microsoft and Windows are registered trademarks of Mi...

Page 3: ...a Class A product In a domestic environment this product may cause radio interference in which case the user may be required to take adequate measures Warnung Dies ist ein Produkt der Klasse A Im Woh...

Page 4: ...Administration 4 Device Information 5 IP Address 8 IP MTU Settings 10 Stacking 11 Port Configuration 15 Port Configuration 15 Port Error Disabled 16 Port Description 17 Port Auto Negotiation Informat...

Page 5: ...ngs 51 DHCP Relay Option 60 Default Settings 52 DHCP Relay Option 60 Settings 52 DHCP Relay Option 61 Default Settings 53 DHCP Relay Option 61 Settings 54 DHCP BOOTP Local Relay Settings 55 DHCPv6 Rel...

Page 6: ...P Port Settings 114 IGMP Snooping 115 IGMP Snooping Settings 115 Router Port Settings 118 IGMP Snooping Static Group Settings 120 ISM VLAN Settings 122 IP Multicast Address Range Settings 124 Limited...

Page 7: ...ures 167 Interface Settings 173 IPv4 Interfaces Settings 173 IPv6 Interface Settings 175 Loopback Interfaces Settings 178 MD5 Key Settings 179 Route Redistribution Settings 179 Multicast Static Route...

Page 8: ...Resolver Dynamic Name Server Table 251 DNS Resolver Static Host Name Settings 251 DNS Resolver Dynamic Host Name Table 252 VRRP 252 VRRP Global Settings 252 VRRP Virtual Router Settings 253 VRRP Authe...

Page 9: ...ol Settings 301 HOL Prevention Settings 302 Schedule Settings 302 QoS Output Scheduling Settings 302 QoS Scheduling Mechanism Settings 305 ACL 306 Time Range 306 Access Profile Table 307 ACL Flow Mete...

Page 10: ...385 Enable Method Lists 386 Configure Local Enable Password 388 Enable Admin 388 RADIUS Accounting Settings 389 MAC based Access Control 390 MAC based Access Control Global Settings 390 MAC based Acc...

Page 11: ...tus Port 434 Port Access Control 435 Authenticator State 435 Authenticator Statistics 436 Authenticator Session Statistics 438 Authenticator Diagnostics 440 RADIUS Authentication 443 RADIUS Account Cl...

Page 12: ...onitor 457 OSPF 457 OSPFv3 459 Switch Logs 461 Browse ARP Table 461 Session Table 462 MAC based Access Control Authentication Status 462 Switch Maintenance 464 Reset 464 Reboot System 464 Save Service...

Page 13: ...am names and commands For example use the copy command Boldface Typewriter Font Indicates commands and responses to prompts that must be typed exactly as printed in the manual Initial capital letter I...

Page 14: ...nternal components Operate the product only from the type of external power source indicated on the electrical ratings label If you are not sure of the type of power source required consult your servi...

Page 15: ...ware le racks before working on the rack the rack first from the rack s can pinch your fingers component into the rack ent of the branch circuit rating ents in the rack nents in a rack Before working...

Page 16: ...omponents inside your system To prevent static damage discharge static electricity from your body before you touch any of the electronic components such as the microprocessor You can do so by periodic...

Page 17: ...s the same internal switching software and configure it Thus all settings encountered in web based management are the same as those found in the console program Login to Web Manager To begin managing...

Page 18: ...anager window Area Function Area 1 Select the folder or window to be displayed The folder icons can be opened to display the hyper linked window buttons and subfolders contained within them Click the...

Page 19: ...nel Settings RIP OSPF DHCP Server Filter DHCP Server DNS Relay DNS Resolver VRRP IP Multicast Routing Protocol BGP and IP Route Filter QoS Contains the following folders and windows 802 1p Settings Ba...

Page 20: ...Password Encryption Mirror System Log System Severity Settings Command Logging Settings SNTP Settings MAC Notification Settings TFTP Services File System Services Ping Test IPv6 Neighbor DHCP Auto Con...

Page 21: ...s address table if necessary The user may also enter a System Name System Location and System Contact to aid in defining the Switch In addition this window displays the status of functions on the Swit...

Page 22: ...Baud Rate This field specifies the baud rate for the serial port on the Switch There are four possible baud rates to choose from 9600 19200 38400 and 115200 For a connection to the Switch using the CL...

Page 23: ...the Switch The default is Disabled When enabled jumbo frames frames larger than the Ethernet frame size of 1536 bytes of up to 9216 bytes tagged can be transmitted by the Switch Syslog State Enables...

Page 24: ...gn the Switch s IP address subnet mask and default gateway address 1 Select Manual from the Get IP From drop down menu 2 Enter the appropriate IP Address and Subnet Mask 3 If you will manage the Switc...

Page 25: ...of the form xxx xxx xxx xxx where each xxx is a number represented in decimal between 0 and 255 The value should be 255 0 0 0 for a Class A network 255 255 0 0 for a Class B network and 255 255 255 0...

Page 26: ...ct to the Switch IP MTU Settings The IP MTU Settings window is used to configure the IP layer MTU settings on the Switch The MTU is the largest size of IP datagram which may be transferred using a spe...

Page 27: ...ormat Using this method data transfer is only possible in one direction and if there is a break in the chain then data transfer will obviously be affected Duplex Ring As shown in Figure 6 3 the Duplex...

Page 28: ...tacking Unit IDs to switches in the stack synchronize configurations for all switches and then transmit commands to the rest of the switches based on the user configurations of the Primary Master Once...

Page 29: ...enable this device for stacking by using the following window To view this window click Administration Stacking Mode Settings as shown below Figure 2 6 Stacking Mode Settings window Force Master Role...

Page 30: ...System default 1 5 6 7 8 21 22 23 24 Engineer 2 9 10 11 12 Marketing 3 13 14 15 16 Finance 4 17 18 19 20 Sales 5 1 2 3 4 Backbone 6 25 26 Table 2 1 VLAN Example Assigned Ports In this case six IP int...

Page 31: ...ncluding port speed and flow control Port Configuration To display the following window click Administration Port Configuration Port Configuration as shown below To configure switch ports 1 Choose the...

Page 32: ...d then to use those settings The other options are Auto 10M Half 10M Full 100M Half and 100M Full 1000M Full_M and 1000M Full_S There is no automatic adjustment of port settings with any option other...

Page 33: ...type of transport medium used SFP ports should be nominated Fiber and the Combo 1000BASE T ports should be nominated Copper The result will be displayed in the appropriate switch port number slot C fo...

Page 34: ...lays the current configurations of a range of ports Use the drop down menu to select the unit you wish to view and the relevant port information will be displayed in the table below To view this windo...

Page 35: ...to view detailed port information for individual ports on a particular unit Use the drop down menus to select the specific port of the unit you wish to view and click Find To view this window click A...

Page 36: ...s window is used to display the port media type available on each unit To view a particular switch in the stack use the drop down menu to select the unit To view this window click Administration Port...

Page 37: ...l the cable diagnostics and determine where and what kind of errors have occurred on the cable This function is primarily used for administrators to view tests on copper cables To view this window cli...

Page 38: ...assword and retype the same password in the Confirm New Password field Choose the level of privilege Admin Operator or User from the Access Right drop down menu Figure 2 18 User Account Modify Table w...

Page 39: ...ryption State Use the pull down menu to enable or disable the password encryption Select Enabled to change the password into encrypted form When password encryption is Disabled the password will be in...

Page 40: ...ply to implement the changes Port Mirror Settings The Switch allows you to copy frames transmitted and received on a port and redirect the copies to another port You can attach a monitoring device to...

Page 41: ...t Port Tick the check box and enter the port which received the copies from the source port State Use the pull down menu to enable or disable the mirror group function Source Ports Action User the pul...

Page 42: ...porarily until another device has been installed in its place If configurations are saved to NVR RAM during this period the configuration will be removed forever Mirroring within the Switch Stack User...

Page 43: ...arameters configured for adding and editing System Log Server settings are the same See the table below for a description Figure 2 25 System Log Server Settings Add window To set the System Log Server...

Page 44: ...de 0 kernel messages 1 user level messages 2 mail system 3 system daemons 4 security authorization messages 5 messages generated internally by syslog line printer subsystem 6 network news subsystem 7...

Page 45: ...erval by which the switch will save the log files On Demand Only save log files when manually telling the Switch to do so Go to Save Services Save Changes to manually save log On Trigger Save log file...

Page 46: ...alert type to an SNMP agent and the Switch s log for analysis Severity Level Choose what level of alert will trigger sending the log entry or trap message as defined by the Severity Name Select Emerge...

Page 47: ...ndow The following parameters are displayed or can be configured Parameter Description Command Logging State Enable or disable command logging settings The default is Disabled Click Apply to implement...

Page 48: ...n Current Time Displays the Current Time set on the Switch Time Source Displays the time source for the system SNTP Settings SNTP State Use this pull down menu to Enabled or Disabled SNTP SNTP Primary...

Page 49: ...is window click Administration SNTP Settings Time Zone and DST as shown below Figure 2 31 Time Zone and DST window The following parameters can be set Parameter Description Time Zone and DST Daylight...

Page 50: ...week of the month the DST will end To Day of Week Enter the day of the week that DST will end To Month Enter the month that DST will end To Time in HH MM Enter the time of day that DST will end DST An...

Page 51: ...he Switch State The time in seconds between notifications Interval 1 2147483647 sec The maximum number of entries listed in the history log used for notification Up to 500 entries can be specified His...

Page 52: ...figured Parameter Description Operation Select a service for the TFTP server to perform from the drop down window Download Firmware Enter the IP address of the TFTP server and specify the location of...

Page 53: ...to select all available units Image File in Flash To select a firmware file from the internal Flash drive to be transferred or to load a firmware file on to the Flash drive enter the path and filenam...

Page 54: ...up files and load them into the Switch If a problem occurs the Switch will use the PROM programmable read only memory will provide the FAT 16 re building function which will format the Flash as FAT 16...

Page 55: ...information about the internal Flash drive Parameter Description Drive ID The name of the drive of the memory There is only one drive in the Flash and it is named C Media Type The type of storage med...

Page 56: ...s Directory as shown below Figure 2 36 Directory window The previous window contains the following information Parameter Description Unit Use the drop down menu to select the unit you wish to configur...

Page 57: ...es Rename as shown below Figure 2 37 Rename window Copy This window is used to copy a directory located within the Flash memory of the switch To view this window click Administration File System Servi...

Page 58: ...and logs between the switch and RCP server Figure 2 39 Remote Copy Protocol between an RCP server and an Ethernet Switch As illustrated in Figure 2 49 a user can a Upload a configuration file from th...

Page 59: ...he method for copying files Options are Download Firmware Download Configuration Upload Configuration Upload Log and Upload Attack Log RCP Server IPv4 Address Enter the IP address of the RCP Server Us...

Page 60: ...g an IPv4 address Parameter Description Target IP Address Enter an IPv4 address to be pinged Domain Name Enter the domain name of the host Repeat Times Either click the Infinite times radio button or...

Page 61: ...e omitted Repeat Times Enter the number of times desired to attempt to ping the IPv6 address configured in this window Users may enter a number of times between 1and 255 Size Use this field to set the...

Page 62: ...to begin the search Neighbor IPv6 Address Enter the IPv6 address of the neighbor of the IPv6 device to be searched Click Find to begin the search State Users may also search by running state of the IP...

Page 63: ...configuration file from a TFTP server which will set the Switch to become a DHCP client automatically on boot up To employ this method the DHCP server must be set up to deliver the TFTP server IP addr...

Page 64: ...BOOTP Relay Hops Count Limit 1 16 This field allows an entry between 1 and 16 to define the maximum number of router hops DHCP BOOTP messages can be forwarded across The default hop count is 4 DHCP B...

Page 65: ...and policy settings will have no effect DHCP Relay Agent Information Option 82 Check This field can be toggled between Enabled and Disabled using the pull down menu It is used to enable or disable th...

Page 66: ...t 1 2 3 4 5 6 7 1 6 0 4 VLAN Module Port 1 byte 1 byte 1 byte 1 byte 2 bytes 1 byte 1 byte a Sub option type b Length c Circuit ID type d Length e VLAN the incoming VLAN ID of DHCP client packet f Mod...

Page 67: ...table at the bottom of the following window once the user clicks the Add button under the Apply heading The user may add up to four server IPs per IP interface on the Switch To view this window click...

Page 68: ...acket with no matching rules found will be dropped without further process When relay is selected the packet will be relayed based on the relay rules Click Add to add a new Relay IP Address entry Clic...

Page 69: ...k the Show DHCP Relay Option 60 Table link DHCP Relay Option 61 Default Settings This window is used to configure the DHCP Relay Option 61 Default Settings These settings are used to determine the rul...

Page 70: ...C Address or String information and click Delete To delete all entries click Clear All To add a new entry click Add the following window will appear Figure 2 55 DHCP Relay Option 61 Add window The fol...

Page 71: ...VLAN Name Enter the name of VLAN VID List Display the VLAN list Click Apply to implement the changes DHCPv6 Relay This section contains information for configuring DHCPv6 relay including DHCP v6 Relay...

Page 72: ...he Switch click View All To change a current entry click the corresponding Modify button of the entry revealing the following window to configure Figure 2 59 DHCPv6 Relay Interface Settings Edit windo...

Page 73: ...igured Parameter Description Interface Name Display the IPv6 relay interface name DHCPv6 Server Address Enter the IPv6 destination address to forward DHCPv6 packets Click Apply to implement the change...

Page 74: ...figure From To Specify the ports on which the Layer 2 Protocol Tunneling will be enabled of disabled Type Use the drop down menu to select the configuration type Tunnel Specifies that the BPDU is rece...

Page 75: ...ve the role of an RSAPN VLAN intermediate switch as well as the role of source switch for another RSPAN VLAN Destination Switch The port which is directly connected to a network analyzer other monitor...

Page 76: ...ill work when RSPAN is enabled and at least one RSPAN VLAN has been configured with redirect ports Modify Redirect Click on the corresponding Modify button to edit the entries Modify Source Click on t...

Page 77: ...eck box and enter a group ID which mirror session is used for RSPAN source function Target Port The mirror group Target Port which the mirror session used for the RSPAN source function Source Ports Ac...

Page 78: ...et for a listed group of SNMP managers Thus you may create a group of SNMP managers that are allowed to view read only information or receive traps using SNMPv1 while assigning a higher level of secur...

Page 79: ...istration SNMP Manager SNMP Trap Settings as shown below Figure 2 66 SNMP Trap Settings window To enable or disable the Traps State Authenticate Trap State and or Linkchange Trap State use the corresp...

Page 80: ...on User Name An alphanumeric string of up to 32 characters This is used to identify the SNMP users Group Name This name is used to specify the SNMP group created can request SNMP messages SNMP Version...

Page 81: ...l will be used This is only operable when V3 is selected in the SNMP Version field and the Encrypted check box has been ticked This field will require the user to enter a password SHA Specifies that t...

Page 82: ...maps SNMP users identified in the SNMP User Table to the views created in the previous window The following parameters can set Parameter Description View Name Type an alphanumeric string of up to 32 c...

Page 83: ...Group Table window To delete an existing SNMP Group Table entry click the corresponding under the Delete heading To display the current settings for an existing SNMP Group Table entry click the View b...

Page 84: ...both centralized and distributed network management strategies It includes improvements in the Structure of Management Information SMI and adds some security features SNMPv3 Specifies that the SNMP ve...

Page 85: ...ure 2 75 SNMP Community Table window The following parameters can set Parameter Description Community Name Type an alphanumeric string of up to 32 characters that is used to identify members of an SNM...

Page 86: ...The following parameters can set Parameter Description Host IPv4 Address Type the IPv4 address of the remote management station that will serve as the SNMP host for the Switch SNMP Version V1 This sp...

Page 87: ...e used with an Auth NoPriv security level V3 Auth Priv To specify that the SNMP version 3 will be used with an Auth Priv security level Community String or SNMP V3 User Name Type in the community stri...

Page 88: ...Source Interface Settings as shown below Figure 2 80 Trap Source Interface Settings window The following parameters can be configured Parameter Description Interface Name Enter a name of the interfac...

Page 89: ...igured by the user 2 The Switch will take a poll of the IF counters located on the switch 3 The Switch will also take a part of the packet header The length of the packet header can also be determined...

Page 90: ...settings Up to four entries can be added with the same UDP port Owner Displays the owner of the entry made here The user that added this sFlow analyzer configured this name Timeout sec Displays the co...

Page 91: ...s server will be deleted The user may set a time between 1 and 2000000 seconds with a default setting of 400 seconds Infinite can be selected to ensure that it never times out Collector IPv4 Address T...

Page 92: ...of 256 For example if a figure of 20 is in this field the switch will sample one out of every 5120 packets 20 x 256 5120 that pass through the individual port Active RX Rate Displays the current rate...

Page 93: ...Users may enter a value between 1 and 65535 An entry of 0 disables the packet sampling Since this is the default setting users are reminded to configure a rate here Otherwise this function will not w...

Page 94: ...Analyzer Server ID Displays the ID of the Analyzer Server where datagrams containing the packet counter polling information taken using this polling mechanism will be sent Polling Interval sec The Po...

Page 95: ...ions for SIM The Commander Switch CS which is the master switch of the group Member Switch MS which is a switch that is recognized by the CS a member of a SIM group and a Candidate Switch CaS which is...

Page 96: ...ets that previously set SIM members will emit after a reboot Once a MS has had its MAC address and password saved to the CS s database if a reboot occurs in the MS the CS will keep this MS information...

Page 97: ...er will make the Switch a Commander Switch CS The user may join other switches to this Switch over Ethernet to be part of its SIM group Choosing this option will also enable the Switch to be configure...

Page 98: ...ce Name of the switches in the SIM group configured by the user If no Device Name is configured by the name it will be given the name default and tagged with the last six digits of the MAC Address to...

Page 99: ...ault Figure 2 92 Topology View window This window will display how the devices within the Single IP Management Group are connected to other groups and devices Possible icons in this window are as foll...

Page 100: ...e information about a specific device as the Tree view does See the window below for an example Figure 6 93 Device Information Utilizing the Tool Tip Setting the mouse cursor over a line between two d...

Page 101: ...group configured by the user If no Device Name is configured by the name it will be given the name default and tagged with the last six digits of the MAC Address to identify it Module Name Displays t...

Page 102: ...cking a Member icon The following options may appear for the user to configure Collapse To collapse the group that will be represented by a single icon Expand To expand the SIM group in detail Remove...

Page 103: ...are as follows File Print Setup Will view the image to be printed Print Topology Will print the topology map Preference Will set display properties such as polling interval and the views to open at S...

Page 104: ...s and enter the Path Filename of the firmware Click Download to initiate the file transfer To view this window click Administration Single IP Management Settings Firmware Upgrade as shown below Figure...

Page 105: ...Upload Log The following window is used to upload log files from SIM member switches to a specified PC To upload a log file enter the IP address of the SIM member switch and then enter a path on your...

Page 106: ...o even slight delays or for data from specified end users whose data transmissions warrant special consideration The Switch also allows further tailoring of how priority tagged data packets are handle...

Page 107: ...ade IEEE 802 1Q tagged VLANs are implemented on the Switch 802 1Q VLANs require tagging which enables them to span the entire network assuming all switches on the network are IEEE 802 1Q compliant VLA...

Page 108: ...94 unique VLANs can be identified The tag is inserted into the packet header making the entire packet longer by 4 octets All of the information originally contained in the packet is retained Figure 3...

Page 109: ...n into the header of all packets that flow into and out of it If a packet has previously been tagged the port will not alter the packet thus keeping the VLAN information intact Other 802 1Q compliant...

Page 110: ...through This selective forwarding feature based on VLAN criteria is how VLANs segment networks The key point being that Port 1 will only transmit on VLAN 2 Network resources such as printers and serv...

Page 111: ...on a new window will appear as shown below To configure the port settings and to assign a unique name and number to the new VLAN see the table below Figure 3 6 Static VLAN window Add To return to the...

Page 112: ...e box will desig nate the port as Tagged None Allows an individual port to be specified as a non VLAN member Egress Select this to specify the port as a static member of the VLAN Egress member ports a...

Page 113: ...coming packets whose VID does not match the PVID of the port Results can be seen in the table under the configuration settings as seen below To view this window click L2 Features VLAN GVRP Settings as...

Page 114: ...nabled the port will compare the VID of the incoming packet to its PVID If the two are unequal the port will drop the packet If the two are equal the port will receive the packet GVRP The GARP VLAN Re...

Page 115: ...form to be encapsulated within the VLAN tag of the packet This identifies the packet as double tagged and segregates it from other VLANs on the network therefore creating a hierarchy of VLANs within a...

Page 116: ...both double and normal VLANs co existing Once the change of VLAN is made all Access Control lists are cleared and must be reconfigured 6 Once Double VLANs are enabled GVRP must be disabled 7 All pack...

Page 117: ...AN that will be used in identification of this potential Double VLAN written in hex form The user may view configurations for a Double VLAN by clicking its corresponding button which will display the...

Page 118: ...Service Provider VLAN with an integer between 1 and 4094 TPID Enter the TPID in hex form to aid in packet identification of the Service Provider VLAN Click Apply to implement changes made To configur...

Page 119: ...ed in or removed from the Service Provider VLAN The beginning and end of the port list range are separated by a dash PVID Auto Assign This enables the PVID Auto Assign features on the switch To view t...

Page 120: ...2 0x0404 netBios 0xF0F0 XNS 0x0600 VINES 0x0BAD IPV6 0x86DD AppleTalk 0x809B RARP 0x8035 SNA over Ethernet2 0x80D5 Table 3 1 Protocol VLAN and the corresponding protocol value The following windows a...

Page 121: ...t IEEE802 3 type field in the packet header which is to be stated using the following Protocol Value IEEE802 3 SNAP Choose this parameter if you wish this protocol group to employ the Sub Network Acce...

Page 122: ...ports to Protocol Group configurations along with associated VLANs and priorities Users may use the Port List Search in the middle of the window to display configurations based on ports on the switch...

Page 123: ...s and may cause the authorization protocol to work less efficiently Subnet VLAN Settings To view this window click L2 Features VLAN Subnet VLAN Subnet VLAN Settings as shown below Figure 3 20 Subnet V...

Page 124: ...VLAN Precedence Settings as shown below Figure 3 21 VLAN Precedence Settings window Parameter Description Unit Select the switch in the switch stack to be modified From To These two fields allow the r...

Page 125: ...enable automatically on the interface for communication between its sub VLANs If an IP interface is bound to a super VLAN it cannot bind to other VLANs A super VLAN cannot be a sub VLAN of other supe...

Page 126: ...AN Settings as shown below Figure 3 24 Sub VLAN Table window The following fields may be configured Parameter Description VLAN Name Enter the name of the sub VLAN VID 1 4094 Enter the VLAN ID of the s...

Page 127: ...bps can be achieved when using the 10 100 1000Mbps Ethernet ports The 10G interfaces also support port trunk groups with 2 interfaces in each group Figure 3 26 Example of Port Trunk Group The Switch t...

Page 128: ...oup Further the aggregated links must all be of the same speed when in the LACP state and should be configured as full duplex The Master Port of the group is to be configured by the user and all confi...

Page 129: ...group click the Hyperlinked Group ID To delete a port trunk group click the corresponding under the Delete heading in the Link Aggregation Group Entries window Figure 3 28 Link Aggregation Group Conf...

Page 130: ...nd passive in processing and sending LACP control frames To view this window click L2 Features Trunking LACP Port Settings as shown The user may set the following parameters Parameter Description Unit...

Page 131: ...settings for each VLAN using the IGMP Snooping link in the L2 Features folder When enabled for IGMP snooping the Switch can open or close a port to a specific multicast group member based on IGMP mes...

Page 132: ...owed before sending an IGMP response report The Max Response Time field allows an entry between 1 and 25 seconds The default is 10 Robustness Variable 1 255 Adjust this variable according to expected...

Page 133: ...ate fields have been Enabled State Select Enabled to implement IGMP Snooping This field is Disabled by default Fast Leave This parameter allows the user to enable the Fast Leave function Enabled this...

Page 134: ...devices are members of a particular multicast group the devices will respond to the query and inform the querier of its membership status RIPv2 multicast Routing Information Protocol Version 2 can be...

Page 135: ...er attached to them There are three options for which to configure these ports None Click this option to not set these ports as router ports Static Click this option to designate a range of ports as b...

Page 136: ...te IGMP snooping static group information IP Address The static group address for which to create IGMP snooping static group information To search for an entry enter the appropriate information and cl...

Page 137: ...try click the corresponding Modify button on the IGMP Snooping Static Group Settings window the following window will be displayed Figure 3 36 IGMP Snooping Static Group Settings Edit window The follo...

Page 138: ...icast VLANs can be implemented on edge and non edge switches 2 Member ports and source ports can be used in multiple ISM VLANs But member ports and source ports cannot be the same port in a specific I...

Page 139: ...nable or disable the selected Multicast VLAN Member Port Enter a port or list of ports to be added to the Multicast VLAN Member ports will become the untagged members of the multicast VLAN Tagged Memb...

Page 140: ...y created IP Multicast Address enter the Range Name and click Find the information will be displayed on the IP Multicast Address Range Table To create a new range click the Add button which will displ...

Page 141: ...of ports to be granted access or denied access from receiving multicast information Access Toggle the Access field to either Permit or Deny to limit or grant access to a specified range of Multicast...

Page 142: ...data There are two types of MLD query messages emitted by the router The General Query is used to advertise all multicast addresses that are ready to send multicast data to all listening ports and the...

Page 143: ...10 Robustness Variable 1 255 Provides fine tuning to allow for expected packet loss on a subnet The user may choose a value between 1 and 255 with a default setting of 2 If a subnet is expected to be...

Page 144: ...that there are no more listeners present of a group on a network Calculated as robustness variable query interval 1 query response interval Querier Present Interval The amount of time that must pass b...

Page 145: ...have a multicast router attached to them There are three options for which to configure these ports None Click this option to not set these ports as router ports Static Click this option to designate...

Page 146: ...kets are received from a port it signifies a loop on the network The Switch will automatically block the port and send an alert to the administrator The Loopback Detection port will restart change to...

Page 147: ...ds Entering 0 will disable the Loopdetect Recover Time The default is 60 seconds Mode Select the mode you wish to use either Port Based or VLAN Based Port Based This mode can detect loopback based on...

Page 148: ...an alphanumeric string of up to 32 characters defined in the MST Configuration Identification window in the Configuration Name field 2 A configuration revision number named here as a Revision Level an...

Page 149: ...ntroduces two new variables the edge port and the point to point P2P port Edge Port The edge port is a configurable designation used for a port that is directly connected to a segment where a loop can...

Page 150: ...and a message will be sent to the Syslog of the switch To recover the port the administrator must disable the state of the problematic port and enable it again This is the only method available to re...

Page 151: ...llo Time cannot be longer than the Max Age Otherwise a configuration error will occur Observe the following formulas when setting the above parameters Max Age 2 x Forward Delay 1 second Max Age 2 x He...

Page 152: ...l The count can be specified from 1 to 10 The default is 3 Forwarding BPDU This field can be Enabled or Disabled When Enabled it allows the forwarding of STP BPDU packets from other network devices Th...

Page 153: ...y choose a value between 0 and 65535 with a default setting of 0 MSTI ID This field shows the MSTI IDs currently set on the Switch This field will always have the CIST MSTI which may be configured but...

Page 154: ...ose a desired method for altering the MSTI settings The user has 2 choices Add VID Select this parameter to add VIDs to the MSTI ID in conjunction with the VID List parameter Remove VID Select this pa...

Page 155: ...e MSTP function will use the port priority to select an interface to put into the forwarding state Set a higher priority value for interfaces to be selected for forwarding first In instances where the...

Page 156: ...her priority Click Apply to implement changes made STP Instance Settings The following window displays MSTIs currently set on the Switch To view the following table click L2 Features Spanning Tree STP...

Page 157: ...he addition of Port Priority and Port Cost An STP Group spanning tree works in the same way as the switch level spanning tree but the root bridge concept is replaced with a root port concept A root po...

Page 158: ...or example if the port is forced to half duplex operation the P2P status changes to operate as if the P2P value were False The default setting for this parameter is True State This drop down menu allo...

Page 159: ...o enable Forwarding BPDU on a per port basis the following settings must first be in effect 1 STP must be globally disabled and 2 Forwarding BPDU must be globally enabled These are the default setting...

Page 160: ...shown below Figure 3 61 Unicast Forwarding Table window To add or edit an entry define the following parameters and then click Add Parameter Description Unit Enter the unit to configure Port Allows th...

Page 161: ...VLAN ID of the VLAN to which the corresponding MAC address belongs Multicast MAC Address The MAC address of the static source of multicast packets This must be a multicast MAC address Port Settings Al...

Page 162: ...ires forwarding to a port in the specified VLAN Forward All Groups This will instruct the Switch to forward a multicast packet to all multicast groups residing within the range of ports specified abov...

Page 163: ...malfunctions that can result in impaired communication at higher layers 3 Provide information to assist network management in making resource changes and or reconfigurations that correct configuratio...

Page 164: ...dicates the interval at which LLDP frames are transmitted on behalf of this LLDP agent The default value is 30 seconds Message TX Hold Multiplier 2 10 This parameter is a multiplier that determines th...

Page 165: ...e desired stacking unit if applicable From To Select a port or group of ports using the pull down menus Notification State Used to configure each port for sending notification to configured SNMP trap...

Page 166: ...to toggle Port Description between Enabled and Disabled System Name Use the drop down menu to toggle System Name between Enabled and Disabled System Description Use the drop down menu to toggle Syste...

Page 167: ...802 1 Extension LLDP on individual port s on the Switch To view this window click L2 Features LLDP 802 1 Extension LLDP Port Settings as shown below Figure 3 67 802 1 Extension LLDP Port Settings Tab...

Page 168: ...rop down menu to toggle among VLAN ID VLAN Name and All Use the drop down menu to toggle between Enabled and Disabled VLAN Name Use the drop down menu to toggle among VLAN ID VLAN Name and All Use the...

Page 169: ...us Use the drop down menu to toggle the MAC PHY Configuration Status between Enabled and Disabled Power Via MDI This TLV optional data type indicates that LLDP agent should transmit Power via MDI TLV...

Page 170: ...nagement Address Settings window The following parameters can be set or displayed Parameter Description Unit Select the desired stacking unit if applicable From To Select a port or group of ports usin...

Page 171: ...r 3 Managed Gigabit Ethernet Switch LLDP Statistics The following window is used to display LLDP statistics To view this window click L2 Features LLDP LLDP Statistics as shown below Figure 3 70 LLDP S...

Page 172: ...agement Address Table window Use the drop down menu to select the type of Management Address enter an IP address in the field provided and then click the Find button LLDP Local Port Table The followin...

Page 173: ...e following window is used to display the LLDP Remote Port Brief Table To view this window click L2 Features LLDP LLDP Remote Port Table as shown below Figure 3 73 LLDP Remote Port Brief Table window...

Page 174: ...omer might cause restrictions on some of their configurations requiring intense processing of VLAN mapping tables which may exceed the VLAN mapping limit Q in Q uses a single service provider VLAN SPV...

Page 175: ...k interface specifies that communication between two specified networks will occur Missdrop Enable or Disable C VLAN based on SP VLAN assignment miss drop When enabled the tagged packet will be droppe...

Page 176: ...ure From To A consecutive group of ports that are part of the VLAN configuration starting with the selected port CVID List The customer VLAN ID List to which the tagged packets will be added Action Sp...

Page 177: ...tion Switching R APS VLAN is created 2 The Ring port is a tagged member port of the R APS VLAN 3 The Ring Protection Link RPL port is specified if the RPL owner is enabled The default state is disable...

Page 178: ...set Parameter Description ERPS State This is used to configure ring state of the specified ring When both the global state and the specified ring ERPS state are enabled the specified ring will be act...

Page 179: ...rmed within period of time specified The range is from 0 to 10000 milliseconds The default holdoff time is 0 milliseconds Guard Time 10 2000 The Guard timer is used to prevent ring nodes from receivin...

Page 180: ...LAN Action Toggle between Add or Delete Add connects the sub ring to another ring Delete disconnects the sub ring from a connected ring Sub Ring R APS VLAN Enter the sub ring R APS VLAN TC Propagation...

Page 181: ...e set Parameter Description Unit Select the unit to configure From To Select a range of ports Admin State Enable or disable the administration state This indicates these ports unidirectional link dete...

Page 182: ...than the shared MAC as the source MAC address of the reply packet The NLB multicast FDB entry will be mutually exclusive with the L2 multicast entry At the current time only multicase mode is supporte...

Page 183: ...to support the following IPv6 unicast multicast and anycast addresses Allow for IPv6 packet forwarding IPv6 fragmentation and re assembly Processing of IPv6 packet and extension headers Static IPv6 r...

Page 184: ...oad of a packet if they are necessary at all Authentication and Privacy Extension Support New authentication capabilities use extensions for data integrity and data confidentiality for IPv6 Flow Label...

Page 185: ...routing header if present Extension Headers Extension headers are used to identify optional parameters regarding IPv6 packets such as routing fragmentation of packets or authentication parameters The...

Page 186: ...ple using this compression it would look like this 2D83 0C76 3140 0000 0000 020C 417A 3214 2D83 C76 3140 0 0 20C 417A 3214 2D83 C76 3140 20C 417A 3214 When IPv4 and IPv6 nodes are mixed in a network t...

Page 187: ...es on the network A common and useful ICMPv6 informational message is the ping program use to discover the availability a device by using a ping request and reply format Other informational messages i...

Page 188: ...o multiple physical interfaces which would be beneficial for load sharing on these interfaces This is dependent on these unicast addresses having a scope smaller than the link local address if these u...

Page 189: ...tch one for IPv4 addresses named IPv4 Interfaces Settings and one for IPv6 addresses named IPv6 Interfaces Settings NOTE After properly configuring an IP interface on the Switch each VLAN can be route...

Page 190: ...menu to enable or disable configuration on this interface Secondary Use the pull down menu to set the IP interface as True or False True will set the interface as secondary and False will denote the i...

Page 191: ...ings window To remove an entry from the table click its corresponding under the Delete heading To add a new IPv6 interface click the Add button which will display the following window Figure 4 5 IPv6...

Page 192: ...ys the IPv6 address created automatically by the Switch based on the MAC Address of the Switch This is a site local address used only for local routing Global Unicast Address This field is the unicast...

Page 193: ...Advertisement Use this pull down menu to enable or disable the switch as being capable of accepting solicitation from a neighbor and thus becoming an IPv6 neighbor Once enabled this Switch is now capa...

Page 194: ...ck interfaces A loopback interface is a logical IP interface which is always active until a user disables or deletes it It is independent of the state of any physical interfaces To view this window cl...

Page 195: ...Key ID entry click the corresponding under the Delete heading Route Redistribution Settings Route redistribution allows routers on the network which are running different routing protocols to exchang...

Page 196: ...the metric value The user may choose between All Internal External ExtType1 ExtType2 Inter E1 Inter E2 Metric 0 16 Allows the entry of an OSPF interface cost This is analogous to a Hop Count in the R...

Page 197: ...ear All button To add a new entry click Add the following window will be displayed for the user to configure Figure 4 12 Multicast Static Route Settings Add window The following parameters may be conf...

Page 198: ...by the entry of an IP address into the Switch s Static IP Routing Table To view the following window click L3 Features Static Default Route Settings IPv4 Static Default Route Settings as shown below F...

Page 199: ...Backup State The user may choose among Primary Backup and Weight If the Primary Static Default Route fails the Backup Route will support the entry Please take note that the Primary and Backup entries...

Page 200: ...ow the user to configure the default gateway for the next hop router only The following fields can be set Parameter Description IPv6 Address Prefix Length Specify the address and mask information usin...

Page 201: ...IP 1 999 100 OSPF ExtT1 1 999 110 OSPF ExtT2 1 999 115 EBGP 1 999 70 IBGP 1 999 130 As shown above Local will always be the first choice for routing purposes and the next most reliable path is Static...

Page 202: ...routing packets The default value is 80 OSPF Inter 1 999 Enter a value between 1 and 999 to set the route preference for OSPF Inter The lower the value the higher the chance the specified protocol wil...

Page 203: ...gure 4 18 Static ARP Settings window To add a new entry click the Add button revealing the following screen to configure Figure 4 19 Static ARP Settings Add window To modify a current entry click the...

Page 204: ...ewed Parameter Description Send on IPIF status up This is used to enable disable the sending of gratuitous ARP request packets while an IPIF interface comes up This is used to automatically announce t...

Page 205: ...dministrator must configure the Policy Route window to be enabled for this Access Profile and its associated rule and the Next Hop Router s IP address 10 2 2 2 must be set Finally this Policy Route en...

Page 206: ...of the Access Profile previously created which will be used to identify packets as following this Policy Route This access profile along with the access rule must first be constructed before this pol...

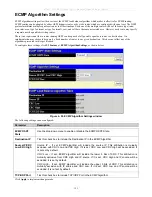
Page 207: ...figure these settings click L3 Features ECMP Algorithm Settings as shown below Figure 4 26 ECMP Algorithm Settings window The following settings can be configured Parameter Description ECMP OSPF State...

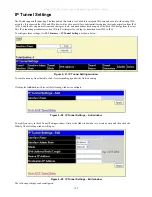
Page 208: ...rt This IPv6 tunneling mechanism is one of D Link s strategies for solving the transition from IPv4 to IPv6 To configure these settings click L3 Features IP Tunnel Settings as shown below Figure 4 27...

Page 209: ...etwork could be the global Internet or a corporate backbone The key requirement is that each site has a globally unique IPv4 address which is used to construct a 48 bit globally unique 6to4 IPv6 prefi...

Page 210: ...tations include an authorization mechanism a password to prevent a router from learning erroneous routes from unauthorized routers To maximize stability the hop count RIP uses to measure distance must...

Page 211: ...Extensions RIP version 2 includes an explicit subnet mask entry so RIP version 2 can be used to propagate variable length subnet addresses or CIDR classless addresses RIP version 2 also adds an expli...

Page 212: ...le among Disabled V1 Only V1 Compatible and V2 Only This entry specifies which version of the RIP protocol will be used to transmit RIP packets Disabled prevents the transmission of RIP packets RX Mod...

Page 213: ...dow The following settings can be configured Parameter Description Global State Enable or disable RIPng globally The default setting is Disabled Method Choose from No Horizon Split Horizon and Poison...

Page 214: ...lowing window Figure 4 35 RIPng Interface Settings Edit window The following settings can be configured Parameter Description Interface Name The name of the interface for the RIPng configuration State...

Page 215: ...specially formatted packet that contains information about all the link states on the router This link state advertisement is flooded to all routers in the area Each router that receives the link sta...

Page 216: ...A Router A can reach 192 213 11 0 through Router B with a cost of 10 5 15 Router A can reach 222 211 10 0 through Router C with a cost of 10 10 20 Router A can also reach 222 211 10 0 through Router...

Page 217: ...s BR The Border Routers have the responsibility of distributing necessary routing information and changes between areas Areas are specific to the router interface A router that has all of its interfac...

Page 218: ...er of all other areas all areas of the network have a physical or virtual connection to the backbone through a router OSPF allows routing information to be distributed by forwarding it into area 0 fro...

Page 219: ...empt On non broadcast multi access networks such as Frame Relay or X 25 this state indicates that no recent information has been received from the neighbor An effort should be made to contact the neig...

Page 220: ...this packet belongs to All OSPF packets are associated with a single area Packets traversing a virtual link are assigned the backbone Area ID of 0 0 0 0 Checksum A standard IP checksum that includes a...

Page 221: ...for this network in the view of the advertising router The DR is identified here by its IP interface address on the network Backup Designated Router The identity of the Backup Designated Router BDR fo...

Page 222: ...equence number then increments until the complete database description has been sent The rest of the packet consists of a list of the topological database s pieces Each link state advertisement in the...

Page 223: ...ure reliable flooded advertisements are acknowledged in Link State Acknowledgment packets If retransmission of certain advertisements is necessary the retransmitted advertisements are always carried b...

Page 224: ...ment describes a piece of the OSPF routing domain Every router originates a router links advertisement In addition whenever the router is elected as the Designated Router it originates a network links...

Page 225: ...ype Advertising Router The Router ID of the router that originated the Link State Advertisement For example in network links advertisements this field is set to the Router ID of the network s Designat...

Page 226: ...link endpoint E bit When set the router is an Autonomous System AS boundary router E is for External B bit When set the router is an area border router B is for Border Number of Links The number of ro...

Page 227: ...Service ToS The metric for ToS 0 must always be included and was discussed above Metrics for non zero TOS are described below Note that the cost for non zero ToS values that are not specified defaults...

Page 228: ...mary routes are used in stub area instead of flooding a complete set of external routes When describing a default summary route the advertisement s Link State ID is always set to the Default Destinati...

Page 229: ...k state path If the E bit is zero the specified metric is a Type 1 external metric This means that is comparable directly to the link state metric Forwarding Address Data traffic for the advertised de...

Page 230: ...es will be determined To alleviate any problems with OSPF summary routing due to new routes and packets all NSSA area border routers ABR must support optional importing of LSA type 3 summary packets i...

Page 231: ...OSPF protocol itself The N Bit Contained in the options field of the Link State Packet header the N Bit is used to ensure that all members of an NSSA agree on the area configurations Used in conjunct...

Page 232: ...xxx that uniquely identifies the Switch in the OSPF domain It is common to assign the highest IP address assigned to the Switch router If 0 0 0 0 is entered the highest IP address assigned to the Swit...

Page 233: ...Click the Add Modify button to add the area ID set to the table To remove an Area ID configuration set simply click in the Delete column for the configuration To change an existing set in the list typ...

Page 234: ...mmary LSAs The default is Disabled This field can only be configured if NSSA is chosen in the Type field Translate Use the pull down menu to enable or disable the translating of Type 7 LSAs into Type...

Page 235: ...SPF Interface Settings window Click the hyperlinked name of the interface to configure the settings for OSPF which will give access to the following window Figure 4 56 OSPF Interface Settings Edit win...

Page 236: ...s selected the Auth Key field allows the entry of an 8 character password that must be the same as a password configured on a neighbor OSPF router MD5 uses a cryptographic key entered in the MD5 Key S...

Page 237: ...he following parameters if you are adding or changing an OSPF Virtual Interface Parameter Description Transit Area ID Allows the entry of an OSPF Area ID previously defined on the Switch that allows a...

Page 238: ...network address and subnet mask This allows for a reduction in the volume of LSDB advertisement traffic as well as a reduction in the memory overhead in the Switch used to maintain routing tables The...

Page 239: ...figure the setting in the window that appears The Add and Modify windows for OSPF host route settings are nearly identical The difference between them is that if you are changing an existing configura...

Page 240: ...he router in the OSPFv3 domain The setting 0 0 0 0 means auto selected The Switch will select the maximum interface s IPv4 address to be the router ID The default value of OSPFv3 router ID is 0 0 0 0...

Page 241: ...ed OSPFv3 area type will appear in the table See the parameter descriptions below for information on the OSPFv3 Area Tables window To remove an entry from the table click its corresponding under the D...

Page 242: ...uniquely identifies the OSPFv3 area in the OSPFv3 domain Type This field can be toggled between Normal and Stub using the pull down menu When it is toggled to Stub the additional field Stub Summary wi...

Page 243: ...erface entries click the View All button To configure the settings for a specifc entry click the Modify button which will give access to the following window Figure 4 68 OSPFv3 Interface Settings Edit...

Page 244: ...n 1 and 65 535 that is representative of the OSPFv3 cost of reaching the selected OSPFv3 interface The default metric is 1 Administrative State Allows the OSPFv3 interface to be Enabled or Disabled fo...

Page 245: ...et you want to change The window to modify an existing set is the same as the window used to add a new one To view the following window click L3 Features OSPF OSPFv3 OSPFv3 Virtual Interface Settings...

Page 246: ...tance should have identical settings for all routers on the same network Dead Interval 1 65535 Specify the length of time between receiving Hello packets from a neighbor router before the selected are...

Page 247: ...tton A new window pictured below appears To change an existing configuration click on the corresponding Modify button for the set you want to change The window to modify an existing configuration is t...

Page 248: ...turn to the previous window Use the following parameters to configure the following settings for OSPFv3 Area Aggregation Settings Parameter Description Area ID Allows the entry the OSPFv3 Area ID for...

Page 249: ...sers also have the ability to bind IP addresses within the DHCP pool to specific MAC addresses in order to keep consistent the IP addresses of devices that may be important to the upkeep of the networ...

Page 250: ...Settings as shown below Figure 4 76 Create DHCP Excluded Address window DHCP Server Pool Settings The following windows will allow users to create and then set the parameters for the DHCP Pool of the...

Page 251: ...e for the DHCP client This domain name represents a general group of networks that collectively make up the domain The Domain Name may be an alphanumeric string of up to 64 characters DNS Server Addre...

Page 252: ...ull down menus to precisely set the time by hours and minutes Users may also use the Infinite check box to set the allotted IP address to never be timed out of its lease The default setting is 1 day B...

Page 253: ...ick Find Dynamically bound entries of this pool will be displayed in the table To clear the corresponding Pool Name entries of this table click Clear To clear all entries click Clear All Pool Name Thi...

Page 254: ...ete heading To set a manual DHCP Binding entry click the Add window which will produce the following window to configure Figure 4 82 Create DHCP Pool Manual Binding window The following parameters may...

Page 255: ...3000 100 64 2 The beginning IPv6 address must be lower than or equal to the ending IPv6 address e g the beginning network address is 2000 200 64 and the ending network address is 2000 100 64 3 There m...

Page 256: ...ings Add window The following parameter may be configured Parameter Description Pool Name Enter a name of up to 12 alphanumeric characters to identify the pool to be created Click Apply to set the ent...

Page 257: ...er Enter the DNS server IPv6 address for this pool Users may specify up to two DNS server addresses Preferred Lifetime 60 4294967295 Enter the length of time that a valid address is preferred i e the...

Page 258: ...erver Manual Binding Brief Table window The following parameter may be configured Parameter Description Pool Name Enter the pool name Clicking the View button will reveal the following window to confi...

Page 259: ...This command only displays the dynamic binding information not including manual binding information To view this window click L3 Features DHCPv6 Server DHCPv6 Server Dynamic Binding Settings as shown...

Page 260: ...he DHCPv6 server global state on the Switch To view this window click L3 Features DHCPv6 Server DHCPv6 Server Interface Settings as shown below Figure 4 91 DHCPv6 Server Interface Table window Clickin...

Page 261: ...ng window to configure Figure 4 94 DHCPv6 Server Excluded Address Settings Add window The following parameter may be configured Parameter Description Pool Name Enter the name of the DHCPv6 pool for wh...

Page 262: ...cted to service a specified DHCP client This is useful when there are two or more DHCP servers present on a network Filter DHCP Server Global Settings This window is used to enable the settings for th...

Page 263: ...er DHCP server Filter DHCP Server Port Settings Action Select Add or Delete to add or delete a filter DHCP server entry Server IP Address Enter the IP address of the DHCP server that specifies an allo...

Page 264: ...e entire name translation or simply return the address of the next DNS server if the server receiving the query cannot resolve the name When a DNS server receives a query it checks to see if the name...

Page 265: ...DNS table will be used or not Click Apply to implement changes made DNS Relay Static Settings This window is used to set the DNS Relay Static Settings on the Switch To view this window click L3 Featu...

Page 266: ...name server if one primary name server exists in the static name server table and a new primary name server is added the existing primary name server will be changed to a normal name server If the ad...

Page 267: ...r Settings as shown below Figure 4 102 DNS Resolver Dynamic Server Table window DNS Resolver Static Host Name Settings This window is used to create or delete a static host name entry of the Switch If...

Page 268: ...the LAN to be used as the default first hop router by end hosts Utilizing VRRP the administrator can achieve a higher available default path cost without needing to configure every end host for dynami...

Page 269: ...4 107 VRRP Virtual Router Settings window The following fields are displayed in the window above Parameter Description VRID Interface Name VRID Displays the virtual router ID set by the user This wil...

Page 270: ...rity will increase the probability that this router will become the Master router of the group A lower priority will increase the probability that this router will become the backup router VRRP router...

Page 271: ...4 109 VRRP Virtual Router Settings Display window This window displays the following information Parameter Description Interface Name An IP interface name that has been enabled for VRRP This entry mus...

Page 272: ...dge if a virtual router is qualified to be a master router Checking Critical IP Displays the status of the Critical IP address May be enabled or disabled Advertisement Interval Displays the time inter...

Page 273: ...d for the router that owns the IP address associated with the virtual router and is therefore set automatically Advertisement Interval 1 255 Enter a time interval value in seconds for sending VRRP mes...

Page 274: ...e type of authentication used The Authentication Type must be consistent with all routers participating within the VRRP group The choices are None Selecting this parameter indicates that VRRP protocol...

Page 275: ...thod for members and multicast routers to communicate when joining or leaving a multicast group IGMP version 1 is defined in RFC 1112 It has a fixed packet size and no optional data The format of an I...

Page 276: ...se specific sources In IGMP v2 Membership reports could contain only one multicast group whereas in v3 these reports can contain multiple multicast groups and multiple sources within the multicast gro...

Page 277: ...m the source If no group report packet is received and the filter mode is include the Switch presumes that traffic from the source is no longer wanted on the attached network and the source record lis...

Page 278: ...etween sending IGMP queries Max Response Time 1 25 Sets the maximum amount of time allowed before sending an IGMP response report A value between 1 and 25 seconds can be entered with a default of 10 s...

Page 279: ...stablished When a sender initiates a multicast DVMRP initially assumes that all users on the network will want to receive the multicast message When an adjacent router receives the message it checks i...

Page 280: ...splays the IP address corresponding to the IP Interface name entered above Neighbor Timeout 1 65535 sec This field allows an entry between 1 and 65 535 seconds and defines the time period DVMRP will h...

Page 281: ...are packets relayed between routers that effectively state which interfaces are or are not to be receiving multicast data These messages can be configured for their frequency to be sent out on the net...

Page 282: ...from its database and floods multicast messages to all interfaces on that branch The interval for removing prune information is the Join Prune Interval PIM SM DM In the PIM SM RP is a key point for t...

Page 283: ...efault setting of 5 seconds Register Suppression Time 3 255 This field is to be configured for the first hop router from the source After this router sends out a Register message to the RP and the RP...

Page 284: ...group The user may state an interval time between 1 and 18724 seconds with a default interval time of 60 seconds DR Priority 0 4294967294 Enter the priority of this IP interface to become the Designat...

Page 285: ...enter the interface name into the space provided and click Search If found the Interface Name will appear alone in the PIM Candidate BSR Settings window below To view the CBSR settings for an IP inter...

Page 286: ...he BSR that it should be immediately removed from CRP status on the PIM SM network Candidate RP Priority 0 255 Enter a priority value to determine which CRP will become the RP for the distribution tre...

Page 287: ...dow The following fields can be viewed or set Parameter Description Group Address Enter the multicast group address for this Static RP This address must be a class D address Group Mask Enter the mask...

Page 288: ...ck its corresponding under the Delete heading BGP The Switch supports Border Gateway Protocol BGP a layer 3 Unicast routing protocol that maintains a table of IP networks or prefixes which designate n...

Page 289: ...the neighbor s configured Autonomous System AS at the beginning of the AS_PATH in the received update will be denied and the neighbor will be closed Enabling this feature adds to the security of the...

Page 290: ...s are sent to its peer If the keepalive value is set to zero then the keepalive message will not be sent out The default value is 60 seconds If the two routers that build a BGP connection have a diffe...

Page 291: ...the Delete heading BGP Network Settings This window is used to specify the network advertised by the Border Gateway Protocol BGP To view this window click L3 Features BGP BGP Network Settings as show...

Page 292: ...y half The default setting is 15 minutes Reuse 1 20000 Enter a reuse value If the penalty for a flapping route decreases enough to fall below this value the route is unsuppressed The default setting i...

Page 293: ...r Group Settings window To configure BGP peer group settings on the Switch complete the following fields Parameter Description Peer Group Name Enter the name of the BGP peer group Action Choose among...

Page 294: ...ings window To configure BGP neighbor peer group settings on the Switch complete the following fields Parameter Description BGP Neighbor Peer Group Settings Peer Group Name Enter the name of the BGP p...

Page 295: ...led to Disabled the session with the neighbor peer will be terminated Activity Toggle to enable or disable the state for an individual address family By default the setting is enabled for IPv4 address...

Page 296: ...to be configured Send Community Toggle between Standard and None This specifies the communities attribute to be sent to the BGP neighbor Standard means only standard communities will be sent and None...

Page 297: ...P peers is 5 seconds and for EBGP peers it is 30 seconds When the default check box is ticked the neighbor specific advertisement interval setting will be returned to the default setting Keep Alive 0...

Page 298: ...p Settings IP Address Enter the IP address of the neighbor to be configured Peer Group Name Enter the peer group to be configured Unsuppress Map Action Toggle between Add and Delete Unsuppress Map Nam...

Page 299: ...to incoming routes or outgoing routes Capability ORF Prefix List Type Use to configure an outbound route filter prefix list capability It can be sent with the following values Receive Enable the ORF...

Page 300: ...ates in reflector mode When Disabled the reflector operates in non reflector mode This means the router will not reflect routes from the route reflect client to other route reflect clients but it will...

Page 301: ...65535 Enter one or multiple AS number partitions each separated by a comma These are the Autonomous System numbers for BGP peers that will belong to the confederation Click Apply to implement changes...

Page 302: ...ist and Expanded configures an expanded community list List Name Enter the name of community list to be configured Click Apply to implement changes made BGP Trap Settings This window is used to config...

Page 303: ...cify all eBGP sessions will be reset All Specify that all current BGP sessions will be reset IP Address If IP Address is specified in the Type above enter an IP address AS Number 1 65535 If AS is spec...

Page 304: ...ld is used to display the total number of BGP AS path entries BGP Community Entries This field is used to display the total number of BGP community entries BGP Summary Table Neighbor This field is use...

Page 305: ...bgp as_path access_list This is used to display routes conforming to the filter list Route Map Name Enter the filter list name that was previously created by route map This is used to display routes...

Page 306: ...Codes This field is used to show the meaning of some characters Origin Codes This field is used to show the meaning of some characters BGP Route Table IP Address Netmask This field is used to display...

Page 307: ...outer ID This field is used to display the BGP local router ID Status Codes This field is used to show the meaning of the characters and symbols used on this window Origin Codes This field is used to...

Page 308: ...This field is used to show the meaning of the characters and symbols used on this window Origin Codes This field is used to show the meaning of the characters and symbols used on this window Network T...

Page 309: ...bed below Parameter Description Show BGP Neighbor IP Address Enter the IP address of the BGP neighbor to be displayed Type Choose among None Advertised Routes Received Routes Routes Received Prefix Fi...

Page 310: ...below Figure 4 152 IP Prefix List Settings window The IP prefix list table parameters are described below Parameter Description IP Prefix List Settings Prefix List Name Enter the name to identify the...

Page 311: ...nter the name of the access list Click Apply to implement changes made To remove an entry from the table click its corresponding under the Delete heading Route Map Settings This window is used to crea...

Page 312: ...eues on every physical port to which packets from various applications can be mapped to and in turn prioritized View the following map to see how the Switch implements 802 1p priority queuing Figure 5...

Page 313: ...based on their priority tags Only when these queues are empty are packets of lower priority transmitted For weighted round robin queuing the number of packets sent from each priority queue depends upo...

Page 314: ...are numbered from 0 the lowest priority to 7 the highest priority Click Apply to implement changes made To view this window click QoS 802 1p Settings 802 1p Default Priority Settings as shown on the r...

Page 315: ...thernet Switch Figure 5 3 802 1p User Priority Settings window Once a priority to the port groups on the Switch has been assigned users can then assign this Class to each of the eight levels of 802 1p...

Page 316: ...From To A consecutive group of ports may be configured starting with the selected port Type This drop down menu allows you to select between RX receive TX transmit and Both This setting will determine...

Page 317: ...to configure From To A consecutive group of ports may be configured starting with the selected port Queue Use the drop down menu to select the desired priority queue Please note Queue 7 is reserved fo...

Page 318: ...ngs section includes QoS Output Scheduling Settings and QoS Scheduling Mechanism Settings QoS Output Scheduling Settings QoS can be customized by changing the output scheduling used for the hardware c...

Page 319: ...duling for emptying given classes of service To set the combination queue enter a 0 for the Max Packets entry of the corresponding priority classes of service listed in the window above Priority class...

Page 320: ...ority class of service can transmit per weighted round robin WRR scheduling cycle to be selected This provides for a controllable CoS behavior while allowing other classes to empty as well A value bet...

Page 321: ...lenecks can quickly develop if the QoS settings are not suitable To view this window click QoS Schedule Settings QoS Scheduling Mechanism Settings as shown below Figure 5 8 QoS Scheduling Mechanism Se...

Page 322: ...s window click ACL Time Range as shown below Figure 6 1 Time Range Settings window The user may adjust the following parameters to configure a time range on the Switch Parameter Description Range Name...

Page 323: ...e Table as shown below Figure 6 2 Access Profile Table window To add an entry to the Access Profile Table click the Add Profile button This will open the Access Profile Configuration window as shown b...

Page 324: ...is as the full or partial criterion for forwarding Source MAC Source MAC Mask Enter a MAC address mask for the source MAC address Destination MAC Destination MAC Mask Enter a MAC address mask for the...

Page 325: ...Message Protocol ICMP field in each frame s header Select Type to further specify that the access profile will apply an ICMP type value or specify Code to further specify that the access profile will...

Page 326: ...e type of profile Select Ethernet to instruct the Switch to examine the layer 2 part of each packet header Select IP to instruct the Switch to examine the IP address in each frame s header Select Pack...

Page 327: ...header Class Ticking this check box will instruct the Switch to examine the class field of the IPv6 header This class field is a part of the packet header that is similar to the Type of Service ToS or...

Page 328: ...he configurations set for a previously created access profile return to the Access Profile Table and click the button under the Display heading corresponding to the access profile for which to view co...

Page 329: ...a new Access Rule click the Add Rule button and the Access Rule Configuration window will appear Figure 6 10 Access Rule Configuration window Ethernet To set the Access Rule for Ethernet adjust the f...

Page 330: ...d mapping for 802 1p see the QoS section of this manual Replace DSCP 0 63 This feature allows the user to specify a value to be written to the DSCP field of an incoming packet This value will over wri...

Page 331: ...ackets identified with this rule Users must note that if the Counter is employed in the ACL Flow Meter function the Counter will automatically be disabled here regardless of this setting To view the s...

Page 332: ...s that match the access profile are mirrored to a port defined in the Port Mirroring window Port Mirroring must be enabled and a target port must be set Access ID 1 128 Type in a unique identifier num...

Page 333: ...ion for forwarding The user may choose a value between 0 and 63 Protocol This field allows the user to modify the protocol used to configure the Access Rule Table depending on which protocol the user...

Page 334: ...l appear Figure 6 14 Access Rule Display window IP The following window is the Access Rule table for Packet Content Figure 6 15 Access Rule Table window Packet Content Mask To remove a previously crea...

Page 335: ...or to specify that packets that match the access profile are mirrored to a port defined in the Port Mirroring window Port Mirroring must be enabled and a target port must be set Access ID 1 128 Type i...

Page 336: ...om the end of the third chunk to the end of the fourth chunk Port The Access Rule may be configured on a per port basis by entering the port number of the switch in the switch stack into this field Wh...

Page 337: ...Port Mirroring function is enabled and a target mirror port is set To configure the Access Rule for IPv6 open the Access Profile Table window and click Modify for an IPv6 entry This will open the fol...

Page 338: ...to Assign Ticking this check box will instruct the Switch to automatically assign an Access ID for the rule being created Type Selected profile based on Ethernet MAC Address IP address Packet Content...

Page 339: ...form Destination IPv6 Address The user may specify an IP address mask for the destination IPv6 address by and entering the IP address mask in hex form Port The Access Rule may be configured on a per...

Page 340: ...S and EBS A packet flow that does not reach the CBS is marked green if it exceeds the CBS but not the EBS its marked yellow and if it exceeds the EBS its marked red CBS Committed Burst Size Measured i...

Page 341: ...ing function To add an ACL Flow Meter configuration for an Access Profile and Rule click the Add button which will display the following window for users to configure Figure 6 22 ACL Flow Meter Config...

Page 342: ...accept the biggest IP packet that is expected in the IP flow Packet flows that are lower than this configured value are marked green Packet flows that exceed this value but are less than the EBS valu...

Page 343: ...ng the user to create various lists of rules without immediately enabling them Creating an access profile for the CPU is divided into two basic parts The first is to specify which part or parts of a f...

Page 344: ...e identifier number for this profile set This value can be set from 1 to 5 Type Select profile based on Ethernet MAC Address IP address or Packet Content Mask or IPv6 address This will change the menu...

Page 345: ...ader Select IP to instruct the Switch to examine the IP address in each frame s header Select Packet Content Mask to specify a mask to hide the content of the packet header Select IPv6 to instruct the...

Page 346: ...her or specify Code to further specify that the access profile will apply an ICMP code value IGMP field in each frame s header Select Type to further specify th TCP to use the TCP port number containe...

Page 347: ...cription Profile ID 1 5 Type in a unique identifier number for this profile set This value can be set from 1 to 5 Type Select profile based on Ethernet MAC Address IP address or Packet Content Mask or...

Page 348: ...figurations can be created Type Selected profile based on Ethernet MAC Address IP address Packet Content Mask or IPv6 Ethernet instructs the Switch to examine the layer 2 part of each packet header IP...

Page 349: ...previously created CPU access profile by clicking the corresponding Add Rule button of the entry to configure Ethernet IPv4 Packet Content Mask or IPv6 Figure 6 31 CPU Interface Filtering Rule Table...

Page 350: ...or IPv6 Ethernet instructs the Switch to examine the layer 2 part of each packet header IP instructs the Switch to examine the IP address in each frame s header Packet Content Mask instructs the Swit...

Page 351: ...ngs of a previously configured rule click in the Access Rule Table to view the following window Figure 6 33 CPU Interface Filtering Rule Display window Ethernet The following window is the CPU Interfa...

Page 352: ...ader IP instructs the Switch to examine the IP address in each frame s header Packet Content Mask instructs the Switch to examine the packet header IPv6 instructs the Switch to examine the IPv6 part o...

Page 353: ...the Access Rule Table to view the following window Figure 6 36 CPU Interface Filtering Rule Display window IP The following window is the CPU Interface Filtering Rule Table for Packet Content Figure 6...

Page 354: ...tion Profile ID This is the identifier number for this profile set Mode Select Permit to specify that the packets that match the access profile are forwarded by the Switch according to any additional...

Page 355: ...e value 16 31 Enter a value in hex form to mask the packet from byte 16 to byte 31 value 32 47 Enter a value in hex form to mask the packet from byte 32 to byte 47 value 48 63 Enter a value in hex for...

Page 356: ...ied Parameter Description Profile ID This is the identifier number for this profile set Mode Select Permit to specify that the packets that match the access profile are forwarded by the Switch accordi...

Page 357: ...fault quality of service or real time service packets Source IPv6 Address The user may specify an IP address mask for the source IPv6 address by entering the IP address mask in hex form Destination IP...

Page 358: ...ast packets continually flood the network as normal procedure At times this traffic may increase do to a malicious endstation on the network or a malfunctioning device such as a faulty network card Th...

Page 359: ...storm continues the port will be placed in a Shutdown Forever mode which will produce a warning message to be sent to the Trap Receiver Once in Shutdown Forever mode the only method of recovering this...

Page 360: ...ackets until the issue is resolved Shutdown Utilizes the Switch s software Traffic Control mechanism to determine the Packet Storm occurring Once detected the port will deny all incoming traffic to th...

Page 361: ...regation Port Trunking NOTE Ports that are in the Shutdown forever mode will be seen as Discarding in Spanning Tree windows and implementations though these ports will still be forwarding BPDUs to the...

Page 362: ...s a security feature that prevents unauthorized computers with source MAC addresses unknown to the Switch from connecting to the Switch s ports and gaining access to the network To view this window cl...

Page 363: ...Reset or in other words only addresses that are permanently learned by the Switch can be deleted on reset Once the entry has been defined by entering the correct information into the window above clic...

Page 364: ...ing issue it also poses potential risk to the entire network 192 168 1 1 00E0 0211 1111 192 168 1 2 00E0 0211 2222 192 168 1 1 00E0 0211 3333 IP Conflict IP Conflict Auditing Problem Figure 7 5 Common...

Page 365: ...the DHCP server packets will be dropped DHCP snooping is generally considered to be more secure because it enforces all clients to acquire IP through the DHCP server Additionally it makes IP informat...

Page 366: ...llegal IPv4 A packets are detected and there are write blocked FDB entries then IPv6 Global also cannot access the network To avoid this case do not write block FDB Not write blocking FDB can also avo...

Page 367: ...ate IPv4 for IP MAC port binding DHCP Snoop IPv6 Use the pull down menu to enable or disable the DHCP snooping state IPv6 for IP MAC port binding ND Snoop Use the pull down menu to enable or disable t...

Page 368: ...very incoming ARP and IP packet it enforces better security and is thus the recommended setting Enabled Loose This mode provides a looser way of control If the user selects loose mode the Switch will...

Page 369: ...the Switch identifies the host is legal the host s MAC will be programed to L2 FDB with allowed otherwise the host s MAC will be programmed to L2 FDB with drop ARP mode for security access control is...

Page 370: ...switch ports for which to configure this IP MAC port binding entry IP Address MAC Address Tick the All Ports check box to configure this entry for all ports on the Switch Click Add for implement chang...

Page 371: ...s been blocked by the IP MAC port binding restrictions enter the VLAN Name and MAC Address in the appropriate fields and click Find To delete an entry click the Delete button next to the entry s port...

Page 372: ...rization is granted The 802 1X Access Control method holds three roles each of which are vital to creating and upkeeping a stable and working Access Control security method Figure 7 16 The three roles...

Page 373: ...ee steps must be implemented on the Switch to properly configure the Authenticator 1 The 802 1X State must be Enabled DGS 3600 Web Management Tool 2 The 802 1X settings must be implemented by port Sec...

Page 374: ...used on the Switch which are 1 Port Based Access Control This method requires only one user to be authenticated per port by a remote RADIUS server to allow the remaining users on the same port access...

Page 375: ...figuration Once the connected device has successfully been authenticated the Port then becomes Authorized and all subsequent traffic on the Port is not subject to access control restriction until an e...

Page 376: ...r to successfully make use of 802 1X in a shared media LAN segment it would be necessary to create logical Ports one for each attached device that required access to the LAN The Switch would regard th...

Page 377: ...st VLAN when trying to access the Switch Upon initial entry to the Switch the client wishing services on the Switch will need to be authenticated by a remote RADIUS Server or local authentication on t...

Page 378: ...2 1X Port Settings To view this window click Security 802 1X 802 1X Port Settings as shown below Figure 7 24 802 1X Port Table window To configure the settings by port click on its corresponding Modif...

Page 379: ...le 802 1X and cause the port to transition to the authorized state without any authentication exchange required This means the port transmits and receives normal traffic without 802 1X based authentic...

Page 380: ...The maximum number of times that the Switch will retransmit an EAP Request to the client before it times out of the authentication sessions The default setting is 2 ReAuthPeriod 1 65535 A constant tha...

Page 381: ...n error message Disabled Ports Selecting this option will disable ports listed in the Port List below as part of the Guest VLAN Be sure that these ports are configured for this VLAN or users will be p...

Page 382: ...rt is 1812 Alternatively users can tick the Default check box Accounting UDP Port 1 65535 Enter the RADIUS account server s UDP port The default port is 1813 Alternatively users can tick the Default c...

Page 383: ...o Limit check box to specify that there will be the maximum number of users By default there is no limit User Name Enter the User Name of the new profile to be created Password Enter a password for th...

Page 384: ...en the user must specify the MAC address to be initialized by entering it into the MAC Address field and ticking the corresponding check box To begin the initialization click Apply This window display...

Page 385: ...0 Web Management Tool window before initializing ports Information in the Initialize Ports Table cannot be viewed before enabling 802 1X To reauthenticate ports for the MAC side of 802 1X the user mus...

Page 386: ...gh a RADIUS server or through the local authentication set on the Switch when a user is trying to access the network via the Switch if the port connected to the user is enabled for this feature The us...

Page 387: ...VLAN 2 If the client is utilizing DHCP to attain an IP address th relay function so that client may obtain an IP address 3 The authentication VLAN of this function must be confi allow the processing...

Page 388: ...s enabled the TCP packets sent to the virtual IP or physical IPIF s IP address will both get a reply When the virtual IP is set to 0 0 0 0 the function will be disabled To ensure that this function wo...

Page 389: ...t setting is 1440 minutes To maintain a constant Port Configuration tick the Infinite box in the WAC configuration window Idle Time 1 1440 min This parameter specifies the period of time during which...

Page 390: ...lected local as their Web based authenticator Password Enter the password the administrator has chosen for the selected user This field is case sensitive and must be a complete alphanumeric string Thi...

Page 391: ...ay have some problems when using Netscape 7 0 If the port where Web Access Control is preset to be moved to a VLAN without an IPIF interface the previous logout screen may also not be presented when l...

Page 392: ...click Clear to remove an entry Trust Host The Switch allows users to enter trusted host secure IP addresses and netmasks used for remote Switch management It should be noted that if one or more trust...

Page 393: ...attack state The under attack state has three modes drop block and shutdown A BPDU protection enabled port will enter under attack state when it receives one STP BPDU packet And it will take action ba...

Page 394: ...ork which may allow an attacker to sniff data frames on a LAN modify the traffic or stop the traffic altogether known as a Denial of Service DoS attack The principle of ARP spoofing is to send fake or...

Page 395: ...ription Gateway IP Address Enter the gateway IP address Gateway MAC Address Enter the gateway MAC address Ports Enter the port or range of ports to be configured Alternatively tick the All Ports check...

Page 396: ...e Switch The server will not accept the username and password and the user is denied access to the Switch The server doesn t respond to the verification query At this point the Switch receives the tim...

Page 397: ...is command will configure the maximum number of times the Switch will accept authentication attempts Users failing to be authenticated after the set amount of attempts will be denied access to the Swi...

Page 398: ...o implement changes made Authentication Server Group This window will allow users to set up Authentication Server Groups on the Switch A server group is a technique used to group TACACS XTACACS TACACS...

Page 399: ...lized server before this function can work properly NOTE The four built in server groups can only have server hosts running the same TACACS daemon TACACS XTACACS TACACS protocols are separate entities...

Page 400: ...5 Enter a number between 1 and 65535 to define the virtual port number of the authentication protocol on a server host The default port number is 49 for TACACS XTACACS TACACS servers and 1813 for RADI...

Page 401: ...upgrade his or her status to the administrator level the user must use the Enable Admin window in which the user must enter a previously configured password set by the administrator See the Enable Adm...

Page 402: ...plemented on the Switch one of which is a default Enable Method List This default Enable Method List cannot be deleted but can be configured The sequence of methods implemented in this command will af...

Page 403: ...le Password must set the local enable password none Adding this parameter will require an authentication to access the Switch radius Adding this parameter will require the user to be authenticated usi...

Page 404: ...e one set in the New Local Enabled field will result in a fail message Enable Admin Figure 7 56 Enable Admin window The Enable Admin window is for users who have logged on to the Switch on the normal...

Page 405: ...end informational packets to a remote RADIUS server when 802 1X users connect to the physical ports on the switch to access the network Network accounting only works when 802 1X is enabled Shell When...

Page 406: ...tch is made with this MAC address the RADIUS server will return a notification stating that the MAC address has been accepted and is to be placed in the target VLAN If the VID for the target VLAN is n...

Page 407: ...The user may choose between the following methods Local Use this method to utilize the locally set MAC address database as the authenticator for MAC based Access Control This MAC address list can be c...

Page 408: ...number of maximum users from 1 to 4000 Alternatively tick the No Limit check box Aging Time 1 1440 min A time period configurable per port between 1 1440 minutes during which an authenticated host wi...

Page 409: ...y MAC If you want to add the entry to the MAC based Access Control Local MAC Table click the Add button To delete an entry click the Delete By MAC button VLAN Name VID To search for a previously confi...

Page 410: ...e Switch will again begin accepting all packets Yet if the checking shows that there continues to be too many packets flooding the Switch it will stop accepting all ARP and IP broadcast packets for do...

Page 411: ...ard Engine settings for the Switch Rising Threshold 20 100 Used to configure the acceptable level of CPU utilization before the Safeguard Engine mechanism is enabled Once the CPU utilization reaches t...

Page 412: ...he Master switch CPU To view the Traffic Segmentation window click Security Traffic Segmentation as shown below Figure 7 64 Current Traffic Segmentation Table window This window allows you to view whi...

Page 413: ...ine a Message Authentication Code This Message Authentication Code will be encrypted with a sent message to provide integrity and prevent against replay attacks The Switch supports two hash algorithms...

Page 414: ...s to the server responsible for issuing certificates This field has been limited to Local for this firmware release Server IP Enter the IP address of the TFTP server where the certificate files are lo...

Page 415: ...iphersuite This field is Enabled by default DHE DSS with 3DES EDE CBC SHA This ciphersuite combines the DSA Diffie Hellman key exchange CBC Block Cipher 3DES_EDE encryption and SHA Hash Algorithm Use...

Page 416: ...ny other admin level User Account on the Switch including specifying a password This password is used to logon to the Switch once a secure communication path has been established using the SSH protoco...

Page 417: ...seconds Auth Fail 2 20 Allows the Administrator to set the maximum number of attempts that a user may try to log on to the SSH Server utilizing the SSH authentication After the maximum number of atte...

Page 418: ...igured password for authentication on the Switch The default is Enabled Public Key This parameter may be enabled if the administrator wishes to use a public key configuration set on a SSH server for a...

Page 419: ...echanism utilizing the Secure Hash algorithm The default is Enabled HMAC MD5 Use the pull down to enable or disable the HMAC Hash for Message Authentication Code mechanism utilizing the MD5 Message Di...

Page 420: ...sed in conjunction with the Host Based choice in the Auth Mode field Host IP Enter the corresponding IP address of the SSH user This parameter is only used in conjunction with the Host Based choice in...

Page 421: ...have been granted or not In the above diagram the Switch port has been configured to allow clients to authenticate using either WAC or JWAC If the client is in the IMPB table and tries to connect to t...

Page 422: ...owing parameters may be set Parameter Description Unit Choose the Unit ID of the switch in the switch stack to configure From To Select a port or range of ports to be configured Authorized Mode Use th...

Page 423: ...enable or disable this function Click Apply to implement changes made Authentication Guest VLAN Settings This window is used to display and configure the Authentication Guest VLAN settings on the Swit...

Page 424: ...Web based Access Control on the Switch Please note that JWAC and Web Authentication are mutually exclusive functions That is they cannot be enabled at the same time To use the JWAC feature computer u...

Page 425: ...specifies the destination before an unauthenticated host is redirected to either the Quarantine Server or the JWAC Login Page Redirect Delay Time 0 10 sec This parameter specifies the Delay Time befo...

Page 426: ...ost sends the HTTP request packets to a random Web server the Switch will handle this HTTP packet and send back a message to the host to allow it access to the Quarantine Server with the configured UR...

Page 427: ...AC Port Settings window Modify To set the JWAC on individual ports for the Switch complete the following fields Parameter Description Unit Choose the Unit ID of the switch in the switch stack to confi...

Page 428: ...nticated host on the port will never be checked The default setting is Infinite Block Time 0 300 sec This parameter specifies the period of time a host will keep in a blocked state after it fails to a...

Page 429: ...Security Japanese Web based Access Control JWAC JWAC Authentication State as shown below Figure 7 84 JWAC Authentication State window To search for hosts enter the Port List information and click the...

Page 430: ...customize the JWAC feature To view this window click Security Japanese Web based Access Control JWAC JWAC Customize Page as shown below Figure 7 86 JWAC Customize Page window This window allows the a...

Page 431: ...Browse MLD Router Port VLAN Status VLAN Status Port Port Access Control MAC Address Table IGMP Snooping Group MLD Snooping Group Trace Route IGMP Snooping Forwarding MLD Snooping Forwarding IP Forwar...

Page 432: ...ow displays all the Switches that are currently in the stack as well as configuration information about each Switch To view the Stacking Information window click Monitoring Stacking Information as sho...

Page 433: ...ription To view the Module Information window click Monitoring Module Information as shown below Figure 8 4 Module Information window DRAM Flash Utilization This window is used to display DRAM and Fla...

Page 434: ...with new updated statistics The information is described as follows Parameter Description Time Interval Select the desired setting between 1s and 60s where s stands for seconds The default value is o...

Page 435: ...r from its drop down menu and click Apply to display the Port Utilization for a particular port The following fields can be set Parameter Description Time Interval Select the desired setting between 1...

Page 436: ...red Received RX To view the Received RX window click Monitoring Packets Received RX as shown below Figure 8 8 RX Packets Analysis window line graph for Bytes and Packets Select a Port number from its...

Page 437: ...ct number of times the Switch will be polled between 20 and 200 The default value is 200 Bytes Counts the number of bytes received on the port Packets Counts the number of packets received on the port...

Page 438: ...RX To view the UMB_cast RX window click Monitoring Packets UMB_cast RX as shown below Figure 8 10 RX Packets Analysis window line graph for Unicast Multicast and Broadcast Packets To view the UMB Cast...

Page 439: ...is 200 Unicast Counts the total number of good packets that were received by a unicast address Multicast Counts the total number of good packets that were received by a multicast address Broadcast Cou...

Page 440: ...Transmitted TX To view this window click Monitoring Packets Transmitted TX as shown below Figure 8 12 TX Packets Analysis window line graph for Bytes and Packets To view the Transmitted TX Table clic...

Page 441: ...f times the Switch will be polled between 20 and 200 The default value is 200 Bytes Counts the number of bytes successfully sent on the port Packets Counts the number of packets successfully sent on t...

Page 442: ...itch s management agent to be viewed as either a line graph or a table Four windows are offered Received RX To view this window click Monitoring Errors Received RX as shown below Figure 8 14 RX Error...

Page 443: ...work occurrence Over Size Counts packets received that were longer than the MAX_PKT_LEN Internally MAX_PKT_LEN is equal to 1536 octets or if a VLAN frame of 1540 octets was received Fragment The numbe...

Page 444: ...ar Clicking this button clears all statistics counters on this window View Table Clicking this button instructs the Switch to display a table rather than a line graph View LineChart Clicking this butt...

Page 445: ...ary LateColl Counts the number of times that a collision is detected later than 512 bit times into the transmission of a packet ExColl Excessive Collisions The number of packets for which transmission...

Page 446: ...six groups and classed by size to be viewed as either a line graph or a table Two windows are offered To view this table click Monitoring Packet Size the following window will be displayed Figure 8 18...

Page 447: ...ctets in length excluding framing bits but including FCS octets 65 127 The total number of packets including bad packets received that were between 65 and 127 octets in length inclusive excluding fram...

Page 448: ...han a line graph View Line Chart Clicking this button instructs the Switch to display a line graph rather than a table Browse Router Port This displays which of the Switch s ports are currently config...

Page 449: ...static router port designated by S A router port that is dynamically configured by the Switch is designated by D and a Forbidden port is designated by F To view this window click Monitoring Browse ML...

Page 450: ...rrently Egress E or Tag T ports To view the next VLAN in the list click the Next button To view this window click Monitoring VLAN Status as shown below Figure 8 22 VLAN Status window VLAN Status Port...

Page 451: ...icator State click Monitoring Port Access Control Authenticator State as shown below Figure 8 24 802 1X Authenticator State Table Settings window The information on this window is described as follows...

Page 452: ...PAE associated with a port Enter a port or range of ports or tick the All Ports check box To view the Authenticator Statistics click Monitoring Port Access Control Authenticator Statistics as shown b...

Page 453: ...er of EAPOL Logoff frames that have been received by this Authenticator EapolReqFramesTX The number of EAP Request frames other than Rq Id frames that have been transmitted by this Authenticator Eapol...

Page 454: ...in this table for each port that supports the Authenticator function Enter a port or range of ports or tick the All Ports check box To view the Authenticator Session Statistics click Monitoring Port A...

Page 455: ...on SessionFramesTX The number of user data frames transmitted on this port during the session SessionID A unique identifier for the session in the form of a printable ASCII string of at least three ch...

Page 456: ...regarding the operation of the Authenticator associated with each port An entry appears in this table for each port that supports the Authenticator function Enter a port or range of ports or tick the...

Page 457: ...CONNECTING to DISCONNECTED as a result of receiving an EAPOL Logoff message EntersAuthenticating Counts the number of times that the state machine transitions from CONNECTING to AUTHENTICATING as a r...

Page 458: ...Responses Counts the number of times that the state machine sends an initial Access Request packet to the Authentication server i e executes sendRespToServer on entry to the RESPONSE state Indicates t...

Page 459: ...The following fields can be viewed Parameter Description ServerIndex The identification number assigned to each RADIUS Authentication server that the client shares a secret with InvalidServerAddr The...

Page 460: ...uts to this server After a timeout the client may retry to the same server send to a different server or give up A retry to the same server is counted as a retransmit as well as a timeout A send to a...

Page 461: ...of RADIUS packets received on the accounting port from this server MalformedResponses The number of malformed RADIUS Accounting Response packets received from this server Malformed packets include pa...

Page 462: ...ding table MAC Address Enter a MAC address for which to browse the forwarding table Find Allows the user to move to a sector of the database corresponding to a user defined port VLAN or MAC address VI...

Page 463: ...witch supports up to 4K IGMP Snooping groups The following field can be viewed Parameter Description VID The VLAN ID of the VLAN VLAN Name The VLAN name which the member port belongs to Source Display...

Page 464: ...VLAN ID of theVLAN VLAN Name The VLAN to which the member port belongs Source Displays the status of the source filtering which is the ability for a system to report the interest in receiving packets...

Page 465: ...ted in this window and click Start Parameter Description Target IP Address Enter the IP address of the computer to be traced Domain Name Enter the domain name of the host TTL 1 60 The time to live val...

Page 466: ...1 60 The time to live value of the trace route request This is the maximum number of routers the traceroute command will cross while seeking the network path between two devices Port 30000 64900 The v...

Page 467: ...8 38 IGMP Snooping Forwarding Table window The user may search the IGMP Snooping Forwarding Table by VLAN Name by entering a VLAN name and then clicking Search The following field can be viewed Parame...

Page 468: ...an be viewed Parameter Description VLAN Name The VLAN Name where multicast packets are being received Source IP The Source IP address that is sending multicast packets Multicast Group The Multicast IP...

Page 469: ...as shown below Figure 8 41 Routing Table window Browse IPv6 Routing Table To view this window click Monitoring Routing Table Browse IPv6 Routing Table as shown below Figure 8 42 IPv6 Routing Table win...

Page 470: ...IP Multicast Interface window Browse IGMP Group Table This window will show current IGMP group entries on the Switch To search a specific IGMP group entry enter an interface name into the Interface N...

Page 471: ...Interface Name Neighbor Address or Source Netmask into the respective field and click the Find button DVMRP neighbors of that entry will appear in the DVMRP Neighbor Table below To view this window cl...

Page 472: ...bor Netmask into the respective field and click the Find button PIM neighbors of that entry will appear in the PIM Neighbor Address Table below To view this window click Monitoring PIM Monitor Browse...

Page 473: ...use in the Search Type field The choices are All Area ID Advertise Router ID LSDB Area ID Advertise Router ID Area ID LSDB and Advertise Router ID LSDB If Area ID is selected as the browse method use...

Page 474: ...hbors in that area Neighbors are elected via the Hello protocol IP multicast is used to send out Hello packets to other routers on the segment Routers become neighbors when they see themselves listed...

Page 475: ...nd the OSPFv3 Virtual Neighbor Table Browse OSPFv3 LSDB Table The OSPFv3 LSDB Table displays the current link state database in use by the OSPFv3 routing protocol on a per OSPF area basis To view this...

Page 476: ...n a Hello packet sent by another router on the same segment In this way two way communication is guaranteed to be possible between any two neighbor routers This table displays OSPFv3 neighbors of the...

Page 477: ...regular switch log entries such as logins or firmware transfers Attack Log Choose this option to view attack log files such as spoofing attacks Unit Enter the unit you wish to view Severity Specifies...

Page 478: ...le To view this window click Monitoring Session Table as shown below Figure 8 62 Current Session Table window MAC based Access Control Authentication Status This window is used to clear previously con...

Page 479: ...Table Settings window The The following fields can be configured Parameter Description Ports e g 1 5 7 12 Enter the range of ports you wish to clear and click Clear to clear all ports check the All Po...

Page 480: ...the current configuration but do not save this configuration Reset System will return the Switch s configuration to the state it was when it left the factory Reset gives the option of retaining the Sw...

Page 481: ...lick the Save button in the Save Changes window The save options allow one alternative configuration image to be stored To view this window click Save Services Save Changes as shown beow Figure 9 3 Sa...

Page 482: ...drive to be altered Action This field has two options for configuration Boot Select this option to set the configuration file specified above as the boot up configuration for the Switch This saved con...

Page 483: ...000BASE LX DEM 310GT transceiver IEEE 802 3z 1000BASE SX DEM 311GT transceiver IEEE 802 3z 1000BASE SX DEM 312GT2 transceiver IEEE 802 3z 1000BASE LH DEM 314GT transceiver IEEE 802 3z 1000BASE ZX DEM...

Page 484: ...m x 11mm DGS 3627G Four 40mm x 40mm x 20mm one 50mm x 50mm x 20mm fans DGS 3650 Two 40mm x 40mm x 20mm three 40mm x 40mm x 10mm one 75 7mm x 75 7mm x 30mm fans one 44mm x 44mm x 11mm DGS 3612G Three 4...

Page 485: ...ies Layer 3 Managed Gigabit Ethernet Switch MAC Address Learning Automatic update Supports 16K MAC address Priority Queues 8 Priority Queues per port Forwarding Table Age Time Max age 10 1000000 secon...

Page 486: ...nment The following diagrams and tables show the standard RJ 45 receptacle connector and their pin assignments Figure B 1 The standard RJ 45 port and connector RJ 45 Pin Assignments Contact MDI X Port...

Page 487: ...dant Power is working Redundant Power is working Critical up down load Firmware successfully uploaded Firmware successfully uploaded by console Username username IP ipaddr Informational by console and...

Page 488: ...sole and IP ipaddr MAC macaddr are XOR shown in log string which means if the user logs in through the console no IP or MAC address information will be included in the log Configuration upload was uns...

Page 489: ...through the console no IP or MAC address information will be included in the log Web Successful login through Web Successful login through Web Username username Informational Login failed through Web...

Page 490: ...nning Tree port status changed Instance InstanceID port unitID portNum old_status new_status Notice Spanning Tree port role changed Spanning Tree port status changed Instance InstanceID port unitID po...

Page 491: ...Username username IP ipaddr Informational SSH session timed out SSH session timed out Username username IP ipaddr Informational Enable SSH server SSH server is enabled Informational Disable SSH serve...

Page 492: ...n failed through Telnet authenticated by AAA local method Login failed through Telnet from userIP authenticated by AAA local method Username username Warning Successful login through SSH authenticated...

Page 493: ...are no IP and MAC if login by console Login failed through Console due to AAA server timeout or improper configuration Login failed through Console due to AAA server timeout or improper configuration...

Page 494: ...ough SSH authenticated by AAA server Successful login through SSH from userIP authenticated by AAA server serverIP Username username Informational Login failed through SSH authenticated by AAA server...

Page 495: ...through Telnet authenticated by AAA local_enable method Enable Admin failed through Telnet from userIP authenticated by AAA local_enable method Username username Warning Successful Enable Admin throu...

Page 496: ...erver timeout or improper configuration Enable Admin failed through Console due to AAA server timeout or improper configuration Username username Warning Successful Enable Admin through Web authentica...

Page 497: ...ion Username username Warning Successful Enable Admin through SSH authenticated by AAA server Successful Enable Admin through SSH from userIP authenticated by AAA server serverIP Username username Inf...

Page 498: ...currently shut down due to a packet storm Warning Security Packet received containing a MAC address identical to the MAC address of the device s interface Possible spoofing attack from IP ipaddr MAC m...

Page 499: ...of authorized users is below the maximum user limit on the whole device in a time interval JWAC recovered from stop learning state Warning WAC When a client host fails to authenticate WAC unauthentic...

Page 500: ...Warning Dynamic IMPB entry conflicts with static IMPB Dynamic IMPB entry conflicts with static IMPB ipaddr MAC macaddr Port unitID portNum Warning IMPB entry cannot be created in ACL mode due to no A...

Page 501: ...Base SX Multi mode 2km DEM 314GT 1000BASE LH Single mode 50km DEM 315GT 1000BASE ZX Single mode 80km DEM 210 100BASE FX Single mode 15km DEM 211 100BASE FX Multi mode 2km DEM 330T TX 1550 RX 1310nm Si...

Page 502: ...ature on D Link devices to easily recover passwords Complete these steps to reset the password 1 For security reasons the Password Recovery feature requires the user to physically access the device Th...

Page 503: ...sword Recovery Mode and restarts the switch A confirmation message will be displayed to allow the user to save the current settings reboot force_agree This command forces the switch to restart reset a...

Page 504: ...re Vendor Specific Attribute Description Value Usage Vendor ID Defines the vendor 171 DLINK Required Vendor Type Defines the attribute 2 for ingress bandwidth 3 for egress bandwidth Required Attribute...

Page 505: ...server to the port However if the user does not configure the priority attribute and authenticates successfully the device will not assign a priority to this port If the priority attribute is configur...

Page 506: ...e RADIUS Tunnel Attribute Description Value Usage Vendor ID Defines the vendor 171 DLINK Required Vendor Type Defines the attribute 12 for ACL profile 13 for ACL rule Required Attribute Specific Field...

Page 507: ...essage sent to all destination devices on the network broadcast storm Multiple simultaneous broadcasts that typically absorb available network bandwidth and can cause network failure console port The...

Page 508: ...agement Protocol A protocol originally designed to be used in managing TCP IP internets SNMP is presently implemented on a wide range of computers and networking equipment and may be used to manage ma...

Page 509: ...ctual purchase price paid that is attributable to the Software Except as otherwise agreed by D Link in writing the replacement Software is provided only to the original licensee and is subject to the...

Page 510: ...TO D LINK FOR WARRANTY SERVICE RESULTING FROM THE USE OF THE PRODUCT RELATING TO WARRANTY SERVICE OR ARISING OUT OF ANY BREACH OF THIS LIMITED WARRANTY EVEN IF D LINK HAS BEEN ADVISED OF THE POSSIBIL...

Page 511: ...bit Ethernet Switch Product Registration Register your D Link product online at Hhttp support dlink com register 495 Product registration is entirely voluntary and failure to complete or return this f...

Page 512: ...s applicable to your Limited Lifetime hardware warranty Warranty beneficiary The warranty beneficiary is the original end user The original end user is defined as the person that purchases the product...

Page 513: ...in contracts with consumers and the disclaimer below may not apply to you To the extend allowed by local law the above warranties are exclusive and no other warranty condition or other term whether wr...

Page 514: ...the Software for a period of ninety 90 days Warranty Period if the Software is properly installed on approved hardware and operated as contemplated in its documentation D Link further warrants that du...

Page 515: ...RRANTY OF ANY KIND INCLUDING WITHOUT LIMITATION ANY WARRANTY OF MERCHANTABILITY FITNESS FOR A PARTICULAR PURPOSE AND NON INFRINGEMENT IF ANY IMPLIED WARRANTY CANNOT BE DISCLAIMED IN ANY TERRITORY WHER...

Page 516: ...uipment has been tested and found to comply with the limits for a Class A digital device pursuant to Part 15 of the FCC Rules These limits are designed to provide reasonable protection against harmful...

Page 517: ...ct U S and Canadian customers can contact D Link technical support through our website or by phone Tech Support for customers within the United States D Link Technical Support over the Telephone 877 3...

Page 518: ...BT 10ppm UK Pence per minute other carriers may vary Times Mon Fri 9 00am 6 00pm Sat 10 00am 2 00pm 1890 886 899 Ireland 0 05ppm peak 0 045ppm off peak Times Mon Fri 9 00am 6 00pm Sat 10 00am 2 00pm D...

Page 519: ...Link D Link bietet kostenfreie technische Unterst tzung f r Kunden innerhalb Deutschlands sterreichs der Schweiz und Osteuropas Unsere Kunden k nnen technische Unterst tzung ber unsere Website per E...

Page 520: ...z contacter le service technique de D Link par notre site internet ou par t l phone Assistance technique D Link par t l phone 0 820 0803 03 0 12 min Hours Monday Friday 9h to 13h and 14h to 19h Saturd...

Page 521: ...itio web de D Link D Link ofrece asistencia t cnica gratuita para clientes residentes en Espa a durante el periodo de garant a del producto Asistencia T cnica de D Link por tel fono 34 902 30 45 45 0...

Page 522: ...Gli ultimi aggiornamenti e la documentazione sono disponibili sul sito D Link Supporto Tecnico dal luned al venerd dalle ore 9 00 alle ore 19 00 con orario continuato Telefono 199400057 Web http www...

Page 523: ...stomers within Benelux for the duration of the warranty period on this product Benelux customers can contact D Link technical support through our website or by phone Netherlands 0900 501 2007 0 15ppm...

Page 524: ...bezp atn pomoc techniczn klientom w Polsce w okresie gwarancyjnym produktu Klienci z Polski mog si kontaktowa z dzia em pomocy technicznej firmy D Link za po rednictwem Internetu lub telefonicznie Te...

Page 525: ...tuje sv m z kazn k m bezplatnou technickou podporu Z kazn ci mohou kontaktovat odd len technick podpory p es webov str nky mailem nebo telefonicky Telefon 225 281 553 Land Line 1 78 CZK min Mobile 5 4...

Page 526: ...gat s Meghajt programokat s friss t seket a D Link Magyarorsz g weblapj r l t lthet le Tel 06 1 461 3001 Fax 06 1 461 3004 Land Line 14 99 HUG min Mobile 49 99 HUF min Web http www dlink hu E mail sup...

Page 527: ...web sider D Link tilbyr sine kunder gratis teknisk support under produktets garantitid Kunder kan kontakte D Links teknisk support via v re hjemmesider eller p tlf D Link Teknisk telefon Support 800...

Page 528: ...r gratis teknisk support til kunder i Danmark i hele produktets garantiperiode Danske kunder kan kontakte D Link s tekniske support via vores hjemmeside eller telefonisk D Link teknisk support over te...

Page 529: ...a asiakkaille Suomessa D Link tarjoaa teknist tukea asiakkailleen Tuotteen takuun voimassaoloajan Tekninen tuki palvelee seuraavasti numerosta 0800 114 677 Arkisin klo 9 21 Internetin kautta Web http...

Page 530: ...pdateringar och annan anv ndarinformation D Link tillhandah ller teknisk support till kunder i Sverige under hela garantitiden f r denna produkt D Link Teknisk Support via telefon 0770 33 00 35 Vardag...

Page 531: ...de utilizador no site de D Link Portugal http www dlink pt A D Link fornece suporte t cnico gratuito para clientes no Portugal durante o per odo de vig ncia de garantia deste produto Assist ncia T cn...

Page 532: ...software updates D Link D Link D Link Hellas Support Center 64 11251 210 86 11 114 09 00 17 00 210 8611114 Web http www dlink gr support...

Page 533: ...hni ka podr ka Hvala vam na odabiru D Link proizvoda Za dodatne informacije podr ku i upute za kori tenje ure aja molimo vas da posjetite D Link internetsku stranicu na www dlink eu Web www dlink biz...

Page 534: ...hni na podpora Zahvaljujemo se vam ker ste izbrali D Link proizvod Za vse nadaljnje informacije podporo ter navodila za uporabo prosimo obi ite D Link ovo spletno stran www dlink eu Web www dlink biz...

Page 535: ...Suport tehnica V mul umim pentru alegerea produselor D Link Pentru mai multe informa ii suport i manuale ale produselor v rug m s vizita i site ul D Link www dlink eu Web www dlink ro...

Page 536: ...www dlink co in support productsupport aspx Indonesia Malaysia Singapore and Thailand Tel 62 21 5731610 Indonesia Tel 1800 882 880 Malaysia Tel 65 66229355 Singapore Tel 66 2 719 8978 9 Thailand Mond...

Page 537: ...support e mail Hsupport dlink co il Pakistan Tel 92 21 4548158 or 92 21 4548310 Sunday to Thursday 9 00am to 6 00pm http support dlink me com e mail Hsupport pk dlink me com South Africa and Sub Saha...

Page 538: ...D Link D Link D Link D Link 495 744 00 99 http www dlink ru e mail support dlink ru...

Page 539: ...Desk Colombia Tel fono 01800 9525465 Lunes a Viernes 07 00 am a 20 00 pm Soporte T cnico Help Desk Costa Rica Tel fono 0800 0521478 Lunes a Viernes 06 00 am a 19 00 pm Soporte T cnico Help Desk Ecuad...

Page 540: ...rasil com br A D Link fornece suporte t cnico gratuito para clientes no Brasil durante o per odo de vig ncia da garantia deste produto Suporte T cnico para clientes no Brasil Telefone S o Paulo 11 218...

Page 541: ...D Link D Link D Link 0800 002 615 8 30 9 00 http www dlink com tw dssqa_service dlink com tw D Link http www dlink com tw...

Page 542: ...kumentasi pengguna dapat diperoleh pada situs web D Link Dukungan Teknis untuk pelanggan Dukungan Teknis D Link melalui telepon Tel 62 21 5731610 Dukungan Teknis D Link melalui Internet Email support...

Page 543: ...D Link 36 B 26F 02 05 100013 8008296688 028 66052968 028 85176948 36 B 26F 02 05 100013 010 58257789 010 58257790 http www dlink com cn 09 00 18 00...

Page 544: ...www dlink eu Spain Avenida Diagonal 593 95 9th floor 08014 Barcelona Spain TEL 34 93 409 07 70 FAX 34 93 491 07 95 URL www dlink es Sweden Gustavslundsv gen 151B S 167 51 Bromma Sweden TEL 46 0 8 564...

Page 545: ...___________________________________________________________________________ ________________________________________________________________________________________________________________________ Ans...

Page 546: ...Optional Module Slots Optional Module Slots...

Reviews: