background image

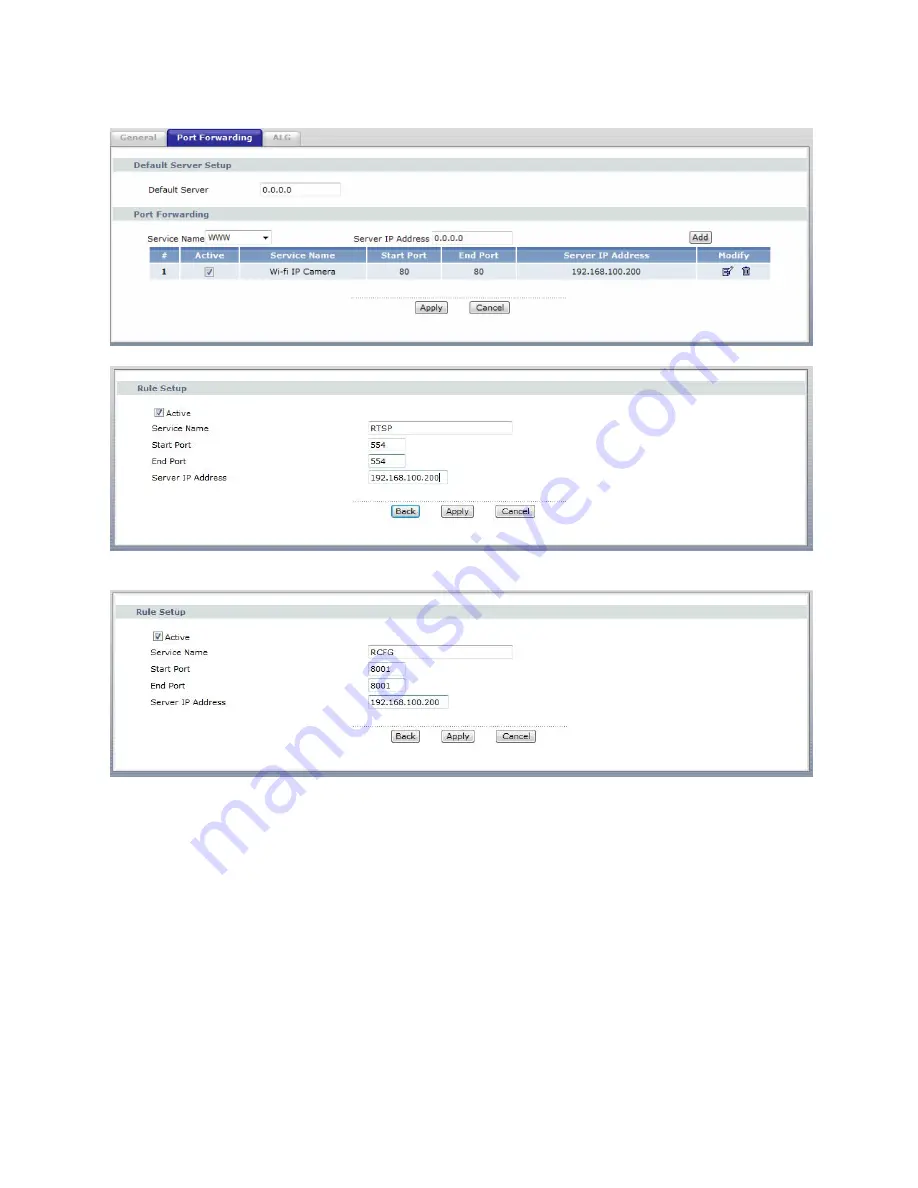
Select the Apply button to save your changes. 


Add again using 

Service Name

, select 

User define.


Select 

Apply

 button. 

Add again using 

Service Name

, select 

User define 


Select 

Apply

 button. 


Summary of Contents for DP-i17

Page 1: ...Packing List 1 Wireless IP Camera 2 Wi Fi Antenna 3 DC Power Supply 4 Network Cable 5 Mounting Bracket 6 Quick Installation Guide 7 CD Includes User Manual IP Camera Tool H 264 Camera Client Quick In...

Page 2: ...ying double click on it Install Click Next Click Next tenna at the back of the camera and make sure it is attached well 3 Plug the network cable of the Wireless IP camera and the network cable coming...

Page 3: ...Click I Agree Click Install Click Finish...

Page 4: ...Click OK Note PC network parameters and IP Camera parameters must belong to the same network segment to access the IP Camera First of all the Gateway and IP Mask Subnet Mask should be the same and the...

Page 5: ...192 168 100 200 2 Login page will appear as follows Input the default username admin and password admin 3 At the first viewing of the IP Camera the browser will prompt the users to install the OCX co...

Page 6: ...Click Next to install Refresh or re login the IE interface after installation Then the IE will go to the default page and show the preview image...

Page 7: ...Parameters Wireless Setting NOTE The wireless function of IP Camera is disabled by default Before using the WIFI of the camera you need to connect the camera on wired setting then enter the IE interf...

Page 8: ...tmask and Gateway Usually it is the router IP In here we used 192 168 100 200 as an example c Enable box must be checked Click on the scan button to select WIFI network or input SSID manually Input WI...

Page 9: ...Click Ok d Unplug the network cable of the IP Wireless Camera from Router e In the browser login to your WIFI Set camera IP address to 192 168 100 200 You can now see the preview picture...

Page 10: ...routers the port forwarding screen is located within the Network NAT Port Forwarding tab in others it is located in the advance tools tab The set up instruction outlined below is an example of port f...

Page 11: ...the list Another window will appear Check the Active box In the Service Name type any name you want e g Wi fi IP Camera In the Start Port field enter the first number of the port you need to port forw...

Page 12: ...Select the Apply button to save your changes Add again using Service Name select User define Select Apply button Add again using Service Name select User define Select Apply button...

Page 13: ...h the port for the camera e g port 80 http IP address 80 is what should be typed into your Internet Explorer browser For the Android devices and Apple devices These are many free apps available to dow...

Page 14: ...elow This means this application is successfully installed 4 After successfully installing the application into your mobile device it is ready to run Just click the VMEye icon in the main menu 5 The m...

Page 15: ...6 There are many buttons in the main interface here is the instruction for their functions See table below...

Page 16: ...different devices for example you can type the names based on the location of the equipment User s name User ID Usually the default is admin please consult your suppliers for more detail Password The...

Reviews: