D.W. FEARN
VT-12 Microphone Preamplifer
36
Remember that vacuum tubes may be quite hot during opera tion. Protect your fingers dur-
ing tube replacement. The VT-12 should be turned off before removing tubes. Allow at least
one minute for the filter capacitors to discharge before tube removal or insertion. Use a lint-
free cloth or paper towel to avoid direct contact between any part of the tube and your fin -
gers.
Tubes are made of glass and will break if dropped or even bumped in a critical area. Handle
with care.
Electrolytic Capacitors
The VT-12 is designed and built to last for a long, long time, and it is possible that some com-
ponents (e.g. electro lytic capacitors) may reach the end of their life long before the equip-
ment becomes obsolete. The electrolytic capacitors used in the VT-12 typically will last at
least twenty years. If there is a measurable and/or audible in crease in 120 cps noise, the fil-
ter capacitors should be suspected. They should be replaced with new capacitors of equiva-
lent capacitance and voltage rating, and the replace ments should be specified for a minimum
ten-year service life.
Electrolytic capacitors are also used as plate and cathode decouplers. In choosing a replace-
ment, the same considera tions as with the filter capacitors should be followed.
VU Meter Calibration
The meter amplifier circuit is stable and re-adjustment of the meter calibration is not normal-
ly required. If the output reference level needs to be changed, here is the procedure:
1. Remove the VT-12 top cover (see above).
2. Terminate the output in the same impedance as the VT-12 will normally be feeding.
This will almost always be a high-impedance bridging termination of 20k ohms or
more.
3. Apply AC power. Allow at least a fifteen minute warm-up. Feed a 1 kc tone at about -
55 dBm into the VT-12 input.
4. Measure the output and set the Attenuation control for +4 dBm (or whatever refer-
ence is desired).
5. Set the Meter Calibration trimmer potentiometer for 0 VU on the VT-12 meter(s). Be
sure the meter is turned on. This control is a 25-turn pot so the adjustment is easy. A
small screwdriver or alignment tool is necessary. The controls are located on the
meter amplifier printed circuit board on the top of the chassis and they are the only
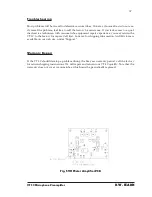
trim pot(s) on the VT-1/VT-12. See Figure 5 on page 38.
6. Replace the top cover. Be sure the ventillation slots are over the tubes (towards the
back).
Summary of Contents for VT-12
Page 1: ...VT 12 Vacuum Tube 70dB Microphone Preamplifier Operating Instructions D W FEARN...
Page 4: ...4...
Page 15: ......
Page 19: ...D W FEARN VT 12 Microphone Preamplifer 22...
Page 27: ...D W FEARN VT 12 Microphone Preamplifer 30...
Page 35: ...D W FEARN VT 12 Microphone Preamplifer 38...
Page 37: ......


