background image

16

10. To maintain product life and safety, avoid damaging the charger, battery, 

or electrical circuit. The car must use the default configuration of the 
dedicated charger and power supply. 

11.  When inactive, disconnect the car’s power by unplugging the (red) bat-

tery wire, ensuring all switches are in the “STOP” or “OFF” position. 

12. The charger is not a toy. Please keep away from children. 
13. Using non-manufacturer or third-party parts is strictly prohibited. 
14. This product is mainly composed of PP material. The expected prod-

uct-usage life is two years. 

USAGE DIRECTION

Before using the car, review the following procedures to ensure functionality: 

1.  All steps are followed per the instructions to complete the car’s assem-

bly. Specifically, the battery wire is connected correctly, and the power 
supply has been switched on to confirm functionality.

2.  Make sure all parts requiring hardware are fixed tightly and correctly. 
3.  Adults must ensure children have taken safety measures before use.
4.  To reduce accidents while using, the child must be seated at all times. 
5.  Follow the product’s recommended seating capacity. Please do not ex-

ceed the maximum number of users to ride. 

6.  Adults must always supervise their children while the car is in use. 
7.  Adults are responsible for the care and guidance of their child while the 

car is in use, ensuring the child is not left unattended. 

8.  Pay attention to the driving environment and surfaces. Ensure the car is 

not driven in an unsafe environment. 

9.  Pay attention to the road, trenches, riverside, slopes, or uneven ground. 
10. Not to be used on public roads or near ongoing traffic. 
11.  The car should only be used in daytime and under light for visibility. Do 

not use the car at night or under low visibility. 

12. To avoid unexpected obstacles or events, adults must supervise at all 

times.

Summary of Contents for VOLTZ TOYS DG-81919

Page 1: ...replacement parts damages or defective issues reported You can contact us directly at www voltztoys ca Phone number 1 888 338 6589 Head Office Unit 7 3600A Laird Rd Mississauga ON L5L 6A6 USER MANUAL...

Page 2: ...tself We apologize for any inconvenience caused An adult should assemble the product All pictures shown are for illustration and reference purposes only The actual product may vary due to product enha...

Page 3: ...2 PARTS LIST...

Page 4: ...9 Adults must assemble the car The product contains small items that may present choking hazards Keep children away from assembling Children under 36 months are prohibited from using Review and count...

Page 5: ...of the engine could be flipped Lower position most seat in the slot will be used for kids and higher position minimal seat in the slot will be used for parents See diagram for details The seat cover...

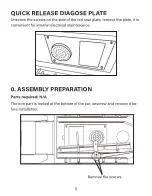
Page 6: ...the side of the red seat plate remove the plate it is convenient for internal electrical maintenance Remove the screws 0 ASSEMBLY PREPARATION Parts required N A The iron part is locked at the bottom o...

Page 7: ...e the connection with cotter pin then place and secure the wheel cover Repeat for the other side Confirm the axle is sits in the centre Slide the motor through the axle con nect the power supply cable...

Page 8: ...7 5 4 11 12 13 11 3 SUPPORT FRAME ASSEMBLY Parts required 11 13 Place the support legs at the designated position fix the connection with 4 x 4 12 large flat head screws each leg...

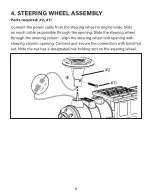
Page 9: ...e body Slide as much cable as possible through the opening Slide the steering wheel through the steering column align the steering wheel bolt opening with steering column opening Connect and secure th...

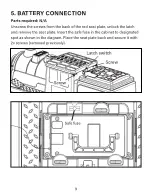
Page 10: ...m the back of the red seat plate unlock the latch and remove the seat plate Insert the safe fuse in the cabinet to designated spot as shown in the diagram Place the seat plate back and secure it with...

Page 11: ...ca bles then place it all the way in Sit wheel through the axle and well on the motor place washer then secure the installation with cotter pin Place the wheel cover afterwards Repeat for the other si...

Page 12: ...11 7 TRAILER SUPPORT FRAME ASSEMBLY Parts required 11 13 Place the support legs at the designated position fix the connection with 4 x 4 12 large flat head screws each leg 13 11...

Page 13: ...ot Turn the unit over attach the trailer to the locomotive Slide the beam to the adapter then to the locomotive align the opening put the connection pin through and secure the connection with washer a...

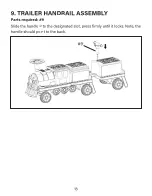
Page 14: ...13 9 TRAILER HANDRAIL ASSEMBLY Parts required 9 Slide the handle into the designated slot press firmly until it locks Note the handle should point to the back 9...

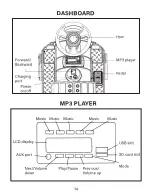
Page 15: ...BOARD MP3 PLAYER Horn MP3 player Forward Backward Pedal Charging port Power on off AUX port LCD display USB slot Music Music Music Music Music SD card slot Mode Previous Volume up Next Volume down Pla...

Page 16: ...ths Do not exceed the maximum weight limit of 60kg 3 This product is ideal for driving on hard flat surfaces e g concrete grav el asphalt etc 4 It is strictly prohibited to drive on the street roads p...

Page 17: ...tched on to confirm functionality 2 Make sure all parts requiring hardware are fixed tightly and correctly 3 Adults must ensure children have taken safety measures before use 4 To reduce accidents whi...

Page 18: ...ay from children CHARGING PROCEDURES For safety purposes charging must be done by adults When initially assembled charge for 8 12 hours before using The charging port is located as shown on the diagra...

Page 19: ...ENTION Before charging please inspect the charger battery and plug to ensure no damages or abnormalities are found If any damages are found dis continue usage of the car until the parts are replaced o...

Page 20: ...charging 5 After using the car charge the car adequately and must be done by an adult If the product is inactive it must be fully charged Charge at least once a month to ensure battery functionality a...

Page 21: ...20 TROUBLESHOOTING...
Reviews: