background image

4

5

Cleaning and Maintenance

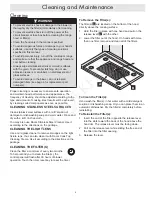
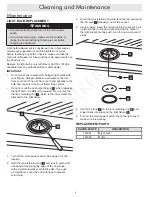
To Remove the Filter(s):

The filter(s) 

 A 

 are located on the bottom of the hood, 

directly above the cooking surface.

Hold the filter in place with one hand and pull on the 

1. 

release lever 

 B 

 with the other. 

Lower the filter out of the hood. On hoods with more 

2. 

than one filter, remove and clean all of the filters.

To Clean the Filter(s):

Hand wash the filter(s) in hot water with a mild detergent 
solution or dishwashing soap. Or you can place them in an 
automatic dishwasher. Dry the filter(s) completely before 
reinstalling.

To Reinstall the Filter(s):

Insert the end of the filter opposite the release lever 

1. 

into the slots toward the back of the hood above the 
hood rim. The release lever must be facing down.

Pull on the release lever while sliding the free end of 

2. 

the filter into the filter opening.

Release the lever.

3. 

Proper cleaning is necessary to ensure safe operation 
and maintain hood performance and appearance. The 
frequency of cleaning should be adjusted according to the 
type and amount of cooking. Best results will be achieved 
by cleaning soiled components as soon as possible. 

CLEANING STAINLESS STEEL SURFACES

Clean stainless steel surfaces with a mild solution of 
detergent or dishwashing soap and warm water. Rinse and 
dry with a soft, lint-free cloth.

You may also use Dacor Stainless Steel Cleaner. Use it 
according to the directions on the package.

CLEANING THE LIGHT LENS

Use a mild glass cleaner to remove smudges on the light 
fixture lens. You can also clean it with Dacor Cook Top 
Cleaning Creme. Use it according to the directions on the 
package.

CLEANING THE FILTER(S)

Clean the filter a minimum of every two months. 
To help remind you to clean the filter(s), the 
control panel will flash after 30 hours of blower 
operation. Touch the timer reset key to reset the timer.

 WARNING

To prevent electric shock or damage to the blower(s), 

• 

thoroughly dry the filter(s) immediately after cleaning.

To prevent electric shock turn off the power at the 

• 

circuit breaker or fuse box before cleaning the range 
hood or filter(s).

Clean the hood only in the manner specified.

• 

To avoid dangerous fumes or damage to your hood’s 

• 

surfaces, use only the types of cleaning solutions 
specified in this manual. 

To avoid personal injury, turn off the cooktop or range 

• 

and make sure that the appliance and range hood are 
cool before cleaning.

Always wipe stainless steel (silver colored) surfaces 

• 

with the grain. To prevent scratching, do not use 
abrasive cleaners or scrubbers on stainless steel or 
glass surfaces.

To avoid damage to the blower, do not reinstall 

• 

damaged filters (see page 6 for replacement part 
numbers).

Cleaning

A

B

Summary of Contents for DHW301

Page 1: ...s Important Safety Instructions 1 2 Parts of the Range Hood 3 Operating Instructions 4 Cleaning and Maintenance 5 6 Before You Call for Service 7 Warranty Service 8 Warranty Card Back Cover For Use W...

Page 2: ...Call for Service section of this manual for guidance It provides useful suggestions and remedies prior to calling for service Valuable customer input helps us to continuously improve our products and...

Page 3: ...over all possible situations Use common sense caution and care when installing maintaining or operating any appliance Safety Symbols and Labels DANGER DANGER Immediate hazards that WILL result in seve...

Page 4: ...ood resulting in a fire hazard Always run the blower s whenever the cooktop is operating 11 Never leave the range or cooktop unattended when a burner or element is in use Boil overs and greasy spills...

Page 5: ...s grease and grime from getting into the blower s The number of filters depends on the model See the table below E MAIN POWER SWITCH Located behind the filter on the bottom of the hood on the opposite...

Page 6: ...he Blower System The blower system has four speed settings The speed is indicated by the number of lights that glow on the blower speed indicator C Touch the key D to turn on the blower system To incr...

Page 7: ...shwashing soap and warm water Rinse and dry with a soft lint free cloth You may also use Dacor Stainless Steel Cleaner Use it according to the directions on the package CLEANING THE LIGHT LENS Use a m...

Page 8: ...light fixture Turn off the main power switch See page 3 for the 1 location Hold the lens retaining ring 2 B and lens in place with one hand while prying the edge of the ring loose with a small screwdr...

Page 9: ...lb see page 6 Blower system does not draw heat and smoke properly Blower set to low setting See Operating Instructions section Filter s clogged or dirty Check filters Make sure they are completely cle...

Page 10: ...TSIDE THE FIFTY STATES OF THE U S A THE DISTRICT OF COLUMBIA AND CANADA LIMITED FIRST YEAR WARRANTY If your DACOR product fails to function within one year of the original date of purchase due to a de...

Page 11: ...THE UNITED STATES DACOR INC ATTN WARRANTY PROCESSING DEPT 1440 BRIDGE GATE DR STE 200 PO BOX 6532 DIAMOND BAR CA 91765 9861 BUSINESS REPLY MAIL PERMIT NO 4507 POSTAGE WILL BE PAID BY ADDRESSEE FIRST C...

Page 12: ...ilder B Magazine G Architect Designer C Appliance Dealer Showroom H Another Dacor Owner D Kitchen Dealer Showroom I Model Home E Home Show J Other 2 Where did you buy your Dacor appliances A Appliance...

Reviews: