17
Installation Instructions
Attaching to the Cabinet
This refrigerator is top-heavy and MUST be attached to
the surrounding cabinetry, otherwise it will fall forward
and could cause injury or death.
DANGER
WARNING
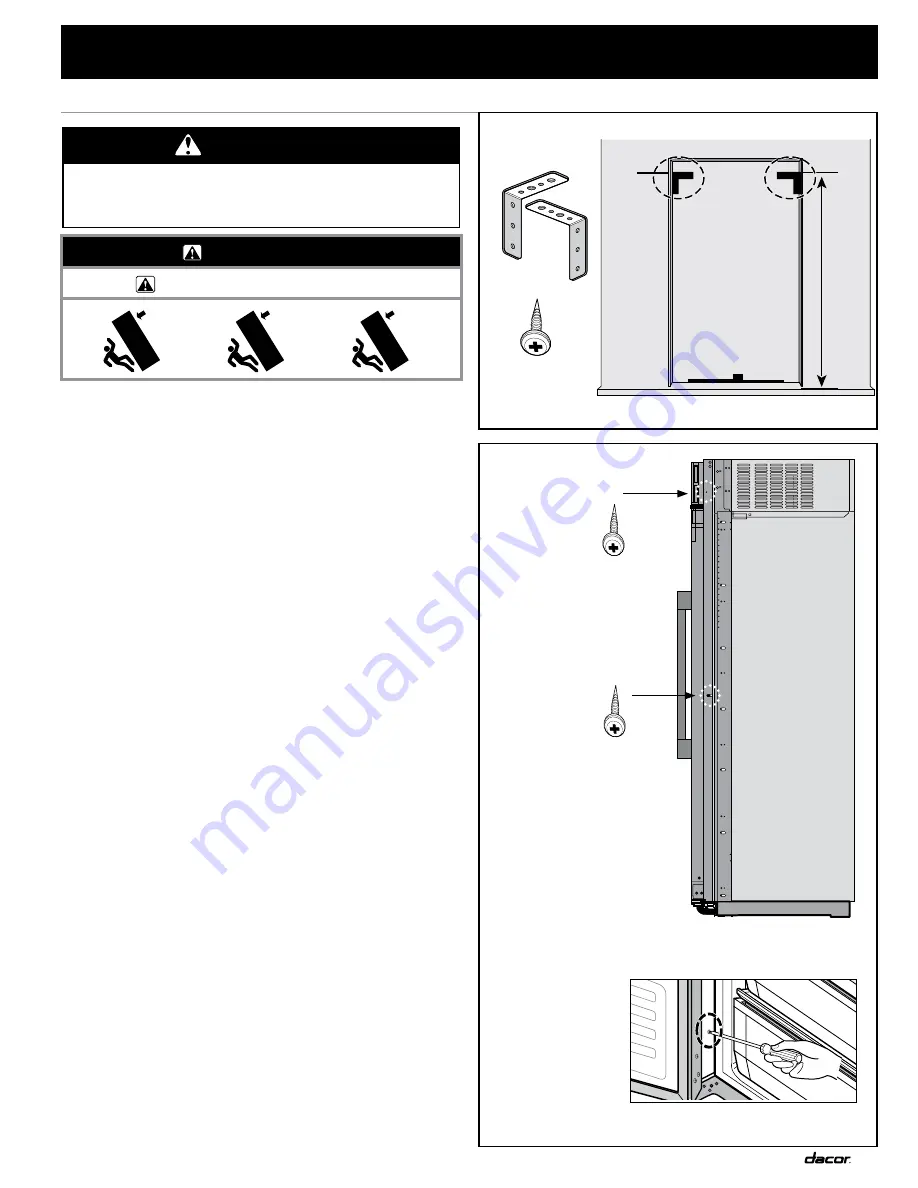
Refer to the images at the right while reading these steps:
Method #1
(optional) and
Method #2
(required)
The first image shows Method #1. If chosen, this must be
performed first, because the brackets cannot be installed
after Method #2 is completed.
Method #1
Brackets will
attach to the cabinet
and reach over the
refrigerator. If the refrigerator tips forward, the brackets will
brace the refrigerator and prevent it from tipping further.
1. Measure 1/4” from the top of the height of your
refrigerator. (Make sure it is at your final height.)
2. Attach the brackets to the cabinetry with the screws.
Method #2
There are two holes on each side of the refrigerator
rail. These holes are for the screws that will attach the
refrigerator to the cabinet.
1. Open the door to access these holes.
2. Place a level on a shelf so that when a screw is
tightened, the refrigerator does not tilt too far left or
right.
3. Insert and tighten the screws in the top left and right
holes.
4. Make sure the refrigerator is level.
5. Insert and tighten the screws in the bottom left and
right holes while making sure the refrigerator is level.
L-Bracket
M4*L22 screw x 8
M4 L22
M4*L22 screw x 8
M4 L22
M4*L12 screw x 6
M4 L12
Attaching Screws Through an Open Door
Suspending L-Brackets Above the Refrigerator
1/4 in
0.64 cm
Method #1
Method #2
Inserting the Screws Inside the Rails
WARNING
AVERTISSIMENT


