background image

E11

Heading

Sensor Cooking Chart (continued)

Food

Amount

Procedure

Reheat

4 - 36 oz.

Place food to be reheated in a dish or casserole slightly larger than the 

amount. Flatten, if possible. Cover with a lid, plastic wrap or wax paper. 

Use covers such as plastic wrap or lids, with larger quantities of more 

dense foods such as stews. After reheating, stir well, if possible. Re-cover 

and allow to stand 2 to 3 minutes. Foods should be very hot. If not, con-

tinue to heat with variable power and time.

Fresh vegetables, soft:  

Broccoli 

  Brussel sprouts

  Cabbage

  Spinach

  Zucchini

  Baked apples

.25 - 2.0 lb.

.25 - 2.0 lb.

.25 - 2.0 lb.

.25 - 2.0 lb.

1 med.

.25 - 1.0 lb.

.25 - 2.0 lb.

2 - 4 med.

Wash and place in casserole. Do not add water if vegetables have just been 

washed. Cover with lid for tender vegetables. Use plastic wrap for tender-

crisp vegetables. Touch FRESH VEGETABLES, number 

1

 and START

After cooking, stir, if possible. Let stand covered for 2 to 5 minutes.

Fresh vegetables, hard:

  Carrots, sliced

  Corn on the cob

  Green beans

  Winter squash:


diced


halves

.25 - 1.5 lb.

2 - 4

.25 - 1.5 lb.


.25 - 1.5 lb.

1 - 2

Place in casserole. Add 1 - 4 tablespoons water. Cover with lid for tender 

vegetables. Use plastic wrap cover for tender-crisp vegetables. Touch 

FRESH VEGETABLES, number 

2

 and START. After cooking, stir, if pos-

sible. Let stand covered for 2 to 5 minutes.

Rice

.5 - 2.0 cup Place rice into a deep casserole and add a double quantity of water. Cover 

with lid or plastic wrap. After cooking, stir, cover and let stand 3 to 5 min-

utes or until all liquid has been absorbed.

Rice 

Water 

Size of casserole

.5 cup 

1 cup 

1.5 quart

1 cup 

2 cups 

2 quart

1.5 cups 

3 cups 

2.5 or 3 quart

2 cups 

4 cups 

3 quart or larger

Baked potatoes

1 - 8 med.

Pierce. Place on paper-towel-lined turntable. After cooking, remove from 

microwave, wrap in aluminum foil and let stand 5 to 10 minutes.

Ground meat

.25 - 2.0 lb. Use this setting to cook ground beef or turkey as patties or in a casserole to 

be added to other ingredients. Place patties on a microwave-safe rack and 

cover with wax paper. Place ground meat in a casserole and cover with wax 

paper or plastic wrap. When the microwave stops, turn the patties over or 

stir the meat in the casserole to break up large pieces. Re-cover and touch 

START. After cooking, let stand covered for 2 to 3 minutes.

Poultry :  Boneless

.5 - 2.0 lb.

Use boneless breast of chicken or turkey. Cover with vented plastic 

wrap. Touch POULTRY, number 

1

 and START. When the oven stops, 

rearrange. Re-cover and touch START. After cooking, let stand, covered, 


Bone-in

.5 - 3.0 lb.

Arrange pieces with meatiest portions toward outside of glass dish or 

microwave safe rack. Cover with vented plastic wrap. Touch POULTRY

number 

2

 and START. After cooking, let stand, covered, 3 to 5 minutes. 

Fish/seafood

.25 - 2.0 lb.

-

neath). Cover with vented plastic wrap. After cooking, let stand covered 

for 3 minutes.

Sensor Cooking

Summary of Contents for Distinctive DMW2420S

Page 1: ...roducts are specifically excluded Coverage Limitations Service will be provided by a Dacor designated servi company during regular business hours Please note service providers are independent entities...

Page 2: ...at can occur Use common sense and caution when installing maintaining or operating this or any other appliance Always contact the Dacor Customer Service Team about problems or situations that you do n...

Page 3: ...f the appli ance surface when the appliance is in operation 17 Do not mount over a sink a Do not overcook food Carefully attend appli ance when paper plastic or other combustible materials are placed...

Page 4: ...to a wall receptacle that is properly installed and grounded in accordance with the National Electrical Code and local codes and ordinances In the event of an electrical short circuit grounding reduce...

Page 5: ...ok for suggestions like paper towels wax paper microwave plastic wrap or a lid Covers prevent spat tering and help foods to cook evenly areas of meat or poultry to prevent overcooking be fore dense th...

Page 6: ...e supervising person should be in the same room The child must be able to reach the oven comfortably At no time should anyone be allowed to lean or sit on the oven Children should be taught all safety...

Page 7: ...pcorn in regular brown bags or glass bowls Exceed maximum time on popcorn package Baby food Transfer baby food to small dish and heat carefully stirring often Check temperature before serving Put nipp...

Page 8: ...rely The turntable will rotate clockwise or counterclockwise Only remove for cleaning 9 Ventilation openings rear 10 Oven light It will light when oven is operating or door is open 11 Waveguide cover...

Page 9: ...n incorrect clock time ERROR will appear in the display Touch the STOP CLEAR key and re enter the time Should the electrical power supply to your microwave oven be interrupted the display will intermi...

Page 10: ...odically to remove or separate the portions that are defrosted If food is not defrosted at the end of the estimated defrosting time program the microwave oven in 1 minute increments at a Power Level o...

Page 11: ...e microwave oven may be opened when the remaining time appears on the display At this time you may stir or season food as desired 7 If the sensor does not detect vapor properly when popping popcorn th...

Page 12: ...0 cup Place rice into a deep casserole and add a double quantity of water Cover with lid or plastic wrap After cooking stir cover and let stand 3 to 5 min utes or until all liquid has been absorbed Ri...

Page 13: ...time is needed continue to cook manually Frozen Foods Menu Options Frozen Foods Chart Food Amount Procedure Entrees 6 17 oz Use this key for frozen convenience foods It will give satisfactory results...

Page 14: ...T 5 Frozen breakfast foods 1 3 6 oz etc Follow manufacturer s directions for how to prepare for microwaving Allow to stand 1 or 2 minutes after cooking Lunch Chart It is not necessary to enter amount...

Page 15: ...CHICKEN then touch START 2 Blend together 8 ounces reduced fat cream cheese softened 1 4 cup milk 3 Stir into the cream cheese mixture 1 10 ounce package of frozen peas 2 cups cooked thinly sliced chi...

Page 16: ...SALMON and then touch START 3 At pause place around edge of salmon 1 red pepper cut into thin strips Drizzle remaining orange mixture over vegetables Top all with 2 tablespoons toasted sesame seeds T...

Page 17: ...ART 2 At pause stir together being sure that chicken strips are separated and mixed into the rice sauce Re cover Touch START 3 At the end stir Serve with buttered green beans and toasted tortillas 3 I...

Page 18: ...ables 2 cups thinly sliced summer squash Re cover Touch START 3 At the end sprinkle top with 4 ounces shredded cheddar cheese Serve with spinach salad and chilled melon Defrost Defrost automatically d...

Page 19: ...0 lb Start defrosting with the fat side down After each stage turn the roast over and shield the warm portions with aluminum foil Let stand covered for 30 to 60 minutes 8 Casserole or soup 1 8 cups Af...

Page 20: ...ber 2 key 4 times 3 Touch the START key NOTES Beverages can be programmed with More or Less Time Adjustment Touch the POWER LEVEL key once or twice after selecting the amount See page 20 Touch SETUP H...

Page 21: ...choose foods that can be left in the oven safely until the Auto Start time Acorn or butternut squash are often a good choice If you wish to know the time of day simply touch Clock key the time of day...

Page 22: ...START key NOTES necessary to touch the POWER LEVEL key If you wish to know the power level during cooking simply touch the POWER LEVEL key As long as your POWER LEVEL key the power level will be displ...

Page 23: ...he cover immedi ately after they occur Built up splashes may overheat and waveguide cover Turntable Turntable Support The turntable and turntable support can be removed for easy cleaning Wash them in...

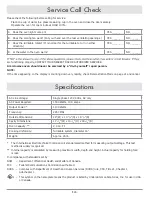
Page 24: ...nd cancel Specifications AC Line Voltage Single phase 120V 60Hz AC only AC Power Required 1500 Watts 13 0 amps Output Power 1100 Watts Frequency 2450 MHz Outside Dimensions 24 W x 13 3 8 H x 19 1 4 D...

Page 25: ...sponsibility for damage to surrounding property including cabinetry floors ceilings and other structures or objects Breakage discoloration or damage to glass metal surfaces plastic components trim pai...

Page 26: ...r that Product a Partial Refund The amount of any Partial Refund to be offered shall be determined in our discretion based on the fair market value of the Product given its age and condition If Purcha...

Page 27: ...and easily accessible from floor level to service personnel If repair cannot be completed during in home service or if in home service is not available in your area you may be directed to deliver the...

Page 28: ...LEGAL RIGHTS AND YOU MAY ALSO HAVE OTHER RIGHTS WHICH VARY FROM PROVINCE TO PROVINCE THIS LIMITED WARRANTY STATES THE PURCHASER S EXCLU SIVE REMEDY EXCEPT WHERE PROHIBITED BY APPLICA BLE PROVINCIAL LA...

Page 29: ...E28 Notes...

Page 30: ...E29 Notes...

Page 31: ...E30 Notes...

Page 32: ...you have any questions or comments relating to Dacor appliances please contact the Dacor Customer Service Center Country Contact Center Web Site U S A 1 833 353 5483 www dacor com CANADA 1 844 509 46...

Reviews: