background image

6

Planning the Installation

Cabinet Layout


WARNING

All maximum and minimum cabinet and countertop dimensions 

and clearances stated in these instructions must be maintained 

for safe operation.

• 

Carefully check the location where the range is to be 

installed. For best performance, the range should be placed 

away from drafts that may be caused by doors, windows and 

heating and air conditioning outlets.

• 

To reduce the risk of personal injury and to reduce 

accumulated smoke in the room, Dacor strongly recommends 

installing a range hood or downdraft vent (model DR30DI[H] 

only). A range hood should project horizontally a minimum of 

five (5) inches beyond the face of the cabinets.

• 

Any openings in the wall behind the appliance or in the floor 

underneath it must be sealed.

• 

Carefully note the requirements stated below for clearances 

to walls and cabinets.

Gas and Electrical Service

• 

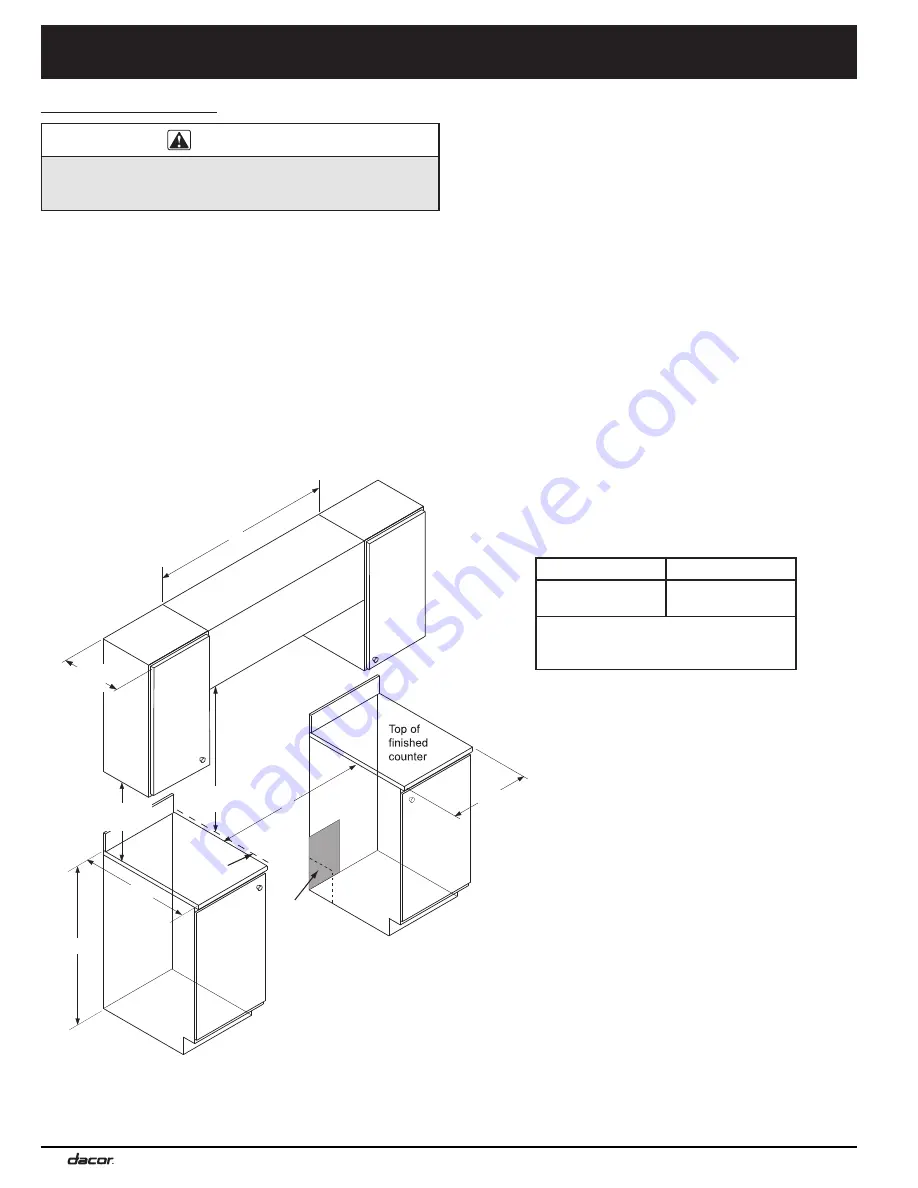
The shaded area shown below denotes the location of the 

gas inlet and the electrical junction box/receptacle. This 

is the recommended location. For replacement purposes, 

the location of the existing utilities may be utilized provided 

they do not interfere with the sides or rear of the range. 

Check local building codes for permissible utility connection 

locations.

• 

An external manual shut-off valve must be installed between 

the gas inlet and the range for the purpose of turning on or 

shutting off gas to the appliance.

The installation must allow for the following:

• 

Access to the gas shut-off valve when the unit is installed.

• 

Access to the remote circuit breaker panel or fuse box when 

the range is in place.

• 

The gas supply piping, gas shut-off valve and the electrical 

junction box or receptacle must be located so they do not 

interfere with the range when it is installed.

• 

The junction box and gas shut off valve must be located 

so that the range can be pulled out for service while the 

appliance remains connected.

Note 3

Note 6

E

F

3

 Cabinet/countertop depth is at discretion of customer but 

cabinet face MUST NOT protrude further than rear of 

cabinet front, see Product Dimensions.

4

 Consult local code for exact location requirements.

6

 Model DR30D[H]: 37 7/8 (96.2 cm) max.


Model DR30DI[H]: 37 7/16 (95.1 cm) max.

2

 Distance to combustible surfaces measured from cooking

surface (top of cooktop grate); if installing an overhead 

range hood, also check the hood specifications for minimum 

required clearances. 

1

 Minimum distance to a combustible rear wall for model 

DR30DI[H] is 2.5” (6.4 cm) from top rear trim. Model DR30D[H] 

may be installed flush to rear wall, but non-combusible surface 

or 9-inch backguard (PN ADB3009) is recommended.

Back wall 

1

10” (25.4 cm) min.

to combustible side

walls above the range

(both sides)

30” (76.2 cm)

min.

2

13” (33.0 cm)

max.

5

18” (45.7 cm)

min.

5

Suggested 

location of 

utilities


4

Grate 

Level

5

 Distance from rnage top panel level. This specification does 

not apply for cabinets located greater than a horizontal 

distance of 10” (25.4 cm) from the edge of the range.

Cutout tolerances: +1/16” (+1.6 mm), -0

E

F***

36” (91.4 cm)* 

30” (76.2 cm)**

30 1/16” (76.4 cm)

* Recommended  ** Minimum 

*** See following pages for self-rimming  

installations

Required Cabinet Dimensions

Note 3

Note 6

E

F

3

 Cabinet/countertop depth is at discretion of customer but 

cabinet face MUST NOT protrude further than rear of 

cabinet front, see Product Dimensions.

4

 Consult local code for exact location requirements.

6

 Model DR30D[H]: 37 7/8 (96.2 cm) max.


Model DR30DI[H]: 37 7/16 (95.1 cm) max.

2

 Distance to combustible surfaces measured from cooking

surface (top of cooktop grate); if installing an overhead 

range hood, also check the hood specifications for minimum 

required clearances. 

1

 Minimum distance to a combustible rear wall for model 

DR30DI[H] is 2.5” (6.4 cm) from top rear trim. Model DR30D[H] 

may be installed flush to rear wall, but non-combusible surface 

or 9-inch backguard (PN ADB3009) is recommended.

Back wall 

1

10” (25.4 cm) min.

to combustible side

walls above the range

(both sides)

30” (76.2 cm)

min.

2

13” (33.0 cm)

max.

5

18” (45.7 cm)

min.

5

Suggested 

location of 

utilities


4

Grate 

Level

5

 Distance from rnage top panel level. This specification does 

not apply for cabinets located greater than a horizontal 

distance of 10” (25.4 cm) from the edge of the range.

Summary of Contents for Distinctive DR30D

Page 1: ...Part No 106769 Rev H THIS APPLIANCE HAS BEEN TESTED IN ACCORDANCE WITH THE LATEST EDITIONS OF UL858 CSA C22 2 NO 61 ANSI Z21 1 STANDARDS FOR HOUSEHOLD COOKING APPLIANCES Models DR30D DR30DH DR30DI DR3...

Page 2: ...stions or problems with installation contact your Dacor dealer or the Dacor Customer Service Team For repairs to Dacor appliances under warranty call the Dacor Distinctive Service line Whenever you ca...

Page 3: ...e as a space heater to heat or warm the room Doing so may result in carbon monoxide poisoning and overheating of the appliance WARNING WARNING NEVER cover any slots holes or passages on the inside or...

Page 4: ...njured while climbing on the appliance Do not attempt to use this appliance in the event of a power failure Do not tamper with the controls Do not adjust or alter any part of the range unless specific...

Page 5: ...uit where local code permits connected to a 3 wire junction box Suggested conduit wiring color code black white red and green Using an appliance cord A 4 wire appliance cord equipped with a NEMA 14 50...

Page 6: ...rdance with the National Fuel Gas Code ANSI Z223 1 Be certain that the appliance being installed is correct for the gas service provided natural gas or LP gas Also if operating the range at an altitud...

Page 7: ...s from top of trim 46 3 8 117 8 cm 28 1 2 72 4 cm 28 7 8 73 3 cm 26 1 2 67 3 cm 24 3 8 61 9 cm 9 22 9 cm Backguard 6 15 2 cm Backguard 3 7 7 cm Backguard External handle shown some models have integra...

Page 8: ...t cabinet face MUST NOT protrude further than rear of cabinet front see Product Dimensions 4 Consult local code for exact location requirements 6 Model DR30D H 37 7 8 96 2 cm max 2 Distance to combust...

Page 9: ...Panels Installed countertop opening 29 1 4 74 3 cm 30 76 2 cm cabinet opening below countertop below countertop To cabinet face Notch countertop overhang to width of cabinets below 1 4 min 6 mm counte...

Page 10: ...abinet Front Self Rimmed 20 5 8 52 4 cm NA 0 0 cm to 5 3 8 13 7 cm Countertop and Cabinet Front Self Rimmed side panels removed 23 7 8 60 6 cm NA 0 0 cm to 2 1 8 5 4 cm Cabinet face below countertop m...

Page 11: ...K 30 76 2 cm Model DR30DI H ERV3015 Countertop and Cabinet Front Self Rimmed Cabinet Depth 26 7 8 Minimum Without 3 1 4 Inch Side Panels Installed Model DR30DI H ERV3015 Countertop and Cabinet Front S...

Page 12: ...Meat probe Dacor Stainless Steel Cleaner Literature kit Install the Anti Tip Bracket and Foot Locate the anti tip bracket included in the parts box There are two ways to mount the anti tip bracket Fl...

Page 13: ...Drill four 4 3 8 diameter countersink holes through any existing floor covering down to the concrete slab below Drill the 4 holes for the anchors 1 1 4 3 2 cm deep into the concrete slab using a 3 16...

Page 14: ...in its final position based on the product dimensions on page 5 and the actual cabinet cutout dimensions used for the installation Determine and mark the required position of the anti tip bracket base...

Page 15: ...d pull it away from the oven while continuing to lift Optional Backguard Island Trim Installation Freestanding Model DR30D H Only When used the optional island trim or optional 6 or 9 inch backguard m...

Page 16: ...ong enough to allow the range to be pulled out for service without disconnecting it from power Types of Electrical Connections Refer to the product data label see inside cover for power requirements T...

Page 17: ...rminal in the box 7 Connect the L1 wire to the L1 power supply terminal in the box 8 Connect the L2 wire to the L2 power supply terminal in the box 9 If using a 4 wire connection connect the ground wi...

Page 18: ...ction loosen the grounding screw and remove the neutral to ground jumper link from the terminal block Leave the link in place for 3 wire connections 3 Remove the nut from the conduit strain relief not...

Page 19: ...supply wire in the junction box 3 Connect the black wire from the appliance to the black L1 power supply wire in the junction box 4 Connect the red wire from the appliance to the red L2 power supply w...

Page 20: ...This is in addition to the pressure regulator provided with the range The maximum gas supply pressure to the regulator must never exceed 1 2 pound per square inch psi or 3 5 kPa The range and shut of...

Page 21: ...ps over the lower lip of each hinge receptacle 2 Lower the door to the fully opened position 3 Rotate the two hinge locks toward the oven 4 Slowly and carefully open and close the door completely to e...

Page 22: ...y three 3 minutes the oven should begin to heat Press the CANCEL SECURE key to stop the oven heating process NOTES If either the oven or cooktop does not operate properly follow these troubleshooting...

Page 23: ......

Page 24: ...Dacor 14425 Clark Avenue City of Industry CA 91745 Phone 800 793 0093 Fax 626 403 3130 www dacor com...

Reviews: