


10
Burner Component Installation
WARNING
•
Never attempt to operate the cooktop with any of the burner parts removed.
•
Do not attempt to adjust the burner air mixture settings. All adjustments are preset at the factory.
Remove the burner parts and grates from their shipping packages.
Installation Instructions
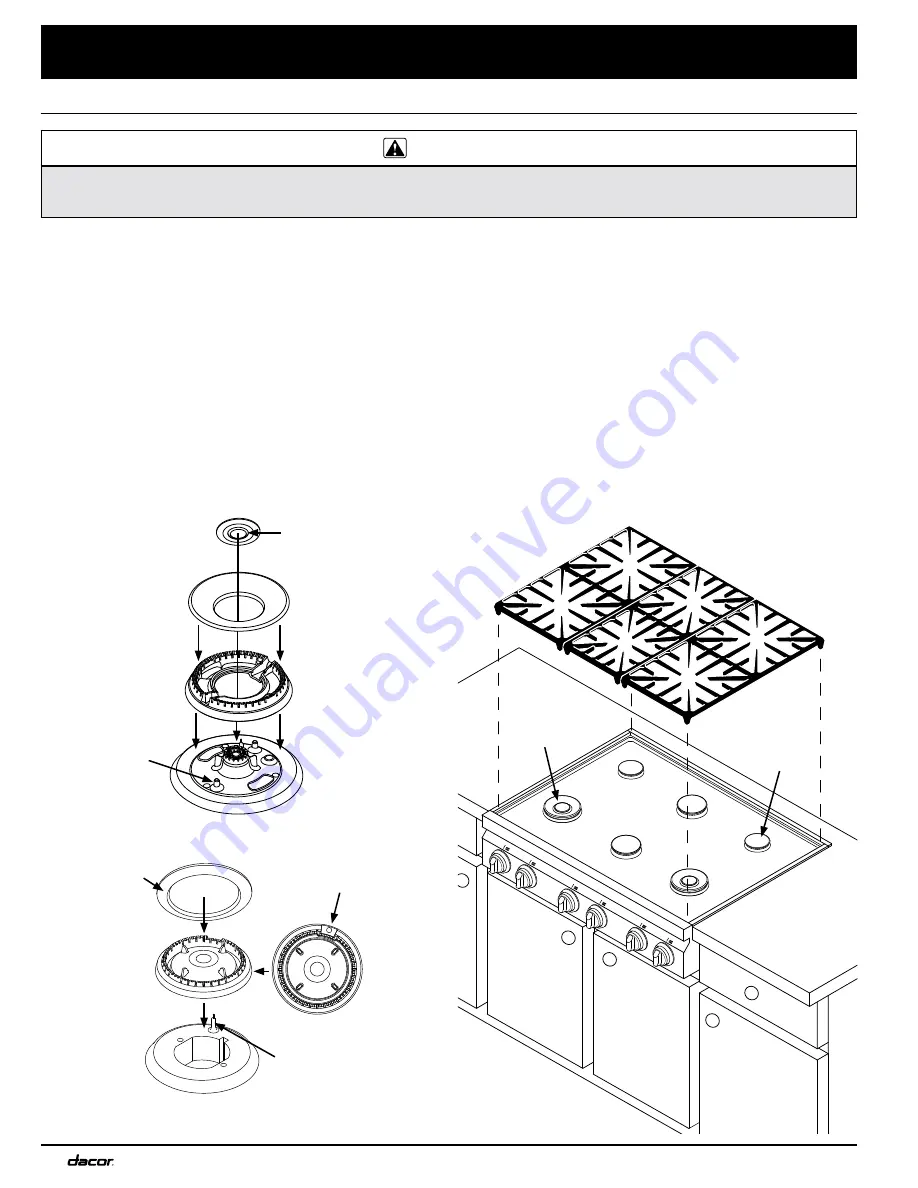
SimmerSear Burner Assembly
Standard Burner Assembly
Outer burner cap
Burner ring
Burner ring
Pin on burner
base
Burner base
Igniter
Ridge on bottom
of inner burner cap
Ridge on bottom
of burner cap
Hole in burner ring
goes over igniter
Spill
tray
Standard
burner
SimmerSear
burner
STEP 2
STEP 2
STEP 3
STEP 1
STEP 1
SimmerSear Burner Assembly
1. Install the SimmerSear burner ring(s) on top of the
SimmerSear burner base(s). Line up the indentations
on the bottom of the burner ring with the pins on the
top of the burner base.
2. Set the outer SimmerSear burner cap(s) on top of the
burner ring(s). Make sure the burner ring is centered on
top.
3. Set the inner SimmerSear burner cap(s) on the center
of the SimmerSear burner base(s). Line up the ridge on
the bottom of the cap with the pins on the center of the
burner base.
Standard Burner Assembly
1. Install the standard burner rings on the standard burner
bases. There are two different sizes. Put the hole on
the edge of each ring over the igniter. Center the tabs
on the bottom of each ring in the hole in the center of
each base.
2. Install all the standard burner caps. The ridge on the
bottom of each cap must surround the top of each ring.
Grate Installation
Gently set the grates on top of the spill trays. Make sure
that the rubber feet are positioned in the dimples. On model
DRT366S, the center grate is smaller than the other two.


