background image

11

Care and Cleaning

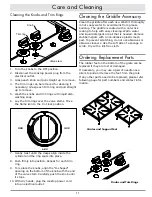
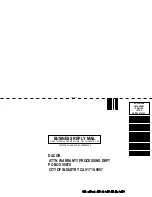
Cleaning the Knobs and Trim Rings

1.  Turn the knobs to the OFF position.
2.  Disconnect the cooktop power plug from the 

electrical outlet.

3.  Grasp each knob and pull straight up to remove.
4.  The trim rings can be removed for cleaning if 

necessary: Grasp each trim ring and pull straight 

up to remove.

5.  Wash the knobs and trim rings with liquid dish-

washing soap. 

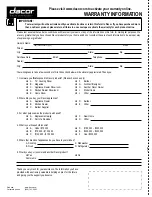
6.  Lay the trim rings over the valve stems. Move 

the flame icon to the 9 o’clock position. 

7.  Gently twist untill the clasps align inside the 

cylinder and the ring seats into place.

8.  Push firmly into position. Repeat for each trim 

ring.

9.  To replace the knobs, align the “D-shaped” 

opening on the bottom of the knob with the end 

of the valve stem. Carefully push the knob until 

it stops.

10. With dry hands, plug the cooktop power cord 

into an electrical outlet.

Cleaning the Griddle Accessory

Clean the griddle after each use. Wash it thoroughly 

in hot soapy water to avoid stains from grease 

build-up. The griddle is coated with a non-stick 

coating to help with easy cleaning. Warm water 

and liquid detergent are all that is needed. Remove 

stubborn spots with a non-abrasive plastic mesh 

pad. To prevent scratching, do not use abrasives or 

abrasive cleaners. Use the soft side of a sponge to 

scrub. Dry with a lint-free cloth.

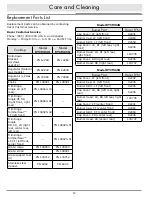
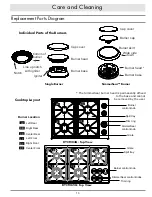
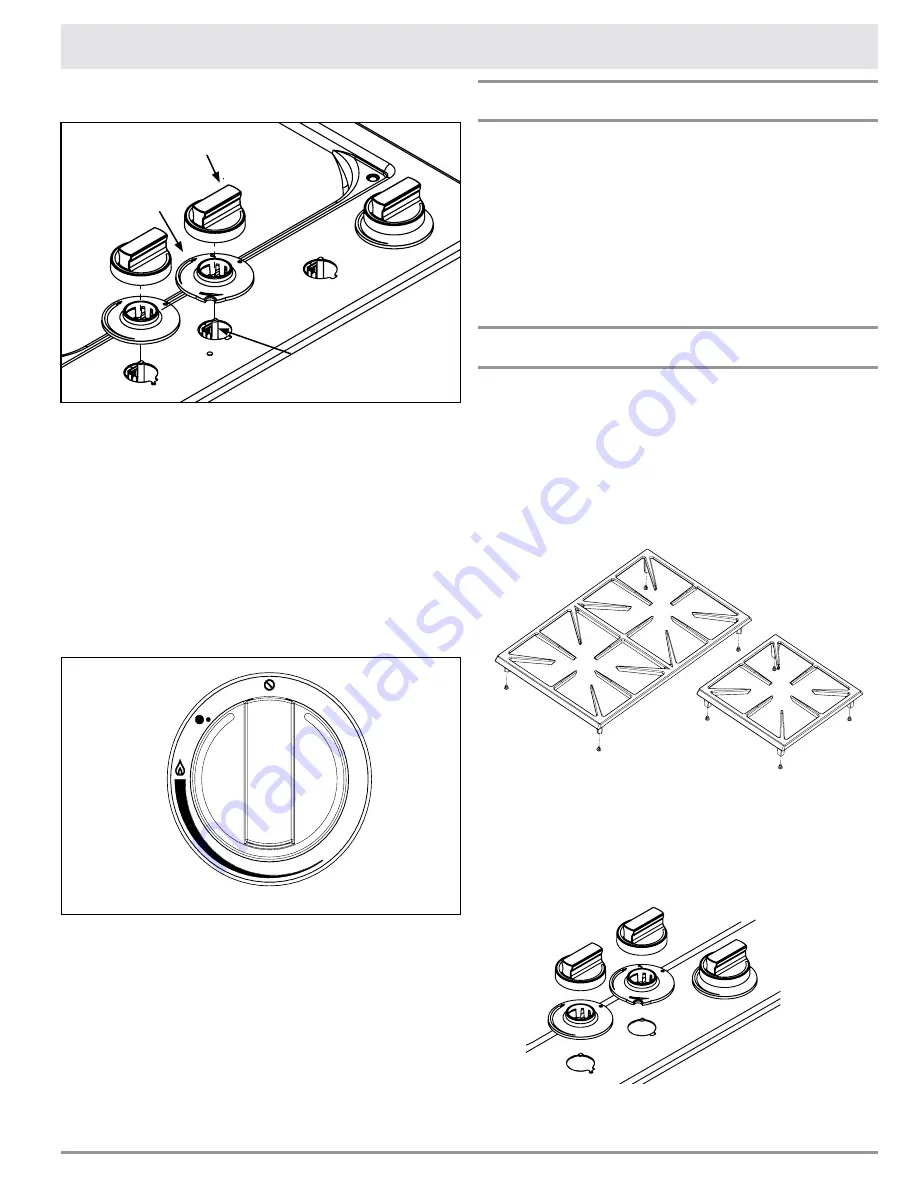
Ordering Replacement Parts

The rubber feet on the bottom of the grate can be 

replaced if they are lost or damaged. 
If necessary, you may use a pair of needle nose 

pliers to pull and remove the feet from the grate.
If any other parts need to be replaced, please refer 

following page for part numbers and contact infor-

mation.

Valve stem

Trim ring

Knob

9:00

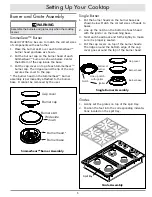
Grates and Support Feet

Knobs and Trim Rings

3:00

6:00

Summary of Contents for DYCT304G

Page 1: ...dels DYCT304G DYCT365G Ta b l e o f C o n t e n t s Important Safety Instructions 1 Getting to Know Your Cooktop 4 Setting Up Your Cooktop 5 Operating Your Cooktop 6 Care and Cleaning 9 Before You Cal...

Page 2: ...2015 Dacor all rights reserved...

Page 3: ...ult in severe personal injury or death CAUTION Hazards or unsafe practices that COULD result in minor personal injury or property damage DANGER IMPORTANT If you smell gas Do not use or light any appli...

Page 4: ...ecorative covers may cause a fire hazard or damage to the cooktop if a burner is accidentally turned on with the cover in place Do not leave the cooktop unattended while in use to avoid the possiblity...

Page 5: ...DO NOT cut or remove the third ground prong from the power cord DO NOT use an adapter plug DO NOT use an extension cord DO NOT use a power cord that is frayed or damaged DO NOT plug the cooktop into a...

Page 6: ...Burner 650 15 000 BTU B Single Burner 12 500 BTU C Single Burner 9 500 BTU D SimmerSear Burner 750 18 000 BTU E SimmerSear Burner 650 12 500 BTU F Single Burner 12 500 BTU G Single Burner 9 500 BTU Tr...

Page 7: ...s and grates only when the cooktop is cool SimmerSear Burner Model DYCT365G be sure to match the correct sizes of components with each other 1 Place the burner skirt over each SimmerSear burner head a...

Page 8: ...ng the control knob The thickness of the black line under the flame on the trim ring corresponds with the flame height The flame height lowers as the knob moves away from the flame icon SimmerSear Bur...

Page 9: ...ry See Care and Cleaning starting on page 9 Dirty or wet igniters will result in constant sparking even if there is a flame pres ent The flame should burn evenly around the perim eter of the burner ex...

Page 10: ...the lid to check food Doing so will decrease cooking time and save energy Dacor s SimmerSear feature allows you preci sion control of the flame The larger the burner size the wider the range of contr...

Page 11: ...es and accessories use only the types of cleaning solutions specified in this manual To avoid electrical shock or burns turn off the burners and make sure that all parts are cool before cleaning DO NO...

Page 12: ...firm toothbrush When done thoroughly rinse all parts with clean water Completely dry all the parts before re assembling them 4 Assemble the cooktop according to the Burner and Grate Assembly Instruct...

Page 13: ...it stops 10 With dry hands plug the cooktop power cord into an electrical outlet Cleaning the Griddle Accessory Clean the griddle after each use Wash it thoroughly in hot soapy water to avoid stains f...

Page 14: ...ont PN 108925 01 Grate large PN 108900 PN 108900 Grate small PN 108901 Grate support feet 4 PN 103712 PN 103712 Stainless steel cleaner PN A302 PN A302 Model DYCT304G Burner Part Dacor P N Cap Cover L...

Page 15: ...cannot be removed by the user SimmerSear Burner Care and Cleaning Cooktop Layout DYCT365G Top View Burner control knob Trim ring Spill tray Grate SimmerSear control knobs LR CR RR LF CF Burner control...

Page 16: ...dirty or clogged Clean and dry according to Care and Cleaning section Burner parts are not properly positioned or seated Make sure burner is assembled according to the Setting Up Your Cooktop sec tion...

Page 17: ...function within one year of the original date of purchase due to a defect in material or workmanship Dacor will remedy it without charge to you All cosmetic damage such as scratches on stain less ste...

Page 18: ...damage to sur rounding property including cabinetry floors ceilings and other structures or objects around the product Breakage discoloration or damage to glass metal surfaces plastic components trim...

Page 19: ...RANTY PROCESSING DEPT PO BOX 90070 CITY OF INDUSTRY CA 91715 9907 NO POSTAGE NECESSARY IF MAILED IN THE UNITED STATES BUSINESS REPLY MAIL FIRST CLASS MAIL CITY OF INDUSTRY CA PERMIT NO 1600 POSTAGE WI...

Page 20: ...e G Architect Designer C Appliance Dealer Showroom H Another Dacor Owner D Kitchen Dealer Showroom I Model Home E Home Show J Other 2 Where did you buy your Dacor appliances A Appliance Dealer D Build...

Reviews: