background image

6

o

ven

 o

peratIon

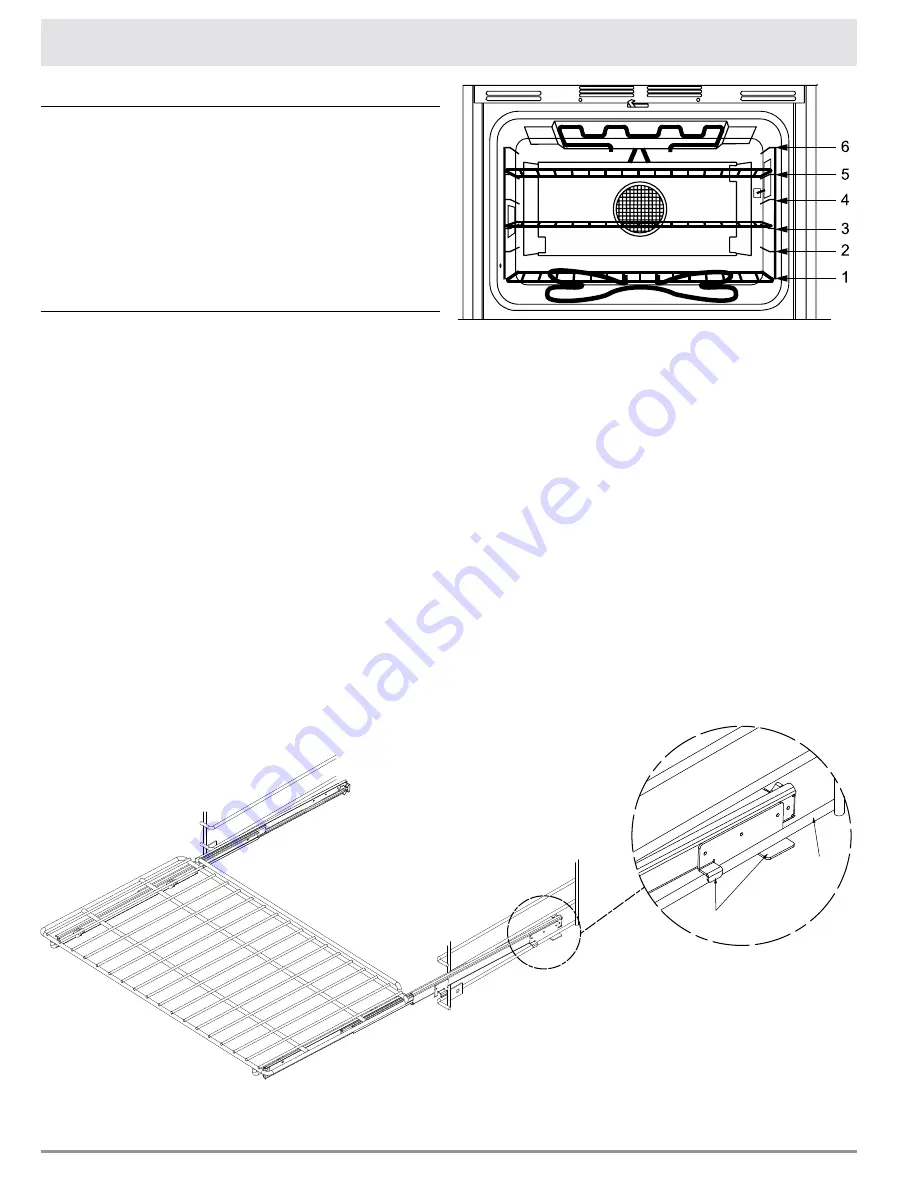
Glide clips

Oven 

rack

helpful hints when using your gliderack oven rack

the GlideRack oven rack works particularly well with heavier 

• 

items, but you can use it during any type of baking, broiling or 

roasting in your Dacor oven.
the GlideRack racks need to be spaced out when using more 

• 

than one in the oven at a time. For instance, they should be 

used in rack positions 1, 3 and 5  or 2 and 4, counting up 

from the bottom, instead of positions 2, 3 and 4.
when using the GlideRack rack with Dacor’s aBS20 baking 

• 

stone, use rack position 1 for best results. 
Heavier roasting pans and dishes will also cook better on 

• 

rack position 1.
Do not leave any of the racks in the oven during self-clean. 

• 

they may be damaged and/or will become difficult to slide 

in and out if self-cleaned. in addition, remove the convection 

filter in the back of the oven before self-cleaning.
to clean the racks, use hot, soapy water and the rough side 

• 

of a sponge. 

oven rack positions

gliderack oven rack 

Installation

Oven Racks and Support

three chrome-plated convection racks are provided in the oven. 

always remember to position the racks prior to heating the oven. 

also, remove the oven racks prior to self-cleaning to prevent 

permanent discoloration of the racks.
the porcelain rack supports provide six heights for positioning of 

the oven racks.
to install a rack, align the left and right edges of the rack with the 

horizontal guide rails of the rack supports, then slide the rack into 

the oven.

GlideRack

™ 

Oven Rack

Dacor’s GlideRack oven rack is designed to install effortlessly 

and glide at a full extension. the full extension of the rack allows 

you to slide pizza on and off with great ease when using Dacor’s 

optional pizza stone (model number aBS20). it is also great for 

large roasts in large roasting pans. it will also allow you to baste 

more easily and check temperatures of the food more safely and 

quickly. 

note:

 when fully extending the rack while in the first position, 

the rack may rest on the inner door.

Installation:

Fully extend the two side guides. align the two small clips 

1. 

on the bottom at the rear of the rack with the black porcelain 

rack guides in the oven.
Begin to slide the rack in, then lift up. the GlideRack oven 

2. 

rack must be in between the two clips on the upper and lower 

side of the rack rear. 
Push the rack all the way to the back.

3. 

Grasp the rack in the front center and pull. the rack should 

4. 

come forward while the side guides remain in place.

Summary of Contents for ECD Series, ECS Series, MCD Se

Page 1: ...l e o f C o n t e n t s Important Safety Instructions 1 2 Oven Operation 3 11 Care and Cleaning 12 15 Before You Call For Service 16 17 Service and Product Warranty 18 Notes 19 20 Place Serial Number Label Here For use with ECD ECS MCD MCS PCD and PCS series models ...

Page 2: ......

Page 3: ...n occur Use common sense and caution when installing maintaining or operating this appliance Always contact the manufacturer about problems or conditions you do not understand Safety Symbols and Labels DANGER DANGER Immediate hazards that WILL result in severe personal injury or death WARNING WARNING Hazards or unsafe practices that COULD result in severe personal injury or death CAUTION CAUTION H...

Page 4: ... wear loose or hanging apparel while using the oven Do not allow clothing to come into contact with the interior of the oven and surrounding areas during and immediately after use WARNING Do not use the oven for storage Clean and maintain the oven regularly as instructed in this manual Keep the entire oven free of grease that could catch fire Clean only those parts listed in this manual Do not tou...

Page 5: ... After choosing a clock function or oven mode you have six seconds to perform the next programming step If the next step is not complete within six 6 seconds the program selection displayed on the clock will disappear Should this occur just repeat the initial function selection Oven Features Setting The Time Of Day Follow these two steps to set the correct time of day Press the 1 CLOCK key The tim...

Page 6: ... and ECD230 Control Panel Millennia Models MCD227 and MCD230 Control Panel Epicure Models ECS227 and ECS230 Control Panel Millennia Models MCS227 and MCS230 Oven Operation Control Panel Epicure Models ECS127 ECS130 and ECS136 Control Panel ...

Page 7: ...5 Oven Operation Control Panel Preference Models PCD227 and PCD230 Control Panel Preference Model PCS230 Control Panel Millennia Models MCS127 and MCS130 Control Panel Preference Model PCS130 ...

Page 8: ...o heating the oven Also remove the oven racks prior to self cleaning to prevent permanent discoloration of the racks The porcelain rack supports provide six heights for positioning of the oven racks To install a rack align the left and right edges of the rack with the horizontal guide rails of the rack supports then slide the rack into the oven GlideRack Oven Rack Dacor s GlideRack oven rack is de...

Page 9: ... heating element provides conventional radiant heat Temperatures may be set from 135 F to 555 F in 5 F increments Use standard bake for single rack baking and roasting STANDARD BROIL The high wattage top heating element supplies the heat in Broil mode The broil temperature is adjustable from 135 F to the HI setting equivalent to 555 F for greater cooking flexibility Broiling is always performed wi...

Page 10: ...the minute timers to time baking functions see page 11 AIR FLOW Heated Air Circulation in Convection Modes Wait until the shortest recommended baking time before checking food For baked goods a wooden pick placed in the center should come clean when the food is done Place pans carefully on the oven racks Turn pans on the racks so that the long sides run left to right parallel to the door Adjustmen...

Page 11: ...IME TEMP key and the default temperature setting HI will be displayed HI is equivalent to 555 F If a temperature other than 4 HI is desired press the TIME TEMP key to reduce the temperature Six seconds after setting the temperature the ON indicator will light up in the clock display the broiler element will begin heating Dacor recommends that you set the minute timer s to time 5 the broiling proce...

Page 12: ...re is the best test for properly cooked food The meat probe takes the guesswork out of roasting by cooking food to the exact temperature you desire Important things to know about the meat probe Double oven models have a meat probe connector in the upper oven only If the internal temperature of the meat you are cooking is less than 55 F you need to wait to insert the meat probe for proper operation...

Page 13: ...robe Pre heat the oven to the desired temperature 1 Insert the meat probe into the food See 2 Probe Placement After the oven cell has reached the desired temperature 3 place the food into the oven Wearing an oven mitt lift the meat probe connector cover 4 in the oven and plug in the meat probe The connector is located on the left inside oven wall near the front of the oven Make sure the plug is pu...

Page 14: ...an the oven Do not use commercial oven cleaners inside the oven Use of these cleaners can produce hazardous fumes or can permanently damage the porcelain finishes Read and follow these Care and Cleaning instructions completely to maintain proper oven operation and appearance throughout the life of the product Several materials and finishes are used in the oven Each material and finish must be prop...

Page 15: ...ace during self clean The filter will discolor due to the high heat but the filtering capabilities will not be affected Wipe up excess grease and other food spills with a damp 3 cloth This will minimize smoke and increase the efficiency of the self clean cycle Turn on kitchen fans or vents to help remove odors during the 4 process IMPORTANT If racks are left in the oven during a self clean cycle i...

Page 16: ...perature adjustment only affects standard bake and 4 convection bake modes Broil and self clean temperatures cannot be adjusted Self Cleaning Continued About 50 to 60 minutes is required for the oven to reach the 7 self clean temperature of 850 F The self clean cycle can be stopped at any time by pressing 8 CANCEL SECURE After completion of the self clean cycle the oven will stop 9 heating and the...

Page 17: ...uneven stress on the lens cover Gently insert the pointed end of the pry stick under the center edge of the lens cover on the side facing the oven door Hold your hand under the lens for support then pry out to remove the lens cover Pull the light bulb out and replace it with a special 10 watt 3 halogen bulb rated for use in a self cleaning oven Use Dacor Part No 86364 available from any authorized...

Page 18: ...re or rack position being used Adjust temperature or time settings Oven temperature calibration differs from your previous oven Calibrate temperature according to Adjusting the Oven Temperature section see Care and Cleaning Foods under cook Incorrect cooking time temperature or rack position being used Adjust temperature or time settings Oven temperature calibration differs from your previous oven...

Page 19: ...cuit failure F2 Oven temperature exceeded the clean runaway temperature self clean mode only or the cooking runaway temperature cooking modes only F3 Short circuit in the oven temperature sensor F4 Open circuit in the oven temperature sensor F6 Failure in the EEPROM check comparison Only time of day and timer will operate F7 Failure of the self clean automatic door latch circuit F8 Failure of the ...

Page 20: ... You Call for Service section Then be certain that the appliance has been installed properly and is being operated correctly Familiarize yourself with the warranty terms and conditions listed in this section If the above mentioned checks have been completed and the problem has not yet been remedied call your local authorized DACOR service representative Your dealer can normally provide the name an...

Page 21: ...19 Notes ...

Page 22: ...20 Notes ...

Page 23: ... THE UNITED STATES DACOR INC ATTN WARRANTY PROCESSING DEPT 1440 BRIDGE GATE DR STE 200 PO BOX 6532 DIAMOND BAR CA 91765 9861 BUSINESS REPLY MAIL PERMIT NO 4507 POSTAGE WILL BE PAID BY ADDRESSEE FIRST CLASS MAIL DIAMOND BAR CA fold here ...

Page 24: ...uilder B Magazine G Architect Designer C Appliance Dealer Showroom H Another Dacor Owner D Kitchen Dealer Showroom I Model Home E Home Show J Other 2 Where did you buy your Dacor appliances A Appliance Dealer D Builder B Kitchen Dealer E Other C Builder Supplier 3 For what purpose was the product purchased A Replacement only C New Home B Part of a Remodel D Other 4 What is your household income A ...

Reviews: