17
IR (Infrared) Broil Burner
CAUTION
To prevent damage to the broil burner, do not spray the
burner or its igniter with any type of cleaner or attempt to
scrub them in any manner.
The IR broil burner is self-cleaning. To burn off any
grime build-up, close the oven door and turn the
oven control knob to the
BROIL
position for about
ten minutes. After ten minutes turn the oven off.
Convection Filter (Oven)
WARNING
The convection filter is made of stainless steel.
•
Remove it only when it is cool.
Re-install the filter before cooking in the oven again.
•
Failure to do so will expose the convection fan blade
that rotates at high speed during convection modes.
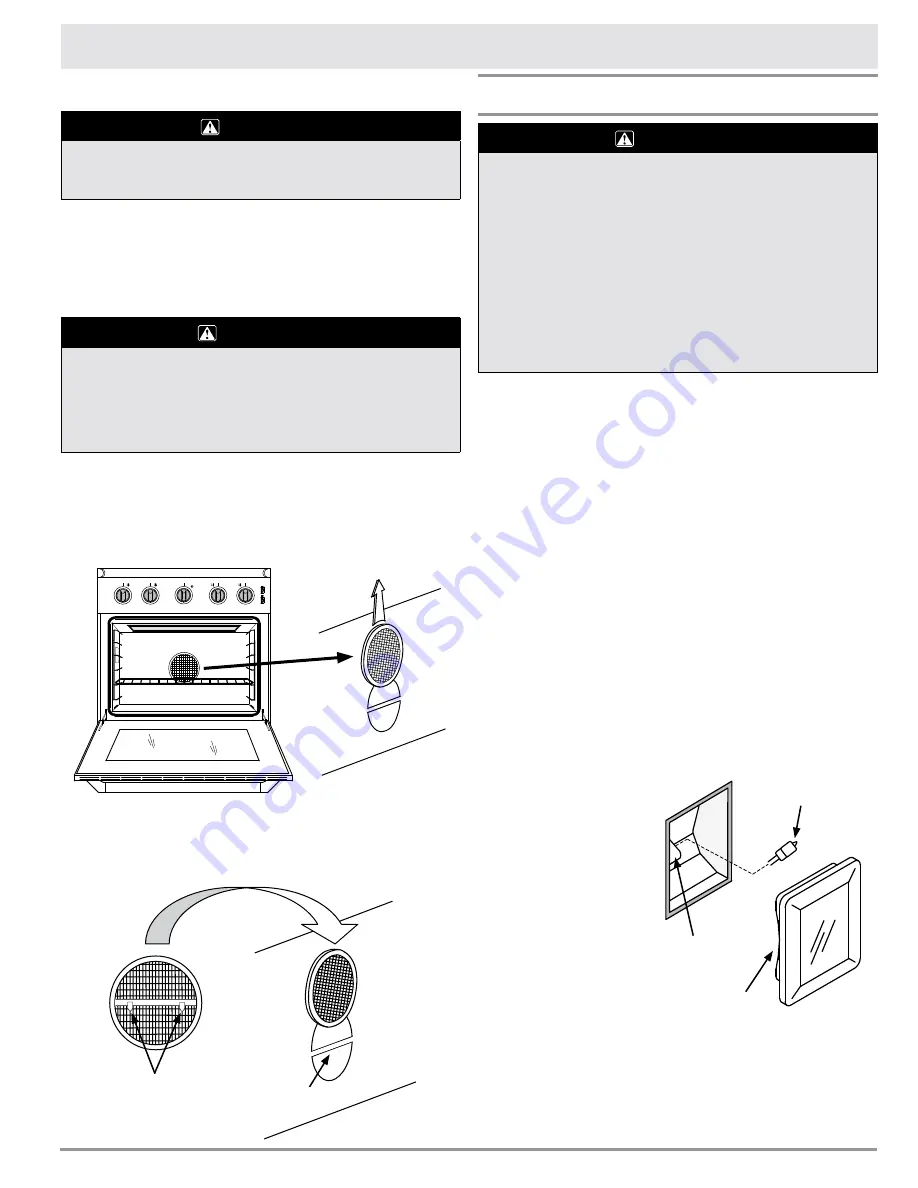
Convection Filter Removal and Cleaning
Remove the filter regularly for cleaning. A
•
clogged filter will reduce the effectiveness of
convection cooking. Soak it in hot soapy water.
Dry it completely before re-installing.
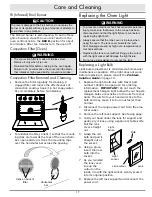
To reinstall the filter, orient it so that the mount-
•
ing clips are towards the rear of the oven cham-
ber, open end down. Hook the mounting clips
over the horizontal bar across the opening.
Care and Cleaning
Replacing the Oven Light
WARNING
To prevent an electrical shock hazard and/or personal
•
injury, make sure that power to the range has been
disconnected and that the light fixture is cool before
replacing the light bulb.
Always ensure that the lens cover is in place when
•
using the oven. The lens cover protects the bulb
from breakage caused by high oven temperatures or
mechanical shock.
Replacing the lens cover without lining up the cutout
•
with the light socket will damage the light fixture.
Do not use a screwdriver to remove the lens.
•
Replacing a Light Bulb
Light bulb replacement is considered a homeowner
maintenance operation. If the light does not work,
before replacing it, please consult the
Problem
Solution Guide
on page 18.
Replace the light bulb only with Dacor part
1.
number 100429. See page 19 for ordering
information.
IMPORTANT:
Do not touch the
replacement halogen light bulb with your fingers.
Halogen bulbs are sensitive to the oils from your
hand. The oils from your hand will stick to the
bulb and may cause it to burn out faster than
normal.
Disconnect the range power cord from the elec-
2.
trical outlet.
Remove the left rack support. See facing page.
3.
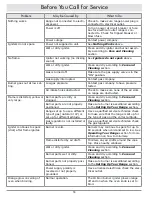
Hold your hand under the lens for support and
4.
gently pry it loose using a spatula or table knife.
Pull the lens
cover straight
out.
Grasp the old
5.
bulb and pull it
straight out of
the socket.
Using a glove,
6.
insert the new
bulb into the
socket.
As you reinstall
7.
the lens cover,
line up the
cutout on the
inside rim with the light socket. Gently press it
into its original position.
Replace the left rack support and reconnect the
8.
power cord.
Clips on back of
filter
Horizontal
bar
Light
fixture
Light
socket
Lens
Lens cutout
Bulb


