background image

28

English

Using the Timers

Enabling the 12-Hr. Oven Shut-Off Timer

The oven has a factory-programmed timer that automatically turns the oven off after 12 hours of continuous 

use. This timer automatically resets if you change the cook temperature or mode, and is automatically disabled 

when you activate Sabbath mode.
You can use this same procedure to disable the 12-hr. timer.
1.  With the oven off, tap-hold 

TIMER 1

 for about 10 seconds.

The control panel beeps, and 

12Hr

 appears on the display, then 

ON

 appears on the display.

2.  Tap 

#

.

The 12-hr. timer is enabled.

3.  Tap 

CANCEL/SECURE

.

The changes are saved; the clock appears on the display.

Using the Range's Cook Timers

You can use the oven’s two timers individually/simultaneously and set them from 1 min. to 99 hrs-59 min. One 

indicator (

1

 or 

2

) appears on the display if one timer is active. Both indicators appear if both timers are active.

•  The timers do not turn the oven off. To turn the oven off automatically, see 

Using Time-Delay Cooking

.

•  Tapping 

CANCEL/SECURE

 does not reset of stop the timers.

1.  On the control panel, tap 

TIMER 1

 or 

TIMER 2

.

2.  On the numeric keypad, enter a cook time. (Ex. To enter 11 hrs, 30 mins, tap 1-1-3-0; for 25 mins, tap 2-5.
3.  Tap 

START/CONTINUE

.


– The cook time appears on the display and begins counting down.


– When the countdown ends, the timer indicator blinks on the display, and a beep sounds. The timers have 

unique cadences (Timer 1: 1 sec on, 1 sec off, repeat; Timer 2: 1 sec on, 1 sec off, 2 sec's on, 1 sec off, repeat).


– Silence the alarm by tapping the blinking timer indicator, then tap 

CLOCK

 to return to the main display.

Viewing Oven Settings As the Timer Counts

While a timer is active, you can check the clock or the other timer without interrupting other settings.


⁕ Tap 

CLOCK

 to view the current time.


⁕ Touch 

TIMER 1

 to view its time.


⁕ Touch 

TIMER 2

 to view its time.

Changing the Time On An Active Timer

1.  Tap 

Timer 1

 or 

Timer 2

.

2.  On the numeric pad, enter the new time, and tap 

START

.

Stopping an Active Timer

1.  Tap the timer key twice.

The timer zeroes out.

2.  Tap 

CLOCK

 to return to the main display.

Operating the Oven

Summary of Contents for HDPR36S

Page 1: ...UserManual Heritage Pro Range HDPR30S HDPR36S HDPR48S HDER30S HDER36S HDER48S Part No 113429 Rev A...

Page 2: ...8 HDPRS HDERS 13 HDPRS HDERS External Features 14 HDPRS HDERS Internal Features 15 HDPRS HDERS Control Panel 16 HDPRS HDERS Control Panel Display 17 Operating the Cooktop 18 Assembling the Burners 18...

Page 3: ...e 32 Adjusting the Oven Temperature Offset 33 Maintaining the Range 34 General External Maintenance 34 Maintaining the Cooktop 34 Using Self Clean Mode 36 Steam Cleaning the Oven 38 Cleaning the Oven...

Page 4: ...gs 41 42 which gives suggestions and remedies that may pre empt a call forservice Valuable customerinput helps us continually improve ourproducts and services so feel free to contact ourCustomerAssura...

Page 5: ...ntain the range as instructed in this manual Keep this manual handy forpersonal and professional reference Wipe down the range s exteriorsurfaces before its first use Then ventilate the kitchen well r...

Page 6: ...rand yourbody This device and its antenna s must not be co located oroperated in conjunction with any otherantenna ortransmitter 2 IC Industry Canada Notice IC before the radio certification numbersig...

Page 7: ...orunsafe practices that may result in electric shock personal injury orproperty damage Useful tips and instructions State of California Proposition 65 Warning The range contains chemicals known to the...

Page 8: ...containers Do not repair replace any part of the range except as instructed in this manual all otherservice must be performed by a qualified technician Do not strike the oven doorglass In disposing of...

Page 9: ...rofessional help Electrical and Grounding Safety Do not use an adapterorextension cord Do not use a damaged plug cord orloose poweroutlet and do not alterthe plug cord oroutlet Do not put a fuse in a...

Page 10: ...ce is equipped with one ormore surface units of different size Select utensils having flat bottoms large enough to coverthe surface unit heating element The use of undersized utensils will expose a po...

Page 11: ...while the oven is on Do not put meat too close to the broil element trim excess fat before cooking Use cooking bags as directed by the bag manufacturer Do not use abrasive cleaners ormetal scrapers to...

Page 12: ...erature Probe 1 Stainless Steel Cleaner SimmerSearBurnerCaps Porcelain 1 Brass 1 Standard Oven Rack 1 Griddle 1 Literature Kit Standard BurnerRings 3 Burner Control Knobs 4 2 standard 2 MAX GRIDDLE Wo...

Page 13: ...IDDLE Wok Ring 1 SimmerSearBurnerCaps Porcelain 2 Brass 2 Standard Oven Rack 1 Anti Tip Bracket w Screws and Anchors BroilerPan and Grill Standard BurnerRings 4 18 GlideRackTM Oven Rack 2 HDRP HDER 48...

Page 14: ...Spill Tray C Burner Control Knob D Control Panel E Removable Oven Door F Standard Burner 800 18 000 BTU left right rear center front rear 36 48 left right rear right front 30 Effective 48 HDPRS 30 HDP...

Page 15: ...e supports rack levels1 bottom 7 top F Oven Rack 2 GlideRack oven racks and 1 standard rack per oven chamber are provided See Pg 21 G Bake Element Below oven chamberfloor bottom heat source H Oven Flo...

Page 16: ...oven is off timers do not turn oven on off see Pg 28 D Push to Tilt Press here and spring loaded control panel slowly rotates upward 50 foreasierviewing push here again until panel clicks into its or...

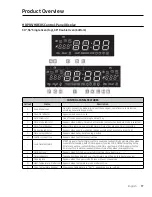
Page 17: ...hed G Time Delay Indicator Appears when delay time cooking is active H Control Lockout Icon Appears when control lockout is active I Cook Time Indicators START Appears if a start time is set fora cook...

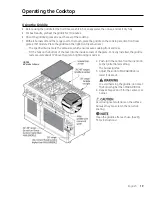
Page 18: ...g a SimmerSearTM Burner 1 Place the burner head so its locating tab is in the base s keyed hole 2 Place the burner ring so the its tabs fit into the slots in the head 3 Place the burner cap so the rid...

Page 19: ...MAX GRIDDLE 4 Repeat Steps 2 and 3 forthe center rear burner Avoid using metal utensils on the surface because they can scratch the non stick coating Clean the griddle aftereach use See Pg 35 forinst...

Page 20: ...p griddle setting 30 right front rearburners 36 48 center front rearburners higher settings may damage the griddle SIMMER Very low heat setting 30 left front burner 36 48 left right front burners Befo...

Page 21: ...lock display switches to military 24 hr mode 3 Tap CANCEL SECURE The main display appears showing the time in military 24 hr mode 1 On the control panel tap hold BROIL for6 seconds double ovens tap ho...

Page 22: ...To avoid marring the oven s porcelain finish quicklywipe up acidic foods e g citrus tomato pineapple Handle the racks onlywhen the oven is cool If you must reposition a rack when the oven is hot use p...

Page 23: ...ECURE forthe oven in use Operating the Oven Positioning the Oven Racks cont The oven comes with a set of DacorGlideRack oven racks These racks can be pulled out furtherthan a stan dard rack and still...

Page 24: ...de Follow recipe cook time and temperature use oven timers to set cook time Avoid opening oven doorto check progress Check food at shortest recommended cook time Cake is done if a toothpick poked in c...

Page 25: ...level Darkened heat absorbing cookie sheet used Use bright reflective cookie sheet Cookies too brown on top Rack level too high Use lowerrack level Dough put in oven during preheat Put cookie dough i...

Page 26: ...foraccurate readings probe should not touch bone fat gristle check meat temp 2 3 into suggested roast time afterreading probe once insert it 1 2 furtherinto meat and take anotherreading if second read...

Page 27: ...OOK MODE TEMP PRESETS Mode Temperature Convection Bake 325 F 163 C Pure Convection Bake 350 F 177 C Convection Roast 375 F 191 C Broil 555 F 291 C Convection Broil Default cook mode temperatures are s...

Page 28: ...en off automatically see Using Time DelayCooking Tapping CANCEL SECURE does not reset of stop the timers 1 On the control panel tap TIMER1 orTIMER 2 2 On the numeric keypad entera cook time Ex To ente...

Page 29: ...orfrozen food in the oven Most unfrozen foods should rest in the oven no more than two hours before cooking begins Using the Time Delay Cooking Keys STARTTIME The time of daywhen the oven starts cooki...

Page 30: ...the oven cooks until the set time and enters Hold mode Operating the Oven Using the Meat Temperature Probe The doneness of bulky meats e g roasts whole turkey and chicken is best determined by taking...

Page 31: ...ooked alone orin bird Ham Uncooked 160 F 71 C Reheat whole orhalf 140 F 60 C NOTE Minimum safe internal cooking temp s are subject to change If bacteria change so do the temp s needed to elim inate th...

Page 32: ...52 C Meat 150 F 66 C Using Sabbath Mode This mode complies with Jewish law forSabbath and Holy Day use When active only Bake and Pure Convec tion modes are available and the oven light and only CANCEL...

Page 33: ...djusted the temp 4 On the numeric keypad enterthe desired increase decrease in temperature To decrease the temp by the amount entered tap fora minus sign otherwise the temp increases by the amount ent...

Page 34: ...h the grain 3 Dry the surface with a soft dry cloth Cleaning the Oven DoorGlass 1 Clean the doorglass inside and out with a mild glass cleaner permanufacturerinstructions 2 With a clean soft cloth moi...

Page 35: ...a damp cloth gently clean the bases then dry them fully before using the cooktop About the Cooktop Grates Wash the grates regularly and afterspillovers Burners should be off and all cooktop components...

Page 36: ...eaning will not work if the meat temperature probe is connected If you try to start self cleaning and the probe is connected the control panel probe icon blinks to alert you to remove the probe 1 Remo...

Page 37: ...Prepare the oven forself cleaning as instructed in the previous procedure and close the oven door 2 Tap SELF CLEAN STARTTIME 3 Entera start time e g for12 30 tap1 2 3 0 Maximum delay 22 hr 59 min 4 T...

Page 38: ...cups water preferably distilled into the recess in the floor Forslightly heavierbuildup mix the waterwith a teaspoon of dish soap then pour 3 Fold a dish towel in half lengthwise and lay it along the...

Page 39: ...Oven Racks Do not self clean the oven racks Self cleaning discolors the racks and makes them hard to slide You may immerse a standard oven rack in water immersing a GlideRack in water however can fou...

Page 40: ...lock Pg 21 Replacing the Oven Lights If no lights work see Troubleshooting Pg 42 before replacing them To prevent electric shock turn off powerto the oven and ensure the oven and bulbs are cool Use th...

Page 41: ...supply is off orimproperly connected See the Installation Instructions Burnerdoes not light Control knob improperly set Push in knob and turn to Lite position Burnercaps not in place orburn erbase mi...

Page 42: ...ven is too hot Let oven cool then reset controls Pgs 27 33 Oven controls incorrectly set See Using Self Clean Mode Pg 36 Control lockout is enabled Disable control lockout Pg 27 Excessive smoke when s...

Page 43: ...or designated service company during regularbusiness hours These providers are independent entities and not Dacoragents Dealerdisplay and model homedisplay products with a production date greaterthan...

Page 44: ...ce issue afterthe standard warranty period expires contact DacorCustomer Assurance nonetheless Dacorreviews each issue and customerconcern to provide the best possible solution forthe customerunderthe...

Page 45: ...45 English Notes...

Page 46: ...46 English Notes...

Page 47: ...what purpose was the product purchased A Replacement only C New Home B Part of a Remodel D Other 4 What is yourhousehold income A Under 75 000 D 150 000 200 000 B 75 000 100 000 E 200 000 250 000 C 10...

Page 48: ...RANTY PROCESSING DEPT PO BOX 90070 CITY OF INDUSTRY CA 91715 9907 NO POSTAGE NECESSARY IF MAILED IN THE UNITED STATES BUSINESS REPLY MAIL FIRST CLASS MAIL CITY OF INDUSTRY CA PERMIT NO 1600 POSTAGE WI...

Reviews: