background image

14

Starting Your Dishwasher (Cont.)

The Sanitize Feature

If you want a high temperature rinse after the wash cycle 

for maximum sanitization:

open the door.

1. 

press one of the wash cycle buttons on the control panel.

2. 

press 

3. 

sanitize

. the 

sanitize

 button will light 

(pressing 

sanitize

 a second time will turn it off 

again).
press 

4. 

start/CanCel

.

close the door. after a short pause, the dish-

5. 

washer will start.

 important

sanitize

 cannot be selected with the rinse cycle.

things to Know about the sanitize Feature

the 

• 

sanitize

 feature increases the wash cycle time.

Ho

• 

 will appear on the display while the dish-

washer heats the water for the high tempera-

ture rinse.
in addition, you can select the 

• 

Hi-temp

 feature 

by pressing the 

Hi-temp

 button before pressing 

start/

CanCel

.

The Delay Feature

to set your dishwasher to start automatically at a later 

time:

press one of the wash cycle buttons or the 

1. 

rinse

 button.

if you have selected a wash cycle, you may press 

2. 

the 

Hi-temp

 or 

sanitize

 feature buttons for 

higher wash temperature or maximum sanitiza-

tion.
repeatedly press the 

3. 

Delay

 button until the 

number of hours you want to delay operation 

appears on the display. you can delay the start of 

your dishwasher up to 24 hours.
after selecting the delay time, press 

4. 

start/CanCel

.

close the door. the dishwasher will start after the selected 

5. 

number of hours.

to cancel the delay function:

open the door.

1. 

press 

2. 

start/CanCel

 once to make the dishwasher start 

when you close the door. press 

start/CanCel

 twice to 

turn the dishwasher all the way off.

Operating Your Dishwasher

The Cycle Memory Feature

your dishwasher remembers the settings for the last cycle it ran.

If you want your dishwasher to run the same cycle as it 

ran the previous time:

open the door.

1. 

press the 

2. 

start/CanCel

 button (without 

pressing a wash/rinse cycle button first). The 

display will read 

Cl

 telling you to close the door.

close the door.

3. 

push on the door handle to make sure that the door is com-

4. 

pletely shut. after a short pause, the dishwasher will begin 

to operate.

note:

 if the delay feature was used during the previous cycle, 

the dishwasher will start after the number of hours originally 

selected.

Turning the Chime On or Off

to turn the chime on or off:

open the door.

1. 

press the 

2. 

short

 and 

rinse

 buttons 

at the same time.

oF

3. 

 will appear on the display when 

you turn the chime off.

on

4. 

 will appear on the display when 

you turn the chime back on.
close the door.

5. 

Summary of Contents for Millennia EDW24

Page 1: ...S Style varies model MDW24S shown Ta b l e o f C o n t e n t s Important Safety Instructions 1 Getting to Know Your Dishwasher 4 Loading Your Dishwasher 8 Operating Your Dishwasher 13 Care and Cleanin...

Page 2: ...2008 Dacor all rights reserved...

Page 3: ...Model Number __________________________________ Serial Number __________________________________ Date of Purchase ________________________________ Since Dacor continuously improves the quality and pe...

Page 4: ...at the circuit breaker panel or fuse box Use this appliance only for its intended purpose washing dish ware and cookware It is not intended for commercial use Do not operate the dishwasher unless all...

Page 5: ...Always check the manufacturer s recommendation before washing plastic items that are not marked To prevent household mold and mildew damage periodically check the hot water supply line and drain hoses...

Page 6: ...The racks are coated with a durable coating that protects the finish of the loaded tableware and cookware They have fold down tines and shelves to allow you to load various size dishes and flatware s...

Page 7: ...washer Rinse aid dispenser Top rack adjustable Silverware basket Bottom spray arm Detergent dispenser Top spray arm Middle spray arm Filter system Bottom rack Control panel Power requirements label Mo...

Page 8: ...items that have been pre rinsed The cycle time is 72 to 90 minutes Press the Rinse button if you want to run the rinse portion of the cycle only The dry cycle will not run Also use this setting to rin...

Page 9: ...normal operation See Care and Cleaning on page 15 Chime feature is activated Press the Short and Rinse buttons at the same time to turn the chime on and off Chime feature is de activated Press the Sho...

Page 10: ...sposable plastic items Flatware with bonded handles Gold Pewter Sharp kitchen carving knives Tin Wood Loading Your Dishwasher important For best results do not nest utensils Do not load silver next to...

Page 11: ...ems to stick out of top and bottom of racks that can block spray arms No cookie sheets trays platters etc here Before You Load the Racks Before loading the racks scrape off leftover food items and non...

Page 12: ...large dish ware in the bottom rack Do not stack dishes glasses or pots and pans Stacking will prevent water from getting to soiled surfaces Load all items so that the open ends face down as much as po...

Page 13: ...er hard ness is measured in grains per gallon gpg Do not use too little detergent for your water hardness Doing so can cause poorly cleaned dishes filming or spotting If you use too much detergent you...

Page 14: ...position Adjusting the Rinse Aid Dispenser The rinse aid dispenser must be properly adjusted Too little rinse aid will allow spotting and drying problems Too much rinse aid will cause foaming and str...

Page 15: ...g the Sanitize button before pressing START CANCEL Starting Your Dishwasher caution If the dishwasher drain line is connected to a garbage disposal run the disposal and make sure it is completely empt...

Page 16: ...to delay operation appears on the display You can delay the start of your dishwasher up to 24 hours After selecting the delay time press 4 START CANCEL Close the door The dishwasher will start after...

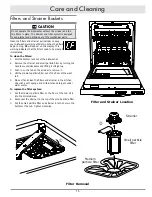
Page 17: ...he strainer and small particle filter by turning the 2 handle counterclockwise and lifting it straight up Push in on the tab on the strainer to remove it 3 Lift the medium particle filter out of the f...

Page 18: ...ecomes plugged or dirty the dishwasher will not drain properly Remove the cover and inspect the air gap every time you clean the filter and strainer To inspect the drain air gap Remove the cover 1 Che...

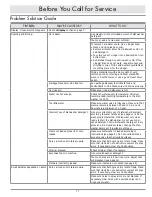
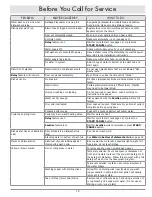
Page 19: ...water pressure is between 20 and 120 p s i and flow rate is a minimum of 1 0 gpm Incorrect use of dishwasher detergent Use only correct amount of dishwasher detergent according to water hardness see p...

Page 20: ...nt to dishwasher just before starting it Spray arms do not rotate properly Make sure that both spray arms rotate freely Make sure that items do not obstruct movement of spray arms If necessary clear a...

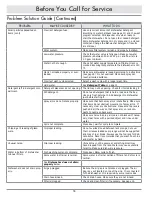
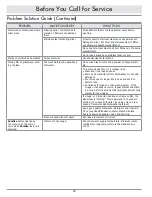
Page 21: ...d according to instructions See page 9 Water not hot enough Dishes washed with the Sanitize setting will dry the fastest Dry cycle interrupted Door opened too soon Make sure dry portion of cycle is co...

Page 22: ...remove cloudy film try a vinegar rinse Wash and rinse load as usual Remove all metal items from dishwasher Do not add detergent Pour two cups of vinegar into a bowl and set it on bottom rack Run dishe...

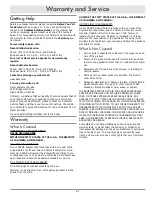
Page 23: ...if non CUL approved product is trans ported from the U S A OUTSIDE THE FIFTY STATES OF THE U S A THE DISTRICT OF COLUMBIA AND CANADA LIMITED FIRST YEAR WARRANTY If your DACOR product fails to function...

Page 24: ...22 Notes...

Page 25: ...23 Notes...

Page 26: ...24 Notes...

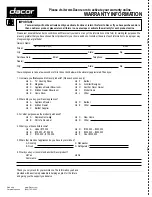
Page 27: ...THE UNITED STATES DACOR INC ATTN WARRANTY PROCESSING DEPT 1440 BRIDGE GATE DR STE 200 PO BOX 6532 DIAMOND BAR CA 91765 9861 BUSINESS REPLY MAIL PERMIT NO 4507 POSTAGE WILL BE PAID BY ADDRESSEE FIRST C...

Page 28: ...ilder B Magazine G Architect Designer C Appliance Dealer Showroom H Another Dacor Owner D Kitchen Dealer Showroom I Model Home E Home Show J Other 2 Where did you buy your Dacor appliances A Appliance...

Reviews: