


6
Models MET304 and METB365-1
IMPORTANT:
When power to the cooktop is turned on after
being interrupted, the cooktop controls take a few seconds to
come on. For safety, the cooktop controls come on in locked
mode. See
Locking and Unlocking the Cooktop Controls
to
unlock the controls.
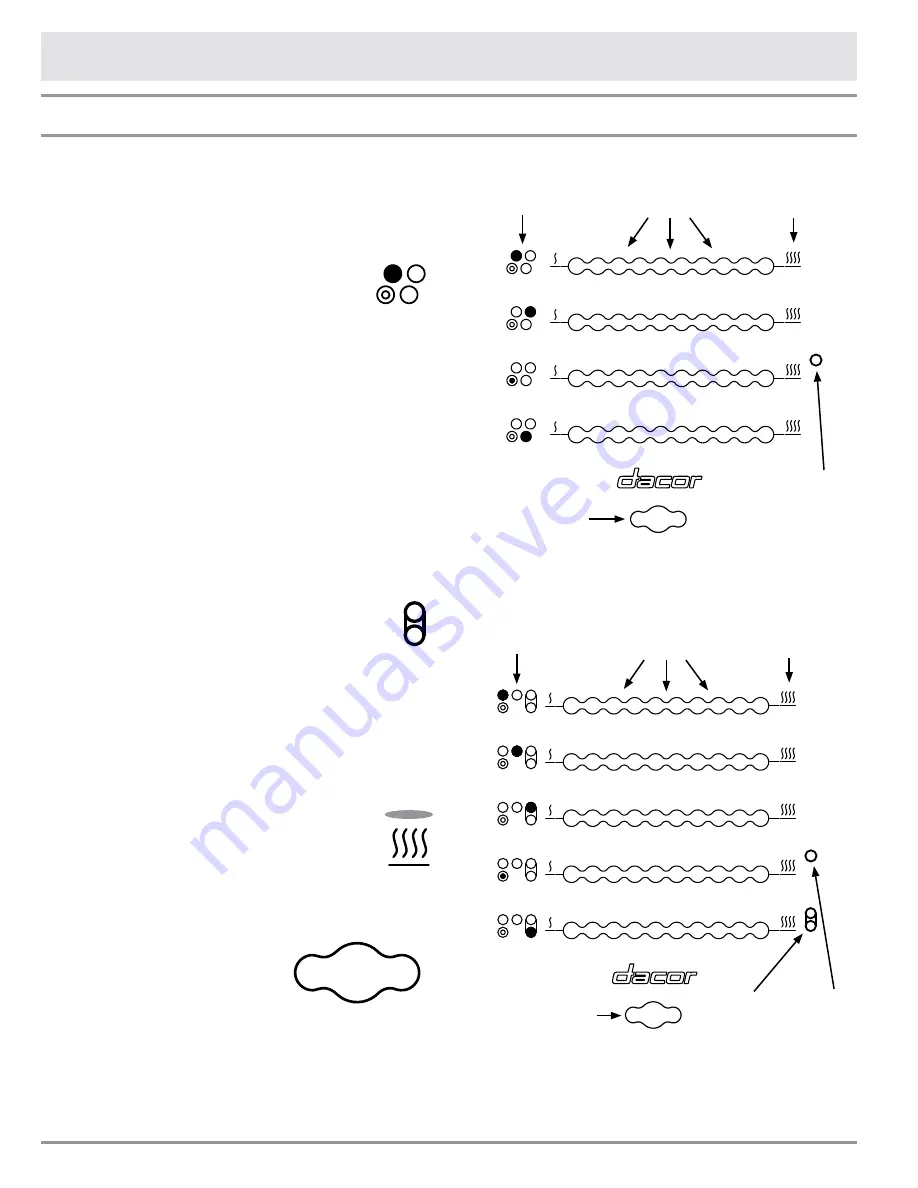
Each element has it’s own
•
ON/OFF
key. The
shaded part of the diagram on each
ON/OFF
key
indicates the element it controls.
To turn an element on, press lightly on the
•
ON/
OFF
key for the desired element, then press one of the
corresponding number keys on the Electric Glide™ control to
select the heat level. The element will come on at the setting
selected as indicated by the light bar above the Electric Glide
control. Slide your finger back and forth along the numbers
on the Electric Glide control to change the heat level.
To activate the outer element on the dual element, first
•
activate the inner element. Press the
ON/OFF
key for the left
front element and press a number setting. Activate the outer
element by pressing the outer element key (the circle) on the
right side of the element controls. Adjust the heat level for the
dual element with the Electric Glide control. The outer heating
element cannot be operated alone.
To turn the bridge element on, turn on the right front and right
•
rear elements at the desired heat levels. Press the bridge
element key, located on the right side of the bottom
element control. The bridge element will come on
at the same heat setting as the right front element.
The bridge element heat setting is controlled in
combination with the right front element using it’s Electric
Glide control.
NOTE:
See the
Accessories
section to order the optional
Dacor AMG11 griddle. It fits perfectly across the three
elements on the right side of the cooktop.
To turn an element off, press the
•
ON/OFF
key for the that
element. To turn off all elements at once press the
CANCEL • SECURE
key rapidly two times.
The residual heat indicators will remain lit until the
•
corresponding elements are safe to touch.
locking and Unlocking the Cooktop Controls
To avoid accidentally turning on an element or to make it more
difficult for children to operate, activate the cooktop lock feature.
To make the cooktop controls
•
non-operational, press and hold
the
CANCEL • SECURE
key for
approximately three seconds. The
cooktop will beep three times and
the element keys will stop working.
The light behind the
CANCEL • SECURE
key will come on
indicating that the controls are locked.
To re-activate the controls, push and hold the
•
CANCEL • SECURE
key again for three seconds. Three
beeps will sound and the
CANCEL • SECURE
indicator light
will go out when the controls are unlocked.
Cooktop Operation
CANCEL • SECURE
ON/OFF
ON/OFF
ON/OFF
ON/OFF
1
2
3
4
5
6
7
8
9 10
1
2
3
4
5
6
7
8
9 10
1
2
3
4
5
6
7
8
9 10
1
2
3
4
5
6
7
8
9 10
Operating the Element Controls (Continued)
CANCEL • SECURE
ON/OFF
ON/OFF
ON/OFF
ON/OFF
1
2
3
4
5
6
7
8
9 10
1
2
3
4
5
6
7
8
9 10
1
2
3
4
5
6
7
8
9 10
1
2
3
4
5
6
7
8
9 10
CANCEL • SECURE
ON/OFF
ON/OFF
ON/OFF
ON/OFF
1
2
3
4
5
6
7
8
9 10
1
2
3
4
5
6
7
8
9 10
1
2
3
4
5
6
7
8
9 10
1
2
3
4
5
6
7
8
9 10
1
2
3
4
5
6
7
8
9 10
CANCEL • SECURE
ON/OFF
ON/OFF
ON/OFF
ON/OFF
1
2
3
4
5
6
7
8
9 10
1
2
3
4
5
6
7
8
9 10
1
2
3
4
5
6
7
8
9 10
1
2
3
4
5
6
7
8
9 10
Left front
element outer
element key
Electric Glide
heat control
keys
Residual heat
indicator lights
ON/OFF
keys
CANCEL • SECURE
key and light
CANCEL • SECURE
ON/OFF
ON/OFF
ON/OFF
ON/OFF
1
2
3
4
5
6
7
8
9 10
1
2
3
4
5
6
7
8
9 10
1
2
3
4
5
6
7
8
9 10
1
2
3
4
5
6
7
8
9 10
1
2
3
4
5
6
7
8
9 10
Left front
element outer
element key
Bridge
element
key
Electric Glide
heat control
keys
Residual heat
indicator lights
ON/OFF
keys
CANCEL • SECURE
key and light
METB365-1 Cooktop Controls
MET304 Cooktop Controls


